
How do you effectively deploy OpenAI integration with Rocket.new? This blog explains the setup, API configuration, backend connection, and testing steps for launching secure, scalable AI features in production.
Still need complex infrastructure and weeks of setup to deploy AI inside web apps?
Not anymore, with Rocket.new, you can create, configure, and deploy AI-powered features in your app while keeping control over servers, databases, and performance.
Let's walk you through the complete process of connecting AI services, wiring them into React components, handling server-side logic, and deploying a production-ready app.
You will understand how the client communicates with the server, how the server processes requests, and how data flows through your system.
The Modern Web Stack and AI
AI is now part of the web development landscape. According to Statista, global AI software revenue is projected to grow significantly in the coming years, driven by adoption across web applications, native apps, and enterprise systems.
At the same time, the React ecosystem continues to dominate front-end applications. The React team maintains React as an open-source JavaScript library under the MIT License, making it accessible to developers worldwide.
When you combine AI services with React, you create intelligent user interface patterns that adapt to user input, respond in real time, and connect seamlessly with backend services.
Rocket.new: Full-Stack Builder
Rocket.new is a full-stack development platform that helps developers create and deploy web applications with structured backend, server configuration, and database management.
Instead of manually wiring server routes, backend code, and deployment pipelines,
Rocket.new gives you tools to:
- Create a server environment
- Connect to a database
- Handle API requests
- Deploy your website
- Add React support for front-end rendering
You still write code. You still control your system. You just skip the repetitive parts.
Client-to-Server Data Flow: How Requests Move Through Your App
Before writing code, take a moment to understand how data flows between the client, server, and backend services. When you clearly see this structure, building and debugging your app becomes much more straightforward.
This same flow applies whether you are building web or native apps with React Native. Once you master this pattern, developing scalable and reliable features becomes much easier.
Project Setup in Rocket.new
Now that you understand the architecture, it’s time to set up your project in Rocket.new. This step lays the foundation by preparing your server, database, and backend services so your app can handle real requests and store data properly.
- Create a project
- Configure your server
- Connect a database
- Enable backend services
Rocket.new generates a base backend structure in Node, simplifying the handling of API endpoints and server configuration.
Your project now contains:
- A server folder
- A database configuration
- A react front end setup
- Environment configuration files
Once Rocket.new generates the base structure with a node and configures your server and database, your full-stack environment is ready. At this point, you can start implementing AI features with confidence, knowing that your backend and frontend are properly connected.
Connecting to the AI API
You need an API key from your AI provider.
Store this key in your server environment variables. Never expose it in client-side code. The server must act as the secure gateway between the client and external services.
Example: Server Route
1// server/routes/ai.js
2import express from "express";
3import fetch from "node-fetch";
4
5const router = express.Router();
6
7router.post("/generate", async (req, res) => {
8 try {
9 const { prompt } = req.body;
10
11 const response = await fetch("https://api.openai.com/v1/chat/completions", {
12 method: "POST",
13 headers: {
14 "Content-Type": "application/json",
15 "Authorization": `Bearer ${process.env.AI_KEY}`
16 },
17 body: JSON.stringify({
18 model: "gpt-4o-mini",
19 messages: [{ role: "user", content: prompt }]
20 })
21 });
22
23 const data = await response.json();
24 res.json(data);
25 } catch (error) {
26 res.status(500).json({ message: "Error generating response" });
27 }
28});
29
30export default router;This backend route processes client requests and forwards them to the external API. It keeps sensitive information secure on the server side.
Database Configuration
Your app should log prompts and responses inside the database. This allows analytics, history, and performance tracking.
In Rocket.new:
- Connect to a database (PostgreSQL or MongoDB)
- Create a schema for AI logs
- Store prompt, response, user id, timestamp
Example schema:
1const aiLogSchema = {
2 userId: String,
3 prompt: String,
4 response: String,
5 createdAt: Date
6};Storing data improves performance monitoring and system debugging.
Creating React Components
Now move to the front end. React components manage the user interface and communicate with the server.
Example component:
1import { useState } from "react";
2
3function AIChat() {
4 const [prompt, setPrompt] = useState("");
5 const [result, setResult] = useState("");
6
7 const handleSubmit = async () => {
8 const response = await fetch("/api/generate", {
9 method: "POST",
10 headers: { "Content-Type": "application/json" },
11 body: JSON.stringify({ prompt })
12 });
13
14 const data = await response.json();
15 setResult(data.choices[0].message.content);
16 };
17
18 return (
19 <div>
20 <textarea
21 value={prompt}
22 onChange={(e) => setPrompt(e.target.value)}
23 />
24 <button onClick={handleSubmit}>Generate</button>
25 <div>{result}</div>
26 </div>
27 );
28}
29
30export default AIChat;This component sends requests to the server and renders the response inside the browser.
Rendering and Performance
React re-renders efficiently when state changes. Each time data updates, components render only the necessary parts.
Performance best practices:
- Use memoized components
- Reduce unnecessary re-render
- Keep heavy data processing on the server
- Cache frequent responses in the database
Web performance directly impacts user satisfaction. Google reports that page speed affects user engagement and conversion rates.
Server Side Logic vs Client Side Code
Understanding the difference between client-side and server-side code keeps your app secure and stable. When you clearly separate responsibilities, your system becomes easier to scale and maintain.
- Handles user interaction
- Triggers API calls
- Renders interface
Server side:
- Validates requests
- Executes business logic
- Connects to database
- Communicates with AI services
Keep sensitive logic, validation, and database communication on the server, not in the browser. A strict backend protects your app, your data, and every user interacting with it.
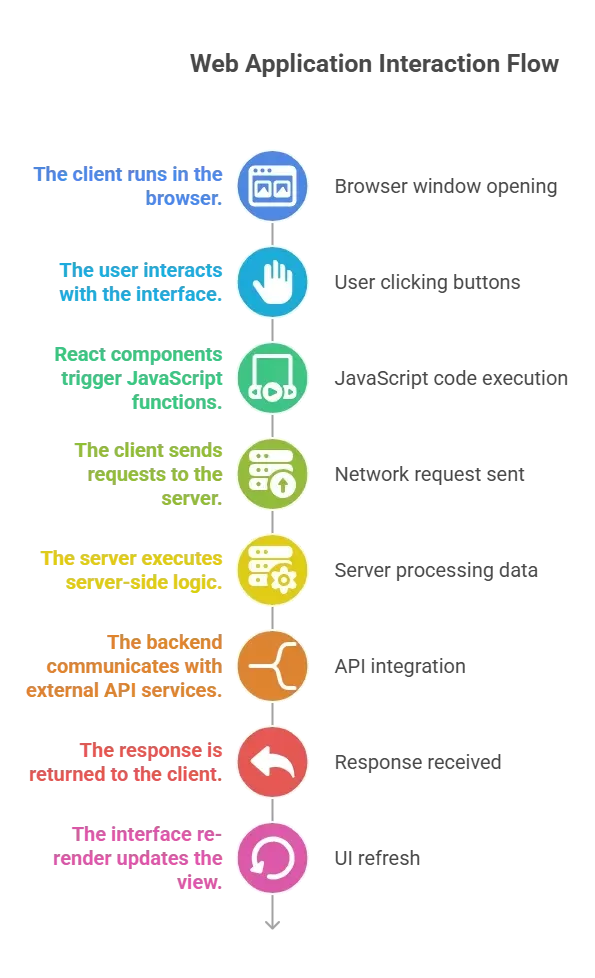
Data Flow Explained
A clear data flow keeps your app predictable and easy to debug. When you understand each step in the request-response cycle, you stop guessing and start building with clarity.
Let’s break it down step by step:
- User enters input.
- Event handlers trigger JavaScript functions.
- Client sends a POST request.
- Server validates request.
- Server communicates with external API.
- Response is stored in database.
- Server sends structured data to client.
- React components render updated interface.
Keep sensitive logic, validation, and database communication on the server, not in the browser. A strict backend protects your app, your data, and every user interacting with it
Supporting Full Stack Development
Full-stack development works best when your front-end and backend speak the same language and share a clear structure. Rocket.new brings these layers together so you can build, test, and deploy without juggling disconnected tools.
- React front end
- Node backend
- Database management
- Server deployment
With React on the front end, Node on the backend, and built-in database and server deployment support, you stay in control of your infrastructure while shipping new features faster and with fewer surprises.
Security and Error Handling
Always include error handling in both server and client layers.
- Validate request payload
- Sanitize input
- Log server errors
- Return meaningful response messages
Example:
1if (!prompt) {
2 return res.status(400).json({ message: "Prompt required" });
3}Protect your system from misuse. AI endpoints can attract excessive requests.
Deploying to Production
Deployment is where your app stops being a local experiment and starts serving real users. A structured production setup helps your server stay stable, your database stay connected, and your website handle traffic without breaking under pressure.
- Managed server configuration
- Secure environment variables
- Database connection management
- Logging and monitoring
During deployment:
- Test API endpoints
- Monitor server logs
- Track performance metrics
- Validate database connections
After testing API endpoints, monitoring server logs, tracking performance, and validating database connections, your web applications are ready for live traffic. From here, it’s about maintaining reliability and continuously improving the system as the user base grows.
Supporting Multiple Platforms
React allows you to reuse logic across web applications and react native when building native apps. While the interface adapts to each platform, much of the core structure and components can remain consistent.
Your server stays the same across platforms, and only the client layer changes based on the environment. This approach reduces duplication and centralizes business logic within backend services, making your system easier to manage and scale.
Building AI-Driven Systems That Actually Work
Modern web applications often struggle to connect AI features to a stable server, a secure database, and a responsive interface. Many developers wire the client directly to external services, expose API keys, or mix business logic across layers, which leads to security gaps and unstable performance under real traffic.
With Rocket.new, you structured the entire flow correctly. You set up a server, connected a database, wrote backend code, created React components, handled API requests, and rendered responses safely in the browser. By keeping server-side logic separate from client-side rendering, you protected API keys, centralized business logic, and deployed a reliable full-stack app.
The key takeaway is simple: clear architecture wins. When your server handles validation, your backend manages data, and your React interface focuses on user interaction, your system stays clean and scalable. Now build a small AI-powered feature in your own project, monitor performance, refine your components, and ship confidently.
Table of contents
- -The Modern Web Stack and AI
- -Rocket.new: Full-Stack Builder
- -Client-to-Server Data Flow: How Requests Move Through Your App
- -Project Setup in Rocket.new
- -Connecting to the AI API
- -Example: Server Route
- -Database Configuration
- -Creating React Components
- -Rendering and Performance
- -Server Side Logic vs Client Side Code
- -Data Flow Explained
- -Supporting Full Stack Development
- -Security and Error Handling
- -Deploying to Production
- -Supporting Multiple Platforms
- -Building AI-Driven Systems That Actually Work