Open the repository, go to Settings, scroll to the Danger Zone, click Delete this repository, confirm through three prompts, and type the repo name. The whole process takes under two minutes, but it's permanent, removing code, commit history, issues, and pull requests. Always back up first.
This guide covers every method, plus how to archive instead of delete and how to recover a deleted repo.
Prerequisites & Checklist Before Deleting
Deleting a repository is not like removing a random folder from a desktop. This action removes code, files, issues, pull requests, wikis, forks, branches, and commit history from GitHub.
Before pressing "delete this repository" verify a few things:
- Is this the correct repository?
- Is the project no longer relevant?
- Do other users depend on it?
- Is it a public repository with active forks?
- Do you have admin permissions or owner privileges?
If the repository was created under an organization, admin privileges and owner privileges are required. If it is under a personal account, the GitHub account owner usually has full control.
Run through this checklist before hitting delete; skipping even one item can cause accidental data loss.
Also, think about accidental data loss. Once you permanently delete, recovery is limited. There is a short window to restore deleted repositories, but that option is not forever.
Quick Overview of the Deletion Process
Here is a simple table that breaks down the steps in the GitHub UI:
| Step | Action | Where to Click |
|---|---|---|
| 1 | Navigate to the correct repository | Main page |
| 2 | Click Settings | Top menu |
| 3 | Scroll to the Danger Zone section | Settings page |
| 4 | Click "Delete this repository." | Danger Zone |
| 5 | Click "I want to delete this repository." | Warning dialog |
| 6 | Click "I have read and understand these effects." | Confirmation |
| 7 | Type the repository name and confirm | Confirmation box |
That is the core process in the GitHub UI. Now let us go deeper.
Step-by-Step: How to Delete a Repository in GitHub Using the UI
Make sure to back up important files and verify that the correct repository is selected before deleting. Once deleted, recovery is limited. Ensure you have admin or owner privileges; without proper permissions, the delete option will not appear.
 The five key UI steps from Settings to final confirmation — follow them in order.
1. Navigate to the Correct Repository
Log in to the GitHub account. From the main page, open the GitHub repo that you want to delete and double-check the repository name.
Check the repo name, branch list, and project details on the page. Verify the date of the last commit. If a new commit was created recently, confirm with the team before deletion.
2. Click Settings
Go to the top menu of the repository page and click Settings. The settings tab sits on the right side of the menu. If the settings tab is missing, it usually means the user lacks admin permissions.
2026 UI Note: In the current GitHub interface, if the Settings tab is not visible in the top menu, click the "..." (More) dropdown on the right side of the tab bar to find it.
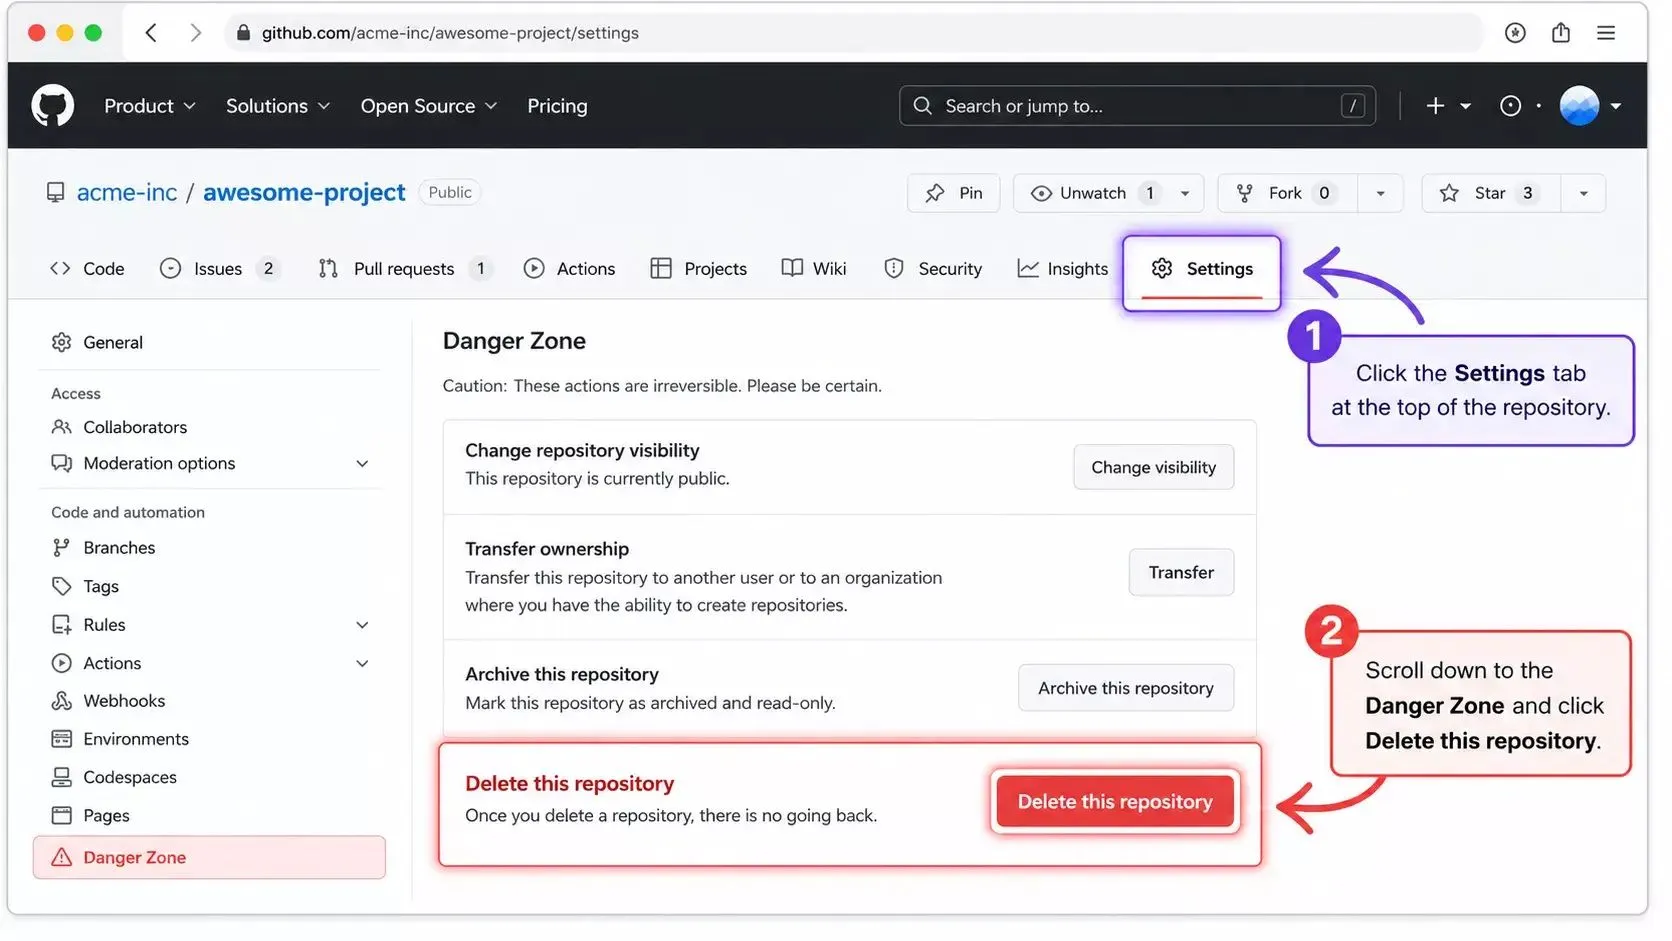
3. Scroll to the Danger Zone Section
On the General settings page, scroll all the way down until reaching the Danger Zone section. GitHub makes this part very clear; it is labeled a Danger Zone for a reason.
Within the Danger Zone, you can archive or delete the repository. If unsure, archive instead of delete. The archive keeps files and code but locks changes. It is a softer option.
4. Click "Delete This Repository"
Inside the Danger Zone section, click Delete this repository. A warning dialog will appear; GitHub does not hide the seriousness of this deletion.
It will state that this action permanently deletes the repository, including files, branches, commit history, pull requests, wikis, and forks. Read the message. Then read it again.
5. Confirm Through the Multi-Step Warning Dialog
GitHub now uses a three-step confirmation flow (updated in 2026 UI):
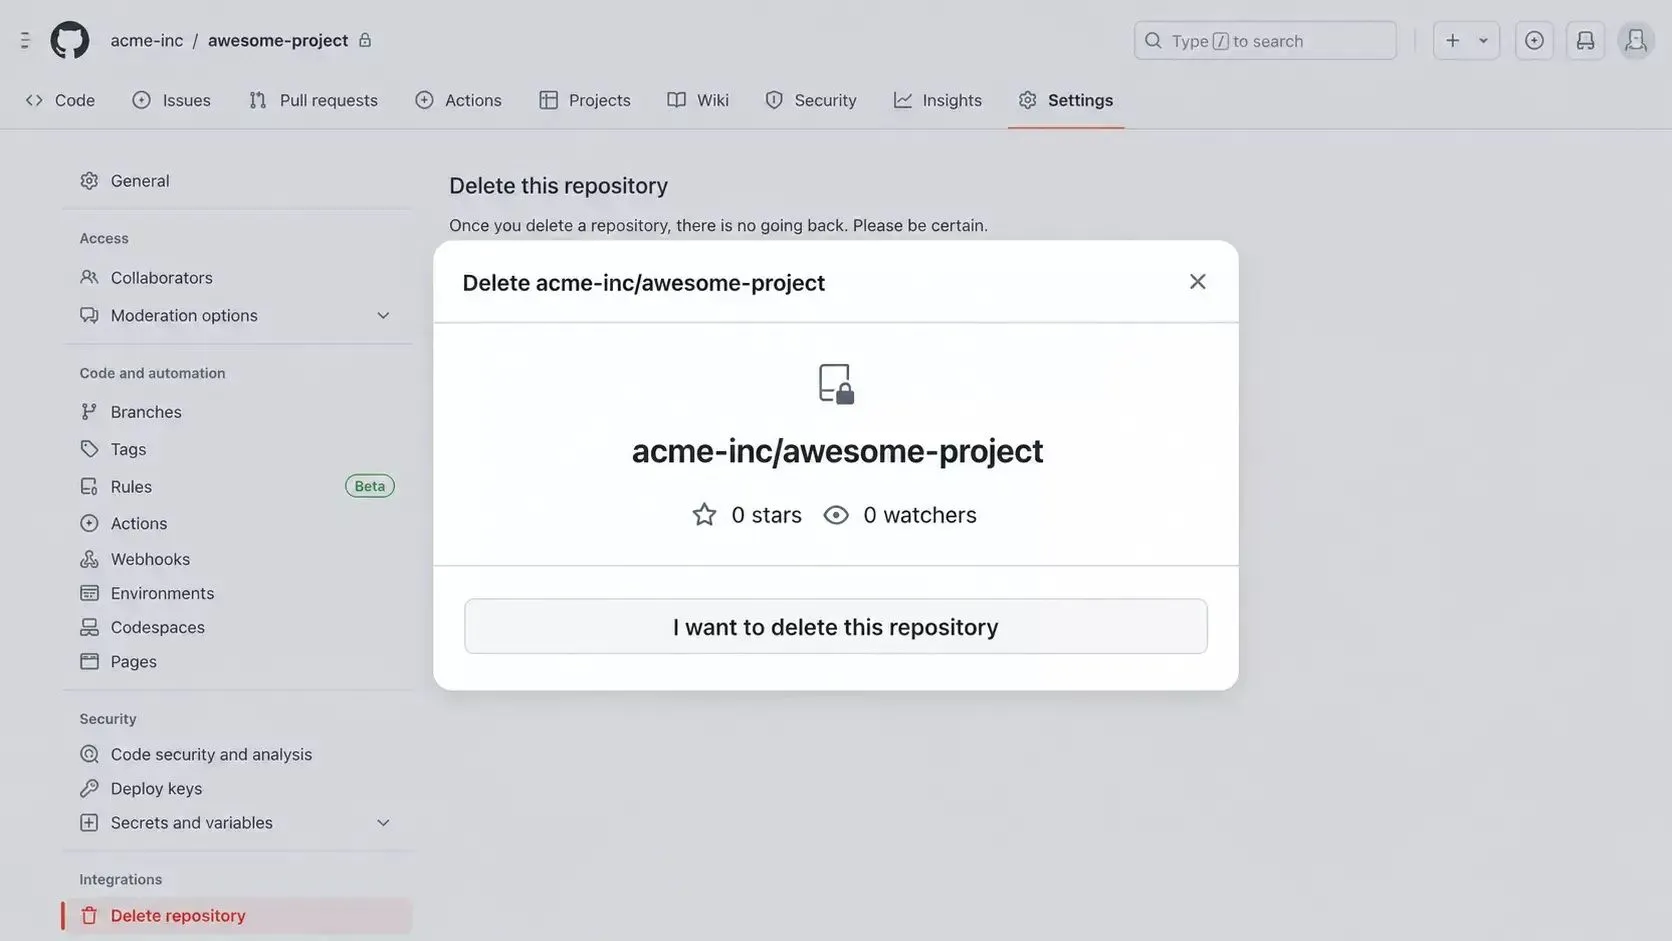
- Click "I want to delete this repository"
- Click "I have read and understand these effects"
- Type the exact repository name in the text box, then click the final "Delete this repository" button
If the repo name does not match exactly, the delete button stays disabled.
That is it; the GitHub repo deletion is complete.
What Happens After Deletion?
Once deleted, a repository cannot be fully restored after GitHub's short recovery window. Always double-check and back up important data before deletion.
- All files disappear
- All branches and each commit vanish
- All pull requests and issues are removed
- Forks remain but disconnect from the original repository
- Collaborators lose access immediately
- Webhooks and integrations tied to the repo stop working
Deleting a public repository will not delete any forks of the repository. If this were a public repository with many forks, other users would still keep their forked repository copies. But the original project page is gone.
GitHub now hosts more than 100 million developers and over 420 million repositories. With that many projects created every day, it is normal for some repositories to become outdated. But with scale comes risk: a single accidental deletion in a large organization can take down integrations, CI/CD pipelines, and team workflows instantly.
Key GitHub statistics that put repository management in perspective.
How to Delete a Repository Using GitHub CLI
Some users like to skip the GitHub UI and go straight to the command line. That is where GitHub CLI comes in handy.
Before running any delete command, verify the CLI is installed:
1gh --versionIf the command returns a version number, you are good to go. If not, install it from cli.github.com.
List your repositories before deleting to confirm the correct one:
1gh repo listThis shows all repositories under your account with visibility status (public/private). Use it to double-check the exact repo name before deletion.
To delete a git repository using GitHub CLI:
- Open the terminal or command line
- Authenticate: run
gh auth loginand follow the prompts - Run the delete command:
1gh repo delete OWNER/REPO-NAME --yesReplace OWNER with your GitHub username or organization name, and REPO-NAME with the exact repository name. The --yes flag skips the interactive confirmation prompt; omit it if you want GitHub CLI to prompt for verification before deletion.
For power users, deleting via the GitHub REST API:
bash
1curl -X DELETE \
2 -H "Authorization: Bearer YOUR_TOKEN" \
3 -H "Accept: application/vnd.github+json" \
4 https://api.github.com/repos/OWNER/REPO-NAMEReplace YOUR_TOKEN with a personal access token that has delete_repo scope. A 204 No Content response confirms successful deletion. This method is useful when automating repository cleanup across multiple repos in scripts or CI pipelines.
Using the command line is faster for advanced users managing multiple repositories. But the confirmation steps remain strict. Double-check the repo name and back up important files; once deleted via CLI, recovery is limited.
If you are building apps that connect to GitHub repositories, Rocket's GitHub connector lets you push code, sync branches, and manage version history directly from your project without switching tools or writing boilerplate.
GitHub Repository Deletion Workflow
Before jumping straight to deletion, it helps to think through the decision. Use this flowchart as a quick gut-check:
How to Archive Instead of Delete a Repository
Archiving is the safer alternative when you want to preserve history without allowing new changes.
When to archive instead of delete:
- The project is complete, but still useful for reference
- Other repositories depend on this code
- You want to preserve commit history and issues
- Team members may need read access in the future
How to archive a repository:
- Navigate to the repository and click Settings
- Scroll to the Danger Zone section
- Click Archive this repository
- Read the warning and type the repository name to confirm
Once archived, the repository becomes read-only. No new commits, pull requests, or issues can be created. The repository remains visible and searchable, and all forks remain connected.
Key difference: Archiving is reversible. You can unarchive a repository at any time by returning to the Danger Zone and clicking Unarchive this repository.
 Archive keeps everything intact and reversible. Delete is permanent with only a 90-day recovery window.
| Feature | Archive | Delete |
|---|---|---|
| Preserves code | Yes | No |
| Preserves history | Yes | No |
| Allows new commits | No | N/A |
| Reversible | Yes | Limited (90-day window) |
| Forks remain connected | Yes | No |
| Visible on GitHub | Yes | No |
How to Recover a Deleted Repository
Some deleted repositories can be restored within 90 days of deletion. Here is how to do it for both personal and the organization's accounts.
For Personal Repositories
- Go to GitHub.com and sign in
- Click your profile picture, then Settings
- In the left sidebar, click Repositories
- Scroll down and click Deleted repositories
- Find the repository you want to restore and click Restore
For Organization Repositories
Only organization owners can restore deleted repositories.
- Navigate to the organization page and click Settings
- In the left sidebar, under Archives, click Deleted repositories
- Find the repository and click Restore
 Recovery steps differ slightly between personal accounts and organization accounts; both require acting within 90 days.
Important: Not all deleted repositories are eligible for restoration. GitHub may not be able to restore repositories deleted more than 90 days ago or repositories deleted as part of a larger account deletion. Contact GitHub Support if the repository does not appear in the deleted repositories list.
What Gets Restored
When a repository is restored, code and commit history return, issues and pull requests return, and wiki pages return. However, collaborator access does NOT automatically restore and must be re-added manually. Webhooks and integrations also do NOT automatically restore.
Organization Repository vs Personal Account
If the repository belongs to an organization, deletion rules are stricter. Only users with admin permissions can delete the repository. Owner privileges may also be required depending on the organization's settings.
Deleting an organization repository affects team members, forks, and project tracking. Always communicate with your team before deletion, and double-check that you have the correct permissions.
Teams that manage multiple repositories and projects often benefit from a structured workflow tool. Rocket's version history and one-click rollback feature mean you never lose a build, every generation saves a version you can restore instantly, which is the kind of safety net that GitHub deletion cannot offer once the window closes.
Real-World Risks of Repository Deletion
Accidental repository deletion is a well-documented risk, not just a theoretical one. Common scenarios reported by developers and teams include:
- Similar repo names causing mix-ups: especially in organizations where multiple repos follow naming conventions like project-v1, project-v2, or project-staging, project-prod.
- CI/CD pipeline breakage: deleting a repo that's connected to automated build or deployment systems can silently break pipelines until the next deploy attempt fails.
- Lost access for collaborators: team members can lose access instantly, sometimes mid-task, with no warning.
- Webhook and integration failures: third-party tools (Slack notifications, issue trackers, deployment bots) tied to the repo stop working immediately and require manual reconfiguration even after a restore.
The takeaway: double-check the repository name, confirm with your team, and verify connected integrations before clicking delete, not after.
Common Mistakes to Avoid
Take a moment to double-check everything before deleting. A quick review now can prevent accidental data loss later.
- Deleting the wrong repository because the names look similar
- Forgetting to back up important data before deletion
- Ignoring active forks that depend on the repository
- Skipping team communication in an organization before deletion
- Confusing git rm (removes files from a branch) with full repository deletion
- Not checking for connected webhooks, CI/CD pipelines, or integrations
Always create a backup before deletion. Clone the git repository locally, archive documentation, and store important files in a safe folder.
Teams that ship frequently also benefit from having a proper version control strategy before deletion ever becomes necessary. Understanding how GitHub backup works for developers is a smart first step to protecting your codebase long-term.
Cleaning Up a GitHub Repository the Right Way
Repositories pile up. Old project code stays there. Forks grow. Branches stack up. At some point, the urge to delete feels obvious. Still, a rushed deletion can remove files, commit history, pull requests, and project data that may still be relevant.
The fix is simple. Open the correct repository from the main page, click Settings, scroll to the Danger Zone section, type the repository name carefully, and confirm before pressing Delete this repository. Slow steps now save stress later.
Deletion on GitHub is simple, but it is permanent if handled casually. Double-check the repo name, keep a backup of important files, and inform users in the organization repository before taking action.
If you are building apps that connect to GitHub, Rocket.new makes it seamless.
Rocket's GitHub connector lets you push code to repos and bring the code from the repos, sync branches, and manage version history directly from your project without switching tools or writing boilerplate. Teams use it to keep their GitHub repos organized and their builds clean.
Start building with Rocket and connect your GitHub workflow today.
Table of contents
- -Prerequisites & Checklist Before Deleting
- -Quick Overview of the Deletion Process
- -Step-by-Step: How to Delete a Repository in GitHub Using the UI
- -1. Navigate to the Correct Repository
- -2. Click Settings
- -3. Scroll to the Danger Zone Section
- -4. Click "Delete This Repository"
- -5. Confirm Through the Multi-Step Warning Dialog
- -What Happens After Deletion?
- -How to Delete a Repository Using GitHub CLI
- -GitHub Repository Deletion Workflow
- -How to Archive Instead of Delete a Repository
- -How to Recover a Deleted Repository
- -For Personal Repositories
- -For Organization Repositories
- -What Gets Restored
- -Organization Repository vs Personal Account
- -Real-World Risks of Repository Deletion
- -Common Mistakes to Avoid
- -Cleaning Up a GitHub Repository the Right Way