
How can you build a secure payment gateway without slowing growth? Learn to design Stripe-powered payment logic with Rocket.new, covering compliance, security, server workflows, and scalable checkout experiences for SaaS and ecommerce.
Online payments must work fast. They must also protect every transaction. If you run a SaaS platform, subscription service, or ecommerce store, payment failures cost revenue and trust.
Many founders want control over their checkout flow but do not want to build complex infrastructure from scratch.
So how do you build a secure system without slowing down your product roadmap?
Let's explain how to build payment gateway logic using Stripe API as the payment processor and Rocket.new as the application layer. You will learn how to handle compliance, security, server side logic, and customer experience in a practical way.
Step by step, you will see how to design, configure, and deploy a payment setup that fits your business and scales as you grow.
What a Payment Gateway Does?
A payment gateway acts as the bridge between your website and the payment processor. It collects customer payment information, encrypts it, and securely sends it for authorization.
When customers enter credit card details:
- The payment gateway encrypts data.
- The payment processor sends it to the card network.
- The bank verifies the transaction.
- Authorization returns to your system.
This entire process takes seconds and enables secure payments across online platforms.

Why Build Your Own Payment Gateway?
Most businesses rely on third-party solutions.
Still, building your own payment gateway using the Stripe API provides:
- Full control over branding and payment portal design
- Direct management of transactions and data
- Custom workflows tailored to your business
- Reduced long-term cost compared to complex enterprise systems
With Rocket.new, you can create backend logic, manage server functions, and connect to Stripe without handling low-level infrastructure.
Stripe as the Payment Processor
Stripe plays a central role in your payment gateway architecture. When building a payment system, you need a reliable payment processor that handles transactions, security, compliance, and communication with banks and card networks on your behalf.
Stripe acts as the payment processor handling:
- Credit card payments
- Bank transfers
- Payment authorization
- Fraud detection
- Identity verification
Stripe handles PCI compliance and follows PCI data security standards. This reduces your compliance requirements while maintaining secure payments.
By delegating payment processing, fraud monitoring, and compliance maintenance to Stripe, your business reduces risk while maintaining full control over the customer experience inside Rocket.new.
PCI Compliance and Security Requirements
When handling online payments, PCI compliance is mandatory. Businesses must comply with PCI DSS and follow PCI data security standards to protect sensitive information, such as credit card numbers.
Key PCI compliance principles:
- Encrypt payment information
- Avoid storing sensitive data on your server
- Use tokenization for card payments
- Maintain secure systems
- Conduct regular risk assessments
Stripe reduces PCI compliance burden by processing card data on Stripe servers rather than storing it in your own payment gateway system.
Rocket.new Architecture for Payment Systems
When building a payment gateway inside a modern application, architecture matters. You need a secure server environment, structured API calls, and a controlled process for handling transactions without exposing sensitive information to the client side.
Rocket.new allows you to create backend logic without manual server configuration.
Key features:
- AI-powered backend logic
- Prompt to App Creation
- Custom domain support
- Code export
- Live preview
- Reusable components
Rocket.new abstracts server management while still giving your business control over payment flows, API routing, and security logic. This structure helps you manage secure payments and payment processing workflows while focusing on business rules rather than infrastructure.
By keeping Stripe secret keys on the backend server and isolating payment authorization from the frontend, you reduce risk, remain compliant with PCI DSS requirements, and build a secure payment gateway customers can trust.
Step 1: Get Your Stripe API Keys
To connect Stripe as your payment processor, generate your API keys from the Stripe Dashboard.
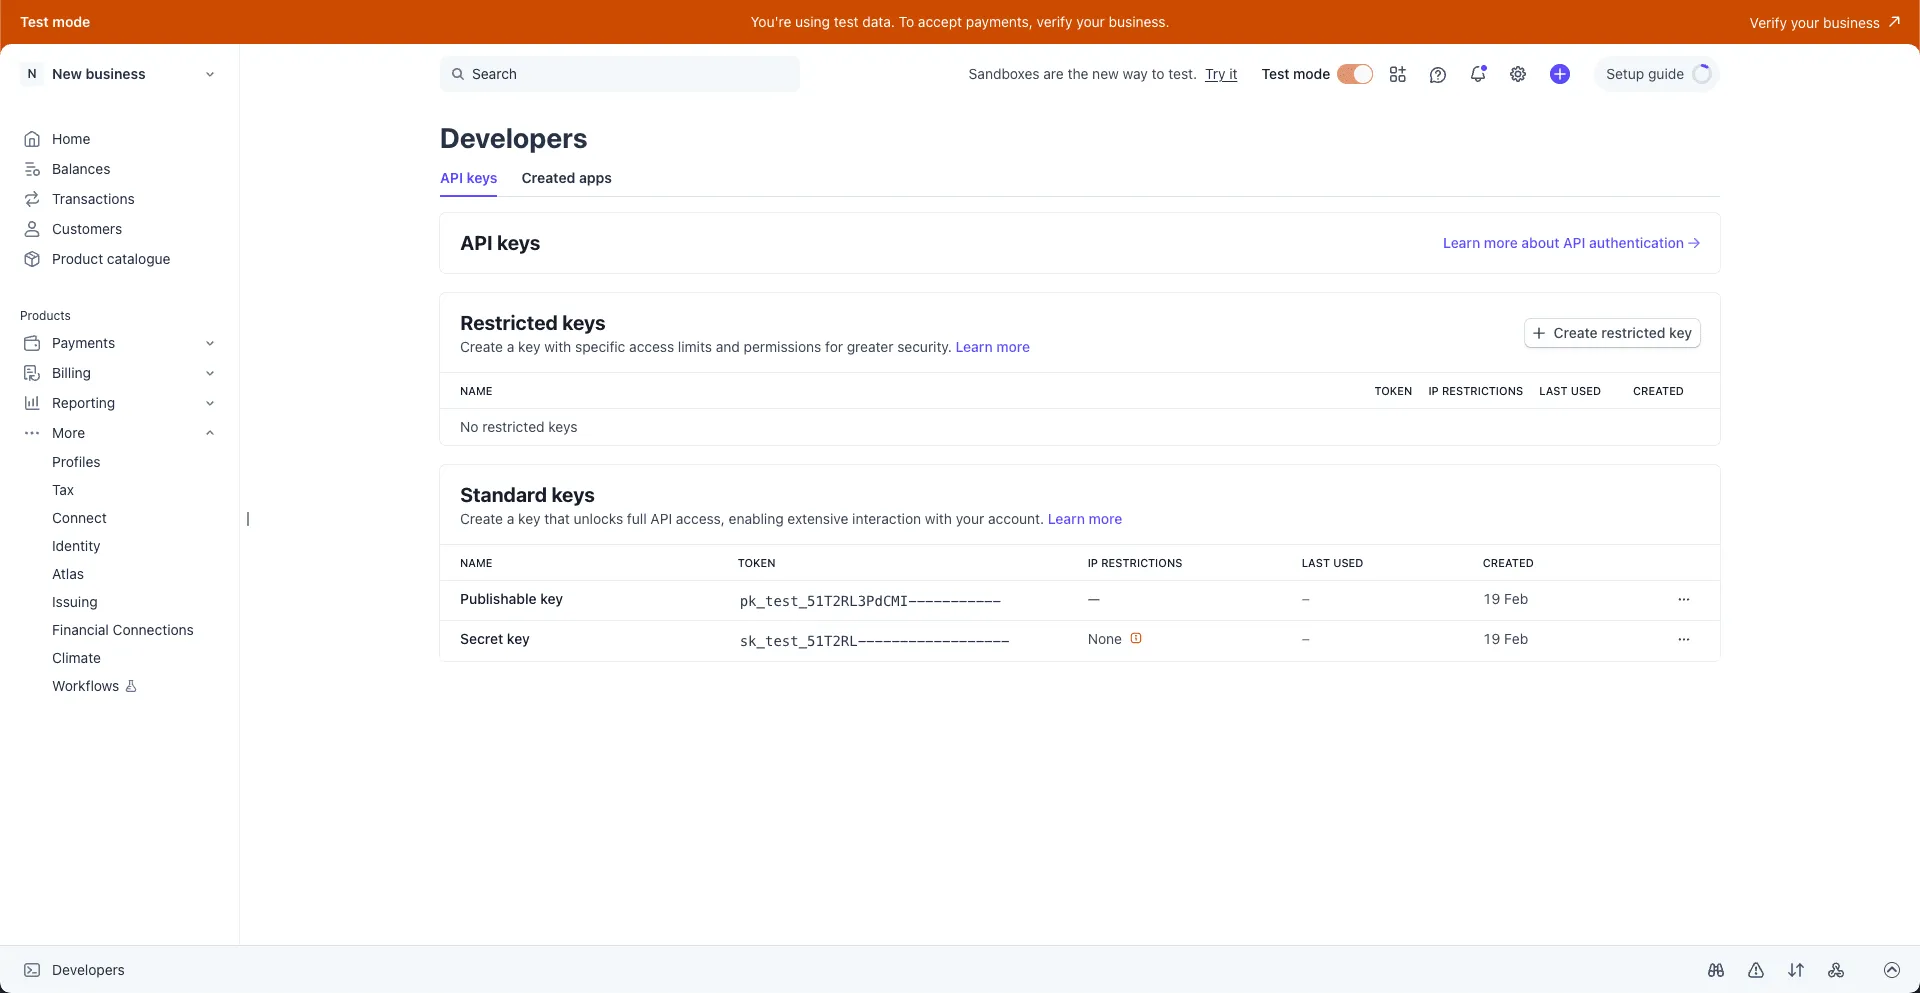
Stripe provides two types of keys:
- Publishable keys (pk_) – safe for client-side use
- Secret keys (sk_) – must remain on the server
Stripe also provides two operating modes:
- Test mode – for development and safe testing
- Live mode – for real payments from customers
Start with Test keys while developing your payment gateway. Switch to Live keys only when your website is ready to accept real money and process live transactions.
Step 2: Connect Stripe to Rocket
You can connect Stripe to Rocket using two different methods.
Method 1: Connect via Rocket Chat
Inside any Rocket project:
- Open the chat panel.
- Type a command such as:
- “Connect my Stripe account.”
- “Create a one-time checkout for my $29 eBook.”
- “Add a monthly Premium plan for $10.”
A pop-up will appear where you can securely paste your API keys.
This method works well when you are already building your payment portal and want to quickly create payment flows.
Method 2: Connect from Project Settings
You can also connect Stripe manually from the settings panel.
Steps:
- Open any Rocket project.
- Navigate to Integrations.
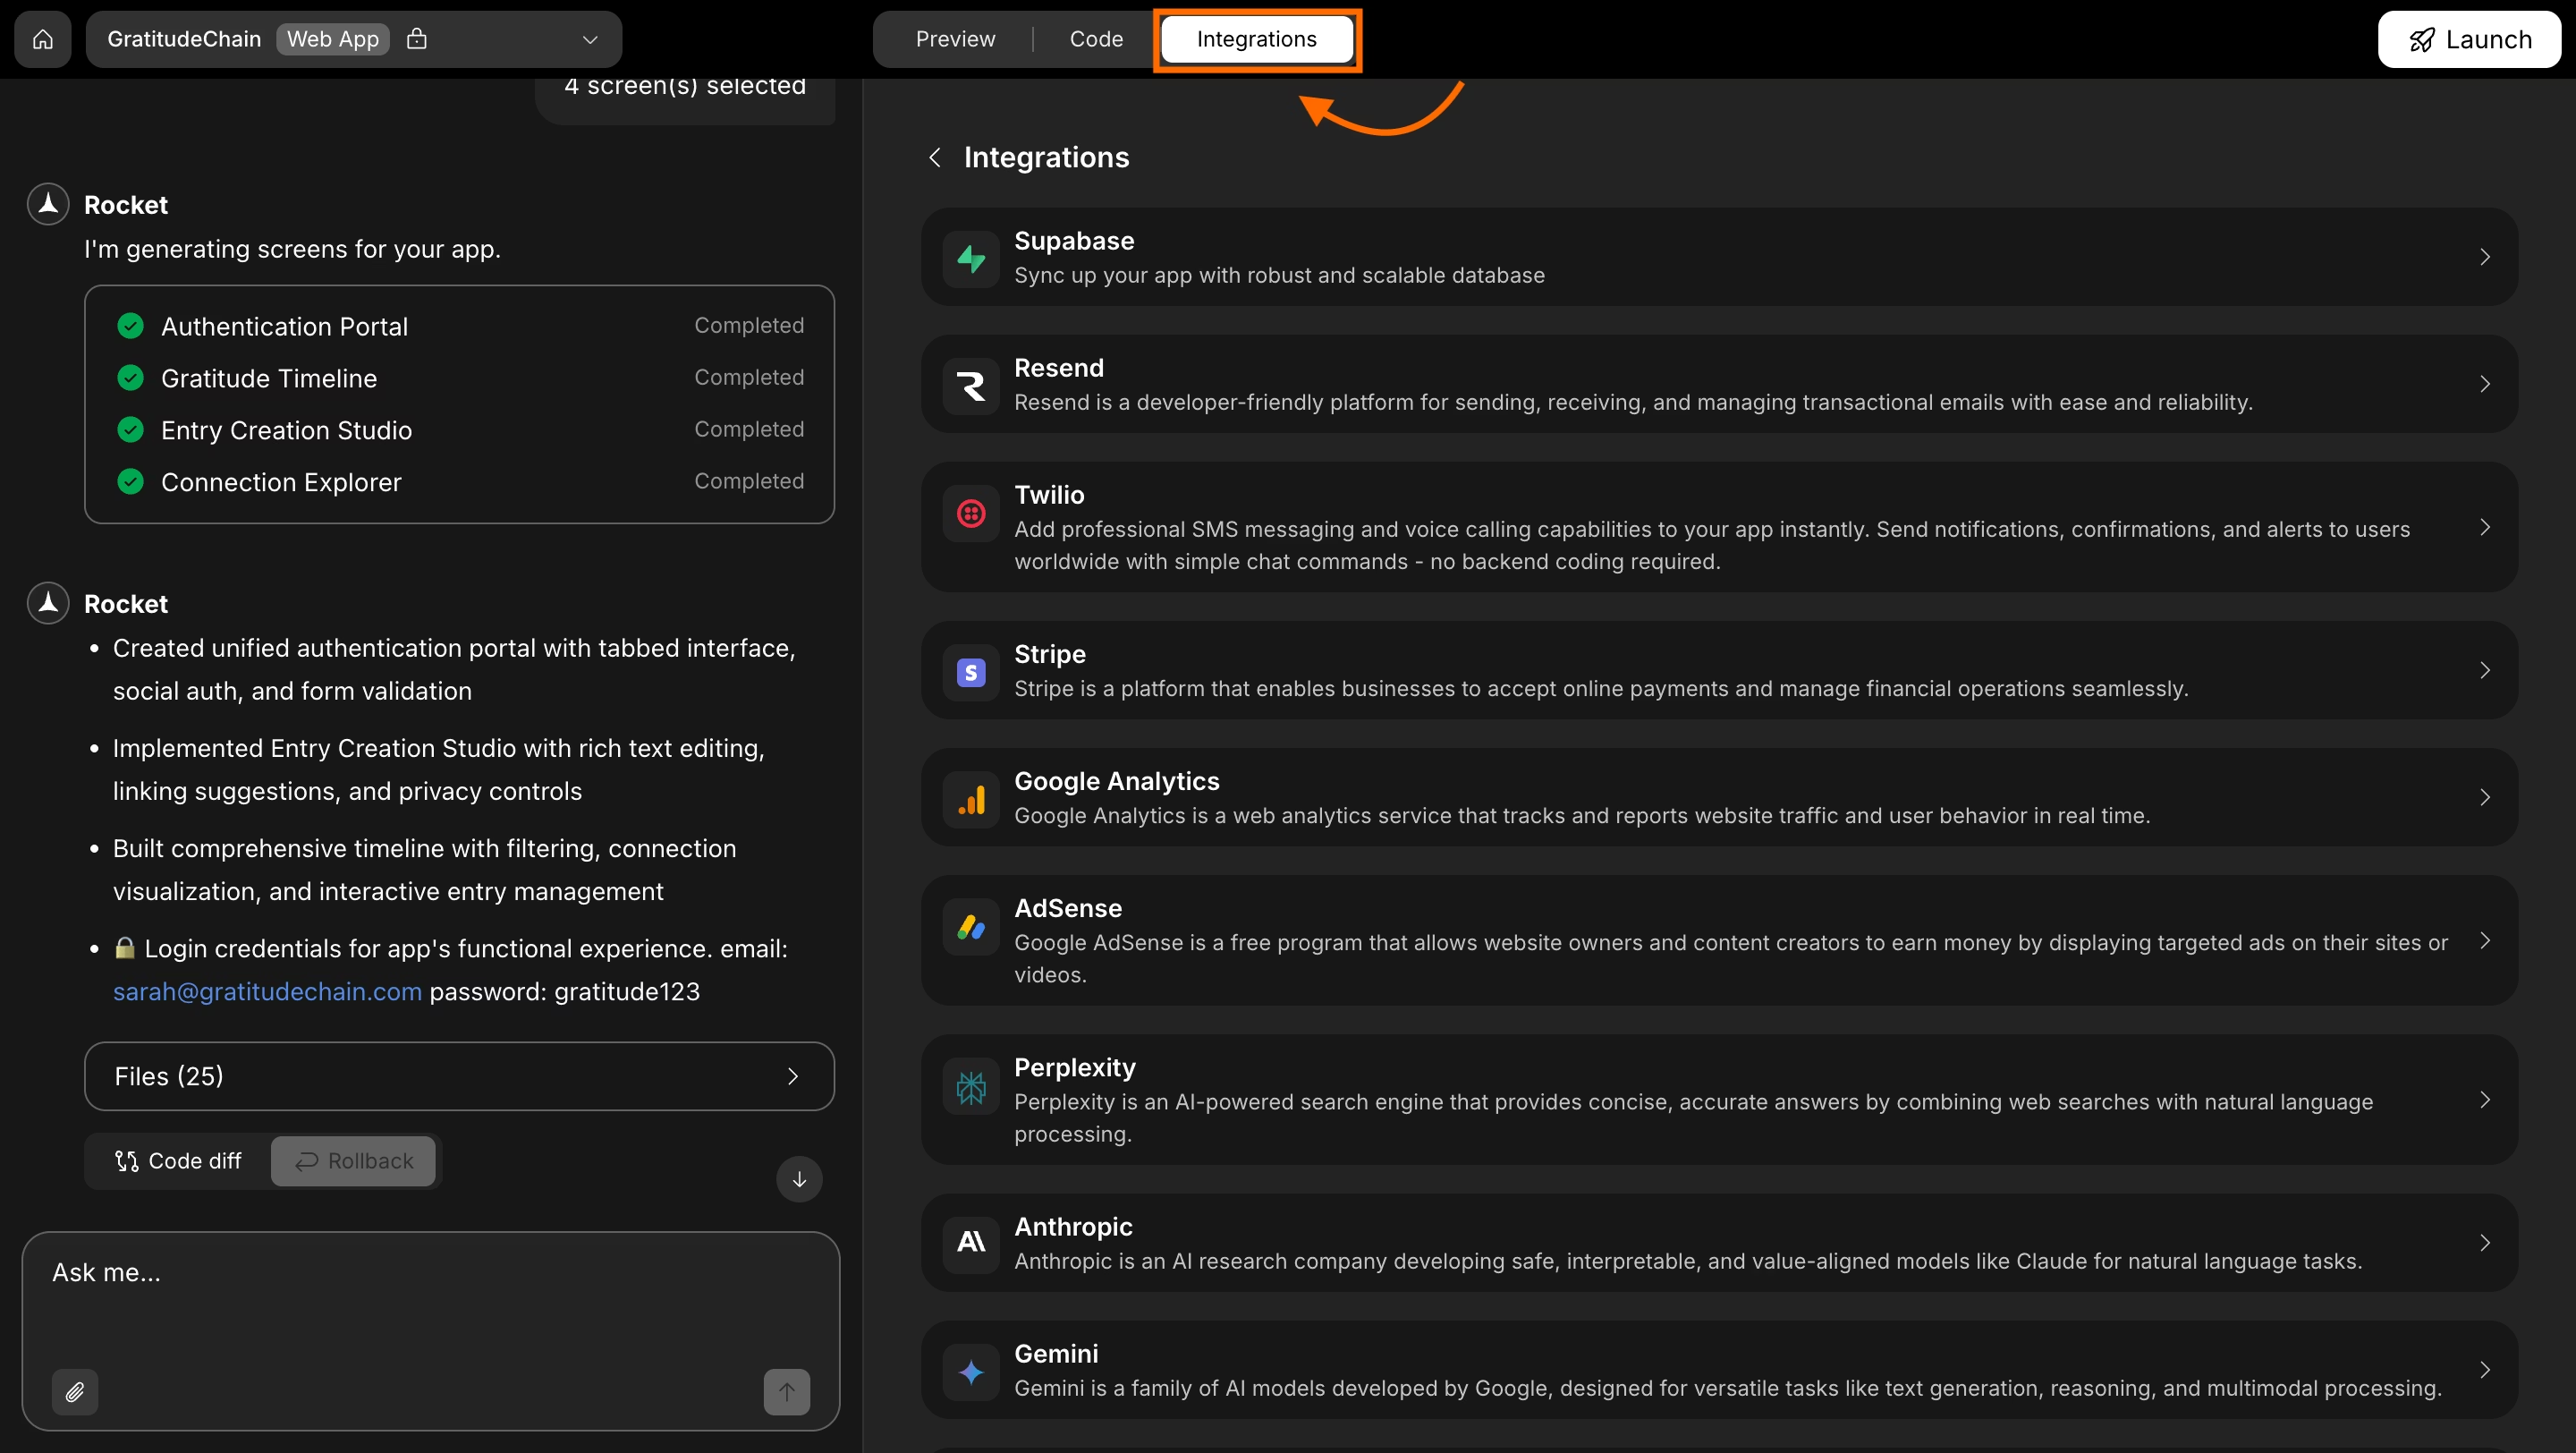
- Scroll through the integrations list.
- Click the Stripe card.
When you connect Stripe from Project Settings, Rocket will not automatically create payment flows. After saving your keys, describe the payment logic in chat so Rocket can generate backend routes, UI components, and database logic.
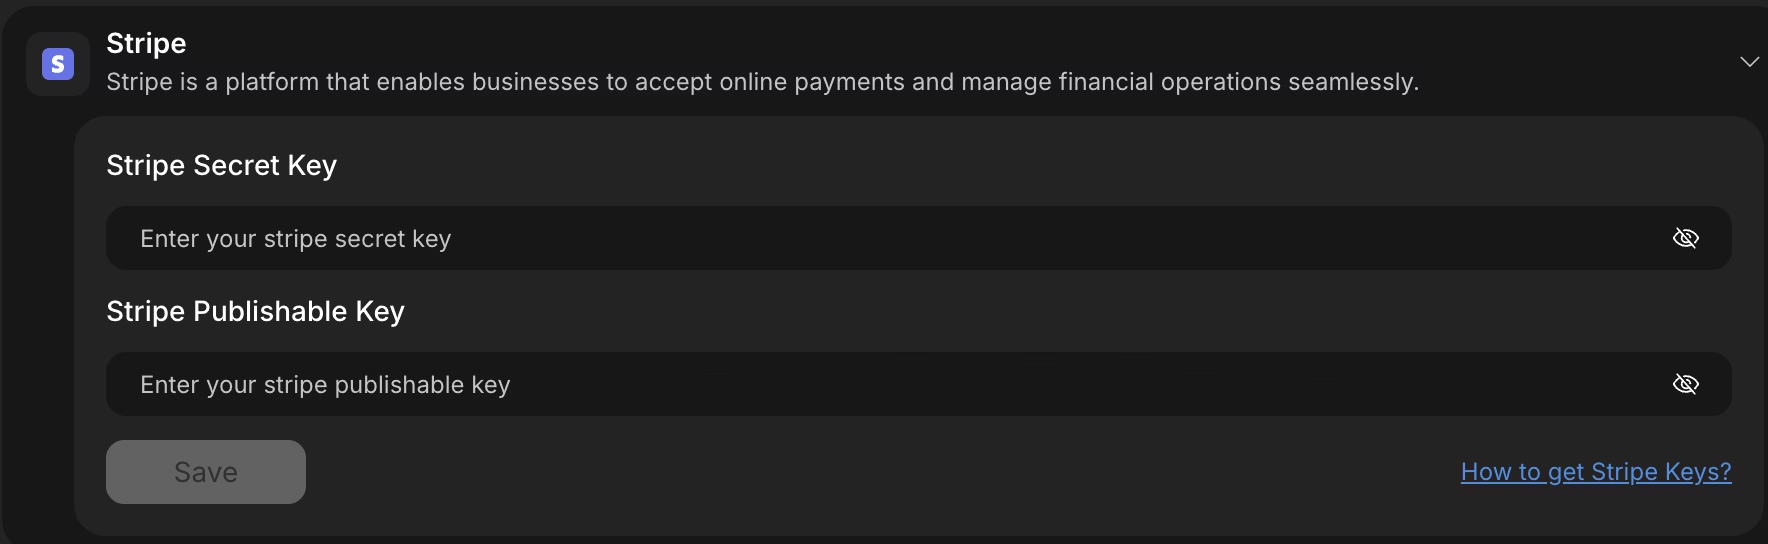
Step 3: Save Your Stripe Keys Securely
Inside the Stripe integration screen:
- Paste your Secret key.
- Paste your Publishable key.
- Click Save.
After a successful connection, you will see a green indicator next to Stripe in your integrations list.
This confirms your payment gateway connection is active and ready to process secure payments.
Important Security Notice
Never paste your Stripe Secret or Publishable keys directly into Rocket chat.
Always use the dedicated integration interface to store keys safely on the server. This prevents accidental exposure of sensitive information such as API credentials or payment information.
If you suspect that your Secret key has been exposed:
- Open the Stripe Dashboard.
- Rotate the key immediately.
Rotating keys limits risk and protects your business from unauthorized transactions.
Step 4: Update or Remove Stripe Keys
To update or remove your Stripe configuration:
- Click the Stripe integration again.
- Replace the keys or click Disconnect.

You can reconnect at any time. This gives your business control over your payment processor configuration while maintaining secure payment processing standards.
Testing Stripe Payments in Test Mode
Before going live, test your payment gateway using Stripe’s test card:
- Card Number: 4242 4242 4242 4242
- Any future expiration date
- Any 3-digit CVC
This allows you to simulate credit card payments without transferring real money from a bank account.
Testing protects customers from failed purchases and reduces fraud risk before production launch.
Automating Post-Payment Workflows
Once a payment is completed, your system should not stop at “Payment Successful.” A well-designed payment architecture automatically triggers backend actions that update user access, records, and communication flows. This ensures a seamless customer experience and reduces manual work.
After successful payments, you may want to:
- Grant premium access
- Send receipts
- Update subscription status
- Trigger onboarding emails
You can connect Stripe webhooks to Supabase Edge Functions for automated backend processing. Webhooks notify your server when transactions succeed, fail, or require additional authorization.
This setup allows your system to automatically manage data updates, customer identity verification, and account provisioning.
Stripe Connected Successfully
Stripe is now connected to your Rocket project. You can accept payments from customers through your website with secure backend handling and structured payment processing.
From here, describe your payment flow in chat, and Rocket will generate:
- Checkout sessions
- Subscription logic
- Backend API routes
- UI components
- Database schema updates
You now have a connected payment gateway ready to handle secure payments, manage transactions, and support your online business growth.
Common Security Concerns
Security is one of the biggest priorities when building a payment gateway. Businesses handling online transactions must protect sensitive financial data while maintaining customer trust. Even a small vulnerability can impact reputation, revenue, and legal compliance.
Many companies worry about:
- Data breaches
- Fraud
- Identity theft
- Unauthorized transactions
By following PCI compliance and using Stripe as payment processor, you reduce risk while maintaining secure payments.
What You Gain by Building Your Own Payment Gateway
Building a secure payment gateway using Stripe API and Rocket.new gives your business:
- Control over transactions
- Custom payment portal design
- Secure payments with reduced risk
- Compliance with PCI compliance standards
- Direct money transfer to your bank account
You now understand how to build payment gateway infrastructure without managing complex banking systems. By combining Stripe’s payment processor capabilities with Rocket.new backend tools, you create secure payments that customers trust and businesses rely on.
Table of contents
- -What a Payment Gateway Does?
- -Why Build Your Own Payment Gateway?
- -Stripe as the Payment Processor
- -PCI Compliance and Security Requirements
- -Rocket.new Architecture for Payment Systems
- -Step 1: Get Your Stripe API Keys
- -Step 2: Connect Stripe to Rocket
- -Method 1: Connect via Rocket Chat
- -Method 2: Connect from Project Settings
- -Step 3: Save Your Stripe Keys Securely
- -Important Security Notice
- -Step 4: Update or Remove Stripe Keys
- -Testing Stripe Payments in Test Mode
- -Automating Post-Payment Workflows
- -Stripe Connected Successfully
- -Common Security Concerns
- -What You Gain by Building Your Own Payment Gateway