
How do you reliably connect Rocket.new to Supabase PostgreSQL? This blog explains configuring database connections, pooling, limits, and production verification to ensure stable backend data operations without service disruptions consistently.
When I build backend logic in Rocket.new, I start by configuring the database layer. Without stable connections between the backend services and the PostgreSQL database, every request that needs to read or write data will fail.
In this blog, I walk through the exact steps I follow to connect a Rocket.new backend project to a Supabase PostgreSQL database, configure connection pooling properly, manage connection limits, and verify that client connections behave correctly in production.
Architecture Overview: Rocket.new + Supabase
Rocket.new allows me to create backend functions that run on a managed server instance. Supabase provides a hosted PostgreSQL database with built-in connection pooler support.
The flow looks like this:
Client → Rocket.new backend → Connection pooler → Postgres database server
Instead of allowing unlimited direct connections from backend services to the database server, I use connection pooling to manage connections safely.
Step-by-Step Process to Connect Rocket.new to Supabase
Now that you understand how Rocket's new backend services communicate with a PostgreSQL database and why connection pooling matters, let me walk you through the exact configuration process.
Below is the structured sequence I follow when connecting a Rocket.new project to a Supabase database. The steps cover project creation, retrieving the correct connection string, configuring environment variables, setting up connection pooling, writing backend query logic, and validating active connections.
Follow the steps in order to avoid connection errors, misconfigured credentials, or exceeding connection limits. Once configured correctly, your backend will maintain stable database connections and handle client requests reliably under production traffic.
Let’s begin with the Supabase project setup.
Step 1: Create a Supabase Project
I start inside Supabase:
- Click “New Project”
- Enter project name
- Choose region close to backend server to reduce network latency
- Set database name
- Create a strong password
Once created, Supabase provisions a PostgreSQL instance and exposes database credentials.
Step 2: Retrieve the Correct Connection String
Inside the Supabase dashboard:
Go to:
Settings → Database → Connection string
You will see multiple options:
- Direct connections
- Pooled connections (via connection pooler)
For backend services that handle multiple client connections, I use the pooled connection string.
It looks like:
1postgresql://username:password@host:port/databaseThis connection string contains:
- username
- password
- server host
- port
- database name
Using the pooled endpoint automatically activates connection pooling.
Why I Use Connection Pooling in Rocket.new?
Every time a backend request needs to query data, it requires database connections.
If I create a new connection per request:
- The database server must repeatedly handle opening and closing connections.
- Memory usage increases.
- Overhead grows.
- Connection limits are reached faster.
- Active connections spike under traffic.
Connection pooling solves this.
A connection pooler maintains a set of pooled connections that backend services reuse. Instead of creating a new connection each time, the backend borrows an existing connection object from the pool.
This improves database performance and stabilizes client connections.
Supabase provides built-in pooling through PgBouncer, which acts as a proxy between backend services and the PostgreSQL database server.
Step 3: Configure Environment Variables in Rocket.new
Inside Rocket.new:
- Open project settings
- Navigate to environment variables
- Create:
DATABASE_URL = <pooled connection string>
DB_USERNAME = <username>
DB_PASSWORD = <password>
Storing connection string values in environment variables protects security and prevents credentials from being exposed to client code.
Rocket.new backend services can now access the connection string securely.
Step 4: Install Required Libraries in Backend
Rocket.new backend supports Node runtime.
I install the postgres library:
1npm install pgThis library supports connection pooling natively.
Step 5: Initialize the Pool in Backend Code
Inside backend file:
1const { Pool } = require('pg');
2
3const pool = new Pool({
4 connectionString: process.env.DATABASE_URL,
5 ssl: { rejectUnauthorized: false },
6});Here, the Pool object manages connection pooling automatically.
Instead of creating a single connection manually, the pool maintains a pool of connections.
Step 6: Executing Queries Safely
To query data:
1const result = await pool.query('SELECT * FROM users');To insert data:
1await pool.query('INSERT INTO users(name) VALUES($1)', ['John']);The pool handles opening and closing connections internally.
This prevents idle connections from being left on the server.
Step 7: Handling Transactions
For multi-step operations:
1const client = await pool.connect();
2try {
3 await client.query('BEGIN');
4 await client.query('INSERT INTO orders VALUES (...)');
5 await client.query('COMMIT');
6} catch (error) {
7 await client.query('ROLLBACK');
8} finally {
9 client.release();
10}The client here temporarily holds a connection from pooled connections.
After the transaction completes, properly closing connections returns them to the pool.
Incorrect transaction handling can leave open database connections and increase overhead.
Step 8: Verifying Active Connections
Inside Supabase dashboard:
Go to:
Database → Metrics
Monitor:
- Active connections
- Idle connections
- Query performance
- Server load
If active connections approach the connection limit, review the pool configuration.
Step 9: Avoiding Common Errors
If an error occurs while trying to connect:
Check:
- Connection string format
- Password accuracy
- Username
- Port
- Database name
- SSL enabled
You can test using the following command:
1psql "your_connection_string"If direct connections work but pooled connections fail, verify you are using the correct pooler endpoint.
Understanding Connection Limits
Before connecting your Rocket.new backend to a Supabase PostgreSQL database, you must understand the database server's connection limits.
Every PostgreSQL database instance has connection limits.
If too many client connections attempt direct connections:
- New connection attempts fail.
- Backend request throws error.
- Performance drops.
Connection pooling reduces the total number of database connections by reusing them.
This protects the PostgreSQL server from overload.
Using pooled connections instead of direct connections helps manage connection limits and keeps the database stable under traffic.
How Pool Size Affects Performance
After enabling connection pooling, configuring the correct pool size becomes critical for maintaining stable performance under real production traffic.
The default pool size may not match production traffic.
If too small:
- Requests queue.
- Latency increases.
If too large:
- Too many connections.
- Increased memory usage on server.
Adjust pool configuration based on traffic patterns. Proper pooling configuration improves database performance without increasing instance size.
Security Best Practices
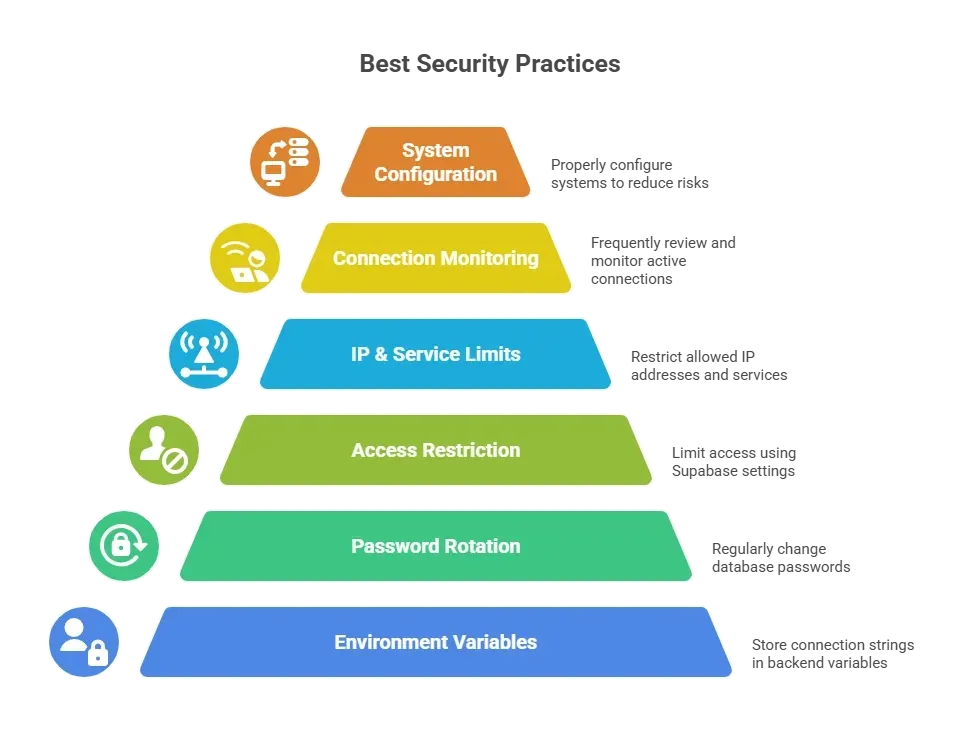
Protect credentials by storing connection strings in backend environment variables, rotating passwords, restricting access, and monitoring connections to maintain data safety and system stability.
Real Deployment Notes from My Setup
During my initial production deployment, I underestimated how quickly database connections could scale under real traffic conditions.
When I first deployed Rocket.new backend with direct connections:
- Traffic spikes caused active connections to grow rapidly.
- Each request attempted a new connection to the postgres database.
- The PostgreSQL server reached its connection limits.
- Backend requests began returning connection errors.
After switching to the Supabase connection pooler:
- Pooled connections were reused instead of creating a new connection per request.
- Connection pooling reduced server overhead.
- Client connections stabilized during peak traffic.
- Database performance remained consistent during concurrent request bursts.
Moving from direct connections to connection pooling completely changed the stability of my deployment. Proper pooling configuration prevented connection limit errors and kept the database server reliable under load.
Next Steps After Connection
After successfully connecting:
- Create tables
- Define row-level security
- Configure auth
- Add backend functions
- Test transaction flow
- Monitor metrics regularly
Once stable, scale backend services confidently.
What You Take Away from This Setup
You now understand how Rocket's new backend services connect to a Supabase PostgreSQL database using a secure connection string and managed connection pooling.
You have seen how pooled connections reduce overhead, protect connection limits, and stabilize database performance under traffic.
If you are learning how to connect backend to database in a production-ready way, the key is simple: use a Supabase pooled connection string, configure environment variables properly, initialize pooling in backend code, and monitor active connections consistently.
A stable database connection strategy keeps your backend reliable as your project grows.
Table of contents
- -Architecture Overview: Rocket.new + Supabase
- -Step-by-Step Process to Connect Rocket.new to Supabase
- -Step 1: Create a Supabase Project
- -Step 2: Retrieve the Correct Connection String
- -Why I Use Connection Pooling in Rocket.new?
- -Step 3: Configure Environment Variables in Rocket.new
- -Step 4: Install Required Libraries in Backend
- -Step 5: Initialize the Pool in Backend Code
- -Step 6: Executing Queries Safely
- -Step 7: Handling Transactions
- -Step 8: Verifying Active Connections
- -Step 9: Avoiding Common Errors
- -Understanding Connection Limits
- -How Pool Size Affects Performance
- -Security Best Practices
- -Real Deployment Notes from My Setup
- -Next Steps After Connection
- -What You Take Away from This Setup