Ready to accept PayPal payments on your website in 2026? Create a PayPal Business account, get a client ID, add a checkout button, test transactions, and then launch with PayPal easily. Following these steps helps you integrate a trusted payment option and offer customers a smooth, secure checkout experience.
How to integrate PayPal into my website in 2026?
Set up a PayPal Business account, grab your client ID from the PayPal Developer Dashboard, add a PayPal button to your checkout page, and test before going live. That is the core process.
PayPal continues to dominate online payments. According to 2024 data, PayPal reported more than 400 million active accounts worldwide. That tells you one thing. Customers already trust the PayPal website for online payments.
So now, let’s walk through this step by step in a practical way.
Why PayPal Still Works So Well in 2026?
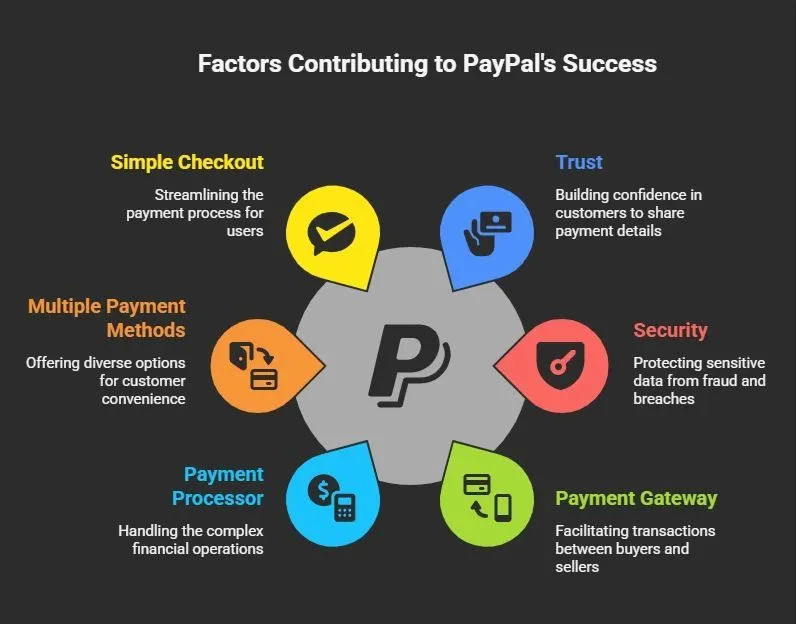
When you run an eCommerce website, trust decides everything. People hesitate before typing their credit card details. They think about fraud. They think about sensitive data. They think about safety.
That is exactly where PayPal helps.
Because PayPal serves as both a payment gateway and a payment processor, it handles the complex payment processing. You do not need to store card details on your own server. That alone reduces risk.
On top of that, PayPal checkout supports multiple payment methods. Customers can pay using their PayPal account, debit cards, credit cards, bank transfers, and even Google Pay in some regions.
PayPal Integration Roadmap
Alright, before we go into details, here is the simple roadmap for integrating PayPal:
- Create a PayPal business account.
- Access the PayPal developer dashboard.
- Generate your client id and secret key.
- Choose your method: PayPal Standard or the JavaScript SDK.
- Add PayPal button to product pages and checkout page.
- Configure payment methods and recurring payments if needed.
- Use sandbox client id to test payments.
- Switch to live mode and start accepting real payments.
That is the structure. Now let’s slow down and go through each step properly.
Step 1: Set Up the Right PayPal Account
Before integrating PayPal, you need the correct account type.
You need a PayPal business account. A personal account will not work for professional eCommerce store setups.
With a PayPal business account, you can:
- Accept payments under your brand name
- Set up recurring payments
- Connect a bank account
- Access the developer dashboard
- View transaction details
- Sync with accounting software
So first, head to the PayPal website. Create your business account. Enter your basic information. Add your billing address. Then link your bank account to withdraw funds.
After that, confirm your login details and verify your account.
At this stage, your PayPal business account acts like your merchant account. It is where all PayPal payments will arrive.
Step 2: Visit the PayPal Developer Dashboard
Now we move to the technical part. Relax. It is manageable.
Log in to your PayPal account and open the PayPal developer dashboard. Inside the developer dashboard, create a new app.
When you do that, you will get:
- A client id
- A secret key
- A sandbox client id
- A sandbox client account
The sandbox client id allows you to run test payments inside a testing environment. This means no real money is involved yet.
Keep your secret key private. Do not expose it on the client side of your website.
Step 3: Add PayPal to Your Website
Alright, now we get to the practical part. You are ready to add PayPal to your eCommerce website.
There are three common ways to add PayPal:
| Method | Best For | Technical Level | Notes |
|---|---|---|---|
| PayPal payments standard | Simple sites | Low | Uses basic html code and redirects to PayPal website |
| PayPal Checkout with JavaScript SDK | Custom checkout page | Medium | Gives more control over checkout |
| Plugin on eCommerce platform | WooCommerce, Shopify | Low | Fast setup |
If you use an eCommerce platform like WooCommerce, install the WooCommerce PayPal Payments plugin. It connects your PayPal business account and handles most of the checkout configuration for you.
If you are building a custom eCommerce store, then you will likely use the PayPal JavaScript SDK.
Step 4: Using the PayPal JavaScript SDK
If you want more control over checkout, this is the better path.
Here is how integrating PayPal with the JavaScript SDK usually works:
- Add the JavaScript SDK script to your HTML code.
- Pass your client id inside the script URL.
- Create a PayPal button container in your HTML code.
- Render the PayPal button using PayPal.Buttons().
- Capture the order once the customer approves payment.
The PayPal button container is simply a div that contains the PayPal button.
This setup gives you more control over:
- Shipping address
- Shipping costs
- Payment information
- Payment option display
Because the logic runs partly on the client side, your checkout feels modern and smooth.
If you want to integrate PayPal checkout properly for a custom design, this method works best.
Step 5: Add a PayPal Button on Key Pages
Placement matters more than you think.
You should add PayPal to:
- Product pages
- Cart page
- Checkout page
- Even project pages
When customers see a PayPal button directly on product pages, they can skip extra steps and go straight to PayPal checkout. That shortens the checkout process and reduces drop-offs.
You can create:
- A standard PayPal button
- A PayPal checkout button
- A dedicated payment button for a single item
Each PayPal button should be visible and clean. Also, check how it looks on mobile. Most payments now happen on phones.
Step 6: Offer Different Payment Options
Customers like flexibility.
With PayPal payments, you can offer multiple payment methods. This includes card payments, wallet payments, and, in some cases, Google Pay.
If you run subscriptions, you can configure recurring payments inside your PayPal business account.
Recurring payments are useful for:
- SaaS platforms
- Membership websites
- Online courses
When integrating PayPal for subscriptions, you configure it through the JavaScript SDK and your business account dashboard.
This keeps your checkout organized and makes managing payments easier.
Step 7: Test Everything Before Going Live
Now let’s slow down for a moment.
Before you start accepting real payments, test thoroughly.
Use the sandbox client id from the PayPal developer dashboard.
Run test payments and check:
- Payment form behavior
- Shipping address collection
- Checkout flow
- Transaction details
- Error messages
Once everything works smoothly, switch from sandbox to live mode. Replace the sandbox client id with your real client id. Then you can start accepting real payments confidently.
Keep an eye on live payments inside your PayPal business account during the first few days.
Community Insight
Here’s a Reddit comment from someone trying to add PayPal to their website and sharing the struggle in an online community:
“I built my subscription-based site using Framer, but I’m stuck on adding PayPal. I want a PayPal Subscribe button for monthly payments and a smooth integration, yet I have zero coding experience.”
This shows that even designers without coding backgrounds bump into the same roadblocks. Embedding PayPal buttons often requires custom code or embed blocks, which isn’t always straightforward in every site builder.
Launch Faster with Rocket.new and Built in PayPal
Now let’s talk about a different route.
What if you do not want to deal with developer dashboard steps, secret key handling, HTML code, or manually setting up the PayPal button container?
This is where Rocket.new changes the workflow.
When you build an eCommerce website using Rocket.new, PayPal comes built in. There is no separate PayPal integration process. No plugin hunting. No manual checkout wiring.
It is already part of the system.
How PayPal Works Inside Rocket.new?
When you create an online store with Rocket.new, PayPal checkout is automatically included. That means:
- Complete PayPal checkout functionality
- Secure processing for credit cards, debit cards, and PayPal account payments
- Shopping cart system
- Order management built in
- All powered by Next.js and JavaScript
So instead of manually integrating PayPal, you simply build your store. The PayPal button is already connected to the checkout flow.
Here, I built an eCommerce store to buy and sell fresh flowers. Once it was built, I was able to automatically integrate and manage the store.
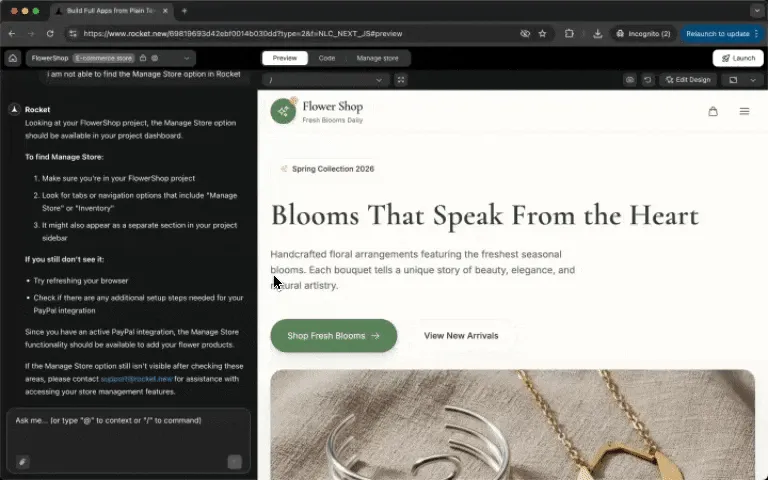
You do not need to open the PayPal developer dashboard and paste the client id into the HTML code yourself. Rocket handles the heavy lifting inside the structure.
That makes integrating PayPal much easier for founders who want to focus on product pages and sales instead of configuration.
Fees and Accounting
PayPal charges a percentage plus a fixed fee per transaction. There may also be additional fees for international payments.
Always check the PayPal website for up-to-date pricing in your region.
To keep finances clean, connect your PayPal business account with accounting software. Many accounting software tools sync automatically with PayPal payments. That makes managing payments and reporting much easier.
Security and Data Safety
One big advantage of using PayPal is data protection.
Customers enter card details inside PayPal checkout, not directly on your server. That reduces your exposure to sensitive data.
Still, you should:
- Use HTTPS
- Keep your JavaScript SDK up to date
- Protect your secret key
- Review security measures regularly
Keeping everything up to date protects your eCommerce store and your customers.
How to Integrate PayPal Into My Website
Many founders overcomplicate integrating PayPal into their websites. They build complex checkout systems, delay launch, and get stuck in technical confusion. The smarter move is simple. Start with a PayPal business account, choose PayPal Payments Standard or the PayPal JavaScript SDK, place a PayPal button on your product pages and checkout page, and test using a sandbox client ID before going live.
Integrating PayPal becomes straightforward when you break it into clear steps. Begin with the basics and upgrade later as your eCommerce store grows. Keep your checkout clean, offer flexible payment methods, and focus on a smooth buying experience. Add PayPal correctly, switch to live mode, and start accepting real payments with confidence.
Table of contents
- -Why PayPal Still Works So Well in 2026?
- -PayPal Integration Roadmap
- -Step 1: Set Up the Right PayPal Account
- -Step 2: Visit the PayPal Developer Dashboard
- -Step 3: Add PayPal to Your Website
- -Step 4: Using the PayPal JavaScript SDK
- -Step 5: Add a PayPal Button on Key Pages
- -Step 6: Offer Different Payment Options
- -Step 7: Test Everything Before Going Live
- -Community Insight
- -Launch Faster with Rocket.new and Built in PayPal
- -How PayPal Works Inside Rocket.new?
- -Fees and Accounting
- -Security and Data Safety
- -How to Integrate PayPal Into My Website