
Want to add ChatGPT to your app? Create OpenAI account, obtain API key, connect to API, send model requests, and handle responses, turning AI adoption into strong tangible app value.
How to integrate ChatGPT into an app?
Create an OpenAI account, obtain your API key, connect to the OpenAI API, send requests to a model, and handle responses in your app.
That is the core flow. The rest is setup, structure, and a bit of smart planning.
With all eyes on gen AI, AI adoption and impact remain steady. According to the McKinsey report, 55% of respondents reported their organizations had adopted AI.
That number keeps climbing. So yes, adding ChatGPT to an app is not just trendy. It is practical.
Let’s break it down.
Why Add ChatGPT to Your App?
ChatGPT is built on advanced machine learning and natural language processing. It can generate text, summarize content, handle ChatGPT conversations, and assist users with tasks.
That means your app can:
- Offer smart chat support
- Generate product descriptions
- Handle language translation
- Answer customer questions
- Process document content with file search
Users expect intelligent tools now. Google and Microsoft are pushing AI systems into daily technology workflows. From Google search to Microsoft Workspace tools, AI models are everywhere. Customers see it. They expect it.
So adding ChatGPT to your app feels natural.
So, What are the Steps?
Alright. Before jumping into code and API keys flying everywhere, here’s the simple roadmap.
Each step builds on the previous one. Just a structured setup and smart configuration.
Now let’s break it down properly.
Step 1: Create an OpenAI Account and Get API Access
Start by creating an OpenAI account on the official website. After you sign up, you will get API access through your dashboard.
Inside your account, generate an API key. This API key acts like a password. Treat it as a secret key. Do not expose it in public code. Store it in environment variables or a secure file.
You may create multiple keys for different environments.
For example:
- Development key
- Production key
- Testing key
Keep your keys organized. Rotate keys when needed. If a key gets blocked or leaked, delete it from your account and create a new one.
Your OpenAI API key gives your system access to models and services. Without it, your app cannot send requests to the OpenAI API.
Step 2: Choose the Right API Model
OpenAI provides different models for different use cases. Some are optimized for chat. Others are better at reasoning or complex tasks.
You select the API model when sending API requests.
Here is a simple comparison:
| Use Case | Recommended Model Type | Example Tasks |
|---|---|---|
| Chat support | Chat model | Customer chat, Q and A |
| Content generation | Text model | Blog drafts, captions |
| Document processing | File enabled model | file search, summaries |
| Advanced logic | Reasoning model | Complex workflows |
The responses API is commonly used to send input and receive structured responses. It supports ChatGPT conversations and can manage message history for better context.
Selecting the right models improves performance and helps control costs.
Step 3: Connect ChatGPT to Your App
Now it is time to connect ChatGPT to your backend system.
Here is a simplified flow:
- User enters input in the app
- Backend receives the input
- Backend sends an API request to openAI API
- OpenAI API processes it using selected models
- Responses API returns ChatGPT responses
- Backend sends the result back to the user
Basic code structure in many languages looks like this:
- Import SDK
- Set API key
- Create client
- Send requests
- Handle responses
Developers usually set the OpenAI API key as an environment variable. Never hardcode secret keys inside frontend files. That is how keys get leaked.
After that, test your requests in development before deployment.
Step 4: Handle Message History and Context
If you want real ChatGPT conversations, you must manage message history. The system does not automatically remember everything forever. You control context.
Store:
- Previous user messages
- Previous model responses
- Conversation ID
Then, with each new request, send relevant information.
If your app has limited memory storage, store only recent messages. That keeps costs lower and avoids hitting usage limits.
Step 5: Add File Search and Multimodal Capabilities
Many apps now go further than text chat. With file search, you can upload a file and let ChatGPT search it.
This is helpful for:
- Legal documents
- Research papers
- Product manuals
- Training guides
Users love it when an app can answer questions from their own data. Some models also support multimodal capabilities. That includes processing text, image, or video input. So yes, your system can analyze video transcripts or image descriptions.
This opens interesting use cases for AI systems.
Step 6: Manage Usage Limits and Costs
OpenAI API works on usage-based pricing.
That means:
- More requests
- More tokens
- More cost
Each OpenAI account has usage limits. You can set soft and hard limits in your account settings. This helps control spending.
Also monitor:
- Number of API requests
- Average response size
- Model selection
If your users grow fast, costs grow too. Plan ahead.
Community Insight: What Developers Say
On Reddit, a user shared this in r/AiAutomations:
“Free unlimited OpenAI APIs? What’s the catch? You still hit unforeseen limits, token usage matters, and billing surprises can happen if you don’t set guardrails.”
That insight points to something many developers learn the hard way. People think API access is easy and free. Then come unexpected costs or limits. That’s why tracking usage early matters
Security and Data Handling
Security matters. When integrating AI into your app, you must protect credentials and handle user data responsibly from the start.
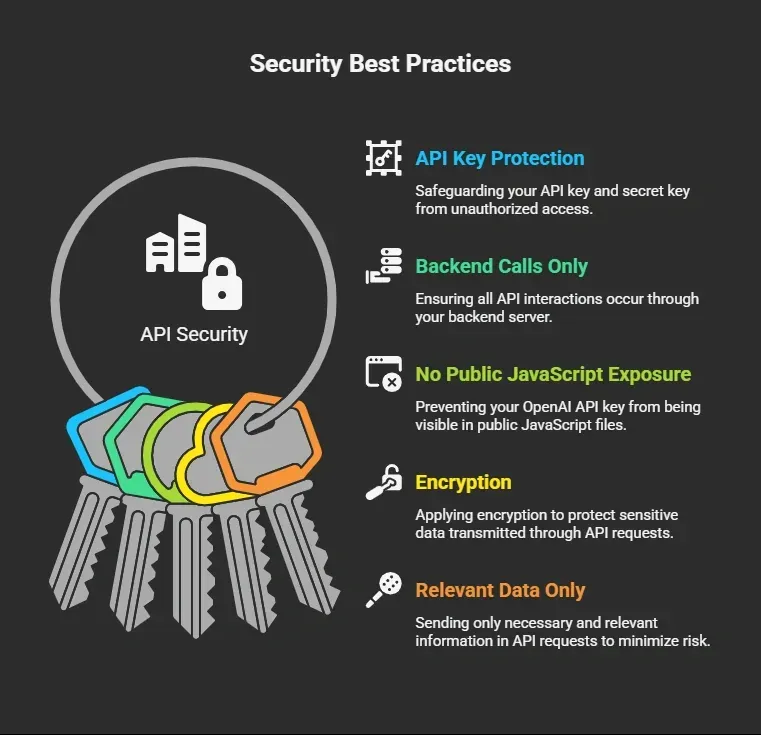
Even if OpenAI secures its services, your system is responsible for how data is handled. Keep your architecture secure, minimize data sharing, and treat user information with care.
Fine-Tuning and Custom Behavior
Sometimes, generic ChatGPT responses are not enough.
You can adjust behavior by:
- System prompts
- Structured instructions
- Fine tuning for specialized training
Fine tuning allows custom models trained on your data. That works well for complex industry tasks. Not every app needs it. Many use cases work well with base models.
Real Use Cases
Here are some practical use cases:
- Customer support chat inside ecommerce app
- Content generation tool for marketers
- AI assistant inside google workspace style productivity tool
- Internal AI system for microsoft style enterprise software
- Education app that answers student questions
Each case uses the same OpenAI API foundation. Only configuration and logic change.
Testing and Deployment
Before deploying, test everything.
Test: API key validity, Error handling, Blocked requests, Rate limits, Large input, File upload behavior
Simulate real users. Send many requests. Check system logs.
If something fails, check:
- Is API key correct?
- Is openAI API key active?
- Are usage limits reached?
- Is API model spelled correctly?
After the successful test phase, deploy to the production server. Keep monitoring performance.
Rocket.new- Makes App Creation Easy as Typing
Rocket.new helps founders and creators build full web apps without deep coding. If someone is interested in adding ChatGPT into a product but does not want to build backend logic from scratch, Rocket.new becomes useful.
It allows users to create apps visually and integrate external APIs, such as the OpenAI API. You can design UI, set workflows, connect tools, and configure backend logic.
Top features:
- Prompt to App Creation: Builds apps directly from single prompts
- Figma Import: Converts design files into live, editable layouts
- AI-Powered Backend: Automatically handles logic, data, and workflows
- Custom Domain Support: Publishes projects with a branded domain
- Code Export: Allows developers to extend or customize later
- Live Preview: Shows instant updates while editing
Steps to integrate OpenAI inside Rocket.new
-
Create and copy your OpenAI API key
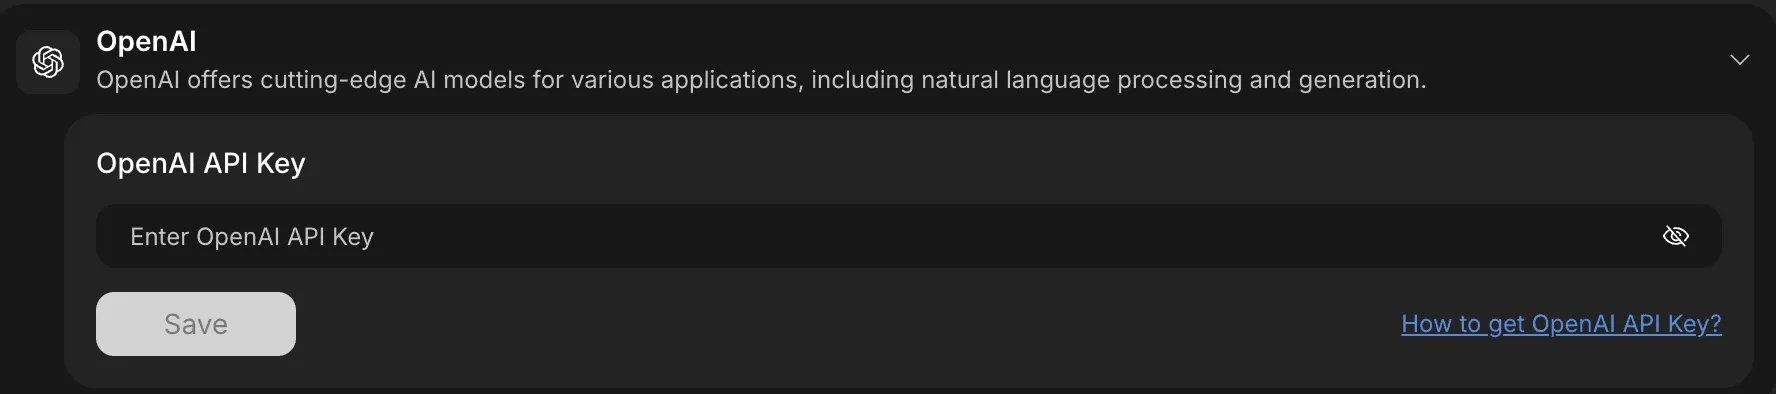
Log in to your OpenAI dashboard, navigate to the API Keys section, and generate a new secret key. Copy and store it securely, as you will paste it into Rocket.new.
-
Open your Rocket.new project and access the integration options
After logging into Rocket.new, open the specific project where you want to enable AI features. Inside your project workspace, you can connect OpenAI in two ways:
- Via Rocket Chat: Open the built-in chat panel within your project and type a request such as “Connect OpenAI to my project.” The system will prompt you to paste your API key directly into a secure popup.
- Via Project Settings: Navigate to the Integrations tab in your project dashboard. Scroll through the available integrations and select OpenAI to open the configuration panel.

-
Paste your API key into the platform settings
Enter your OpenAI API key in the provided field and save your changes to establish the connection.
-
Verify the connection
After saving, confirm the integration status shows as active, typically indicated by a green status or confirmation message.
-
Use OpenAI inside your workflows
Once connected, you can attach AI-powered actions to forms, automations, chat interfaces, or other workflows within your app to generate content, handle user input, or process data dynamically.
This process allows you to enable AI functionality without manually building backend infrastructure.
This setup removes the need to manually configure servers or write backend logic, making AI integration simple even for non-developers.
How to Integrate ChatGPT Into an App?
Apps without AI feel basic. Users compare everything to Google, Microsoft, and other AI-powered tools. They expect smart chat, fast responses, and contextual answers. Building complex AI systems from scratch is not realistic for most teams.
Use the OpenAI API. Create an OpenAI account. Generate API keys. Select models. Send requests through the responses API. Manage message history and file search. Monitor usage limits. Protect your secret key. Test carefully. Deploy confidently.
Learning how to integrate ChatGPT into an app is mostly about structure, not magic. Set up your API key correctly. Manage context. Watch costs. Pick the right models for your use cases. Keep it simple. Build step by step. Let ChatGPT handle the language work while your app handles the experience.
Table of contents
- -Why Add ChatGPT to Your App?
- -So, What are the Steps?
- -Step 1: Create an OpenAI Account and Get API Access
- -Step 2: Choose the Right API Model
- -Step 3: Connect ChatGPT to Your App
- -
- -Step 5: Add File Search and Multimodal Capabilities
- -Step 6: Manage Usage Limits and Costs
- -Community Insight: What Developers Say
- -Security and Data Handling
- -Fine-Tuning and Custom Behavior
- -Real Use Cases
- -Testing and Deployment
- -Rocket.new- Makes App Creation Easy as Typing
- -How to Integrate ChatGPT Into an App?


