Converting a Figma design to Next.js production code is faster than ever. AI tools read your Figma file, parse layouts and components, and generate clean, responsive Next.js code without manual handoff. This blog covers every method, tool, and best practice for going from Figma to Next.js.
Why Figma to Next.js Is the Most Important Design-to-Code Workflow Today?
Next.js is the most widely used React meta-framework for production web apps. According to the 2025 State of JS survey, Next.js has a 58.6% usage rate among JavaScript developers surveyed globally. It is the default choice for teams building production React applications.
Figma is the leading design tool for product teams worldwide. The combination of Figma for design and Next.js for production creates the most common design-to-code challenge in modern product development: how do you move from a polished Figma file to a deployed Next.js app without losing days to manual rebuilding?
The answer has changed. Teams that once spent two to four weeks translating Figma designs into Next.js code can now do it in hours using AI-powered tools. According to the 2024 Stack Overflow Developer Survey, 76% of developers are already using or plan to use AI tools in their development workflow.
What "Figma to Next.js" Actually Means
When developers and designers talk about Figma to Next.js, they mean converting a Figma design file into working Next.js code that can be deployed to production. This involves several interconnected steps.
You translate visual layouts into React components with JSX. You convert Figma auto layout into responsive CSS or Tailwind utility classes. You map Figma color tokens and typography to a design system in code.
The challenge is not just visual accuracy. It is also about code quality, maintainability, and the ability to extend the generated code without rewriting it from scratch.
The Traditional Figma to Next.js Workflow (and Why It Fails)
Before AI tools changed the process, the standard Figma-to-Next.js workflow looked like this. A designer finishes the Figma file and shares it. A developer opens Dev Mode, inspects spacing and colors, then manually writes JSX components from scratch.
CSS or Tailwind classes are written by hand to match spacing and layout. Responsive behavior is coded manually, requiring multiple rounds of review. The designer flags discrepancies and the developer iterates until the output matches.
The core problem: Figma Dev Mode gives developers a reference, not a starting point. Every line of Next.js code still has to be written manually. That is where AI tools change everything.
Figma to Next.js: Four Methods Compared
| Method | Typical Time to Deploy | Code Output | Skill Required | Best For |
|---|---|---|---|---|
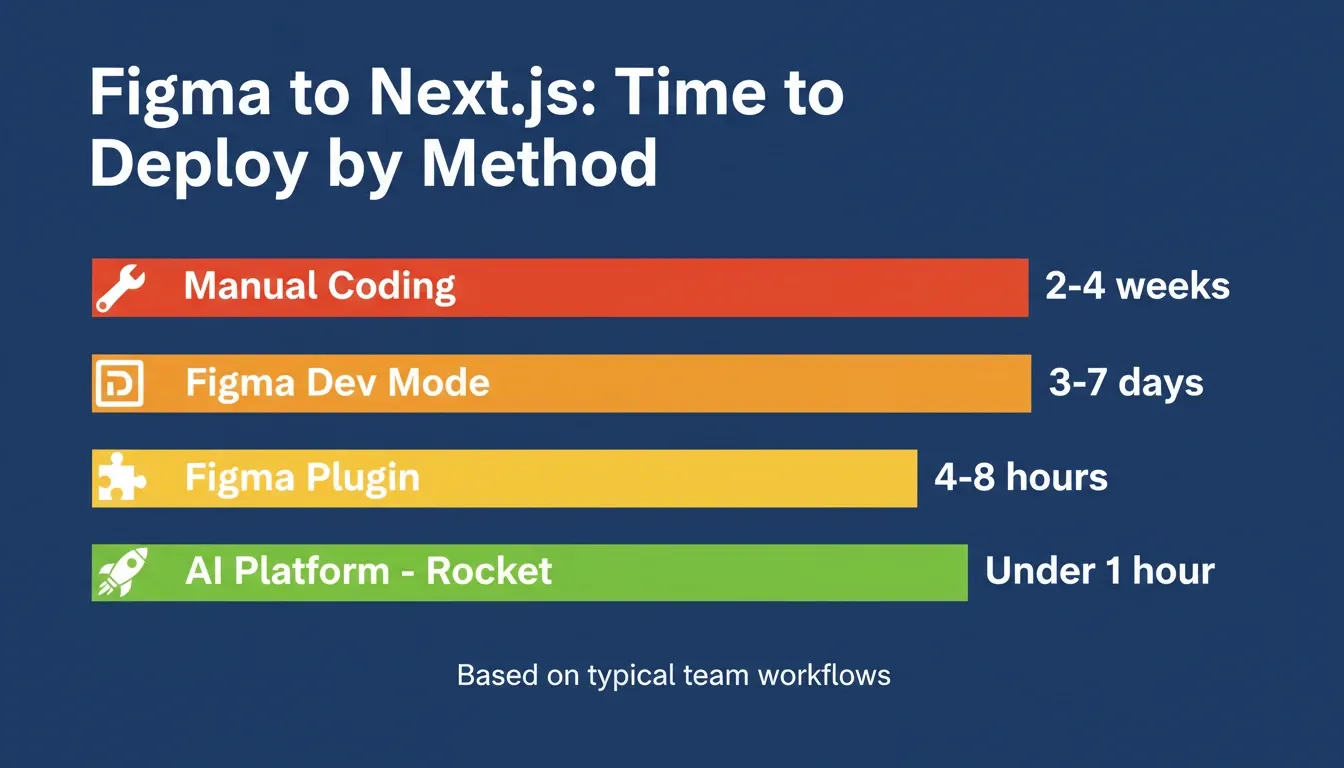
| Manual coding from Figma | 2 to 4 weeks | Full control | Senior developer | Complex custom logic |
| Figma Dev Mode + copy-paste | 3 to 7 days | Medium quality | Mid-level developer | Small teams, simple UIs |
| Figma plugin (Locofy, Anima) | 4 to 8 hours | Front-end only | Any developer | Front-end prototypes |
| AI platform (Rocket) | Under 1 hour | Production-ready full-stack | No code required | MVPs, full apps, agencies |
The AI platform approach is the only method that produces a deployable Next.js app, not just front-end code snippets.
How AI Converts Figma to Next.js: The Technical Pipeline
Understanding what happens under the hood helps you prepare better Figma files and get better output. Here is how modern AI tools like Rocket convert a Figma design to Next.js.
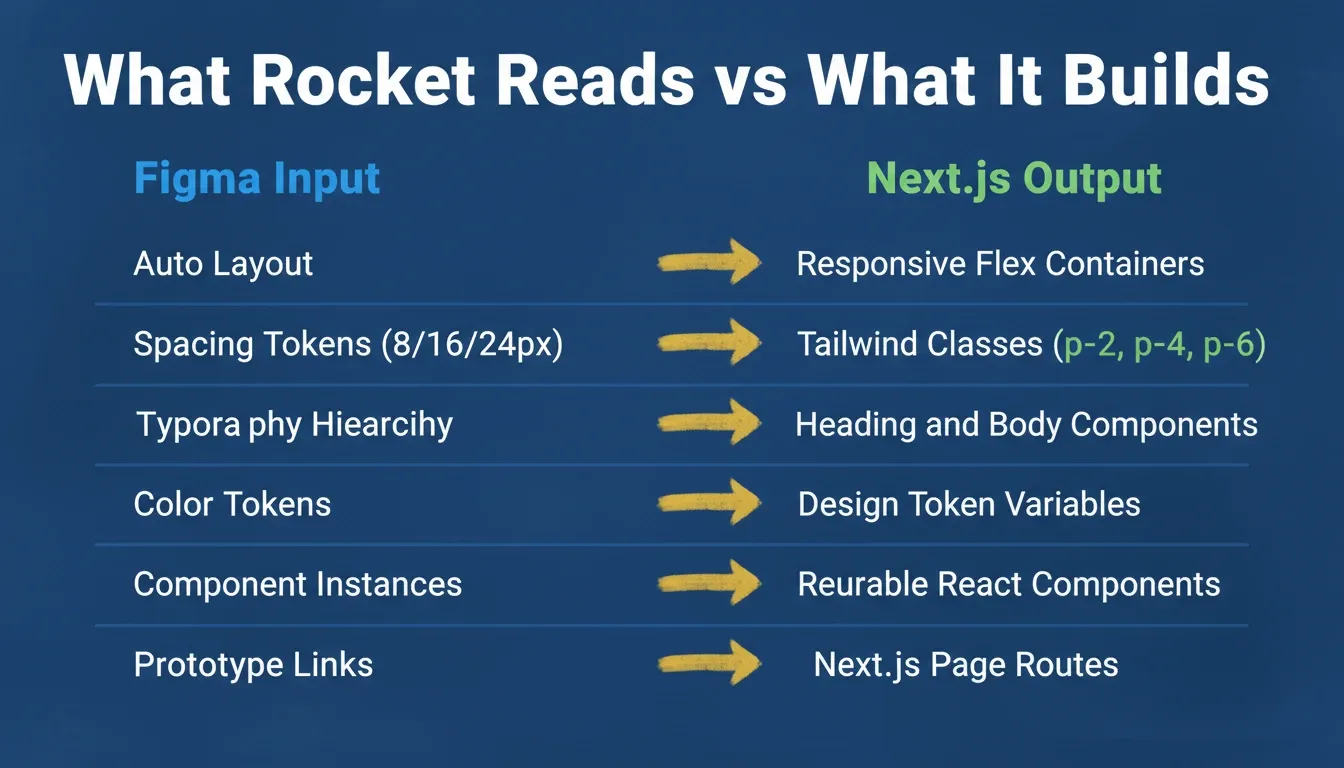
The AI does not just read pixel coordinates. It reads the design system underneath the visual layer. Auto layout becomes responsive flex containers. Spacing tokens map to Tailwind utility classes. Component instances become reusable React components with variant support.
A padding value of 24px is not treated as a random number. Rocket recognizes it as a step in a 4px spacing scale and maps it to the correct Tailwind utility class. This is what separates AI-powered conversion from tools that only read appearance.
Step-by-Step: Convert Figma to Next.js with Rocket
Rocket is the most complete platform for converting Figma designs to Next.js. It produces full-stack, production-ready apps, not just front-end code. Here is the complete workflow.
Step 1: Prepare Your Figma File
The quality of your Next.js output depends directly on the quality of your Figma file. Use auto layout throughout. Frames built with auto layout generate responsive flex containers. Frames without it produce fixed-position code that breaks on different screen sizes.
Name your layers clearly. Well-named layers produce clean component names in the generated code. Define a consistent spacing scale using 4px increments so tokens map cleanly to Tailwind classes.
Step 2: Connect Your Figma Account to Rocket
Rocket connects to Figma via OAuth. No API key or plugin is required. Click the + button at the lower left of the chat input inside Rocket and select Add from Figma.
A popup appears asking you to connect your Figma account. Click Connect. Figma opens an authorization screen. Review the permissions and click Allow access. A green dot appears next to Figma in your connectors when the connection is active.
Alternatively, connect from workspace Settings under the Connectors tab. This makes Figma available across all tasks in the workspace. Full setup details are in the Figma connector documentation.
Step 3: Import Your Figma Design
Once connected, the import process is straightforward. Copy your Figma file link, click the + button, and select Add from Figma. Paste your Figma URL and Rocket displays the frames from your file.
Select the screens you want to import. You can import up to 40 screens at once. Choose Next.js as your output and click Import. Rocket fetches your design assets, reads the layer structure, extracts spacing tokens, and generates structured code screen by screen.
Step 4: What Rocket Generates from Your Figma File
| What Rocket Reads | What It Produces in Next.js |
|---|---|
| Auto-layout properties | Responsive flex layouts with Tailwind CSS |
| Spacing tokens (8, 16, 24, 32px) | Tailwind utility classes (p-2, p-4, p-6, gap-4) |
| Typography hierarchy | Correct heading and body component structure |
| Color system by usage | Design tokens mapped to primary, secondary, accent |
| Component instances | Reusable React components with variant support |
| Prototype click connections | Next.js page routes and navigation links |
| Images and assets | Optimized with Next.js Image component |
Step 5: Extend, Integrate, and Deploy
Once Rocket generates your Next.js app from Figma, the build does not stop there. Connect Supabase to wire up your imported layouts with a live database and authentication. Add Stripe for payments directly onto your Figma-designed pages.
Publish to a live URL via Netlify or Rocket's built-in hosting with one click. Use the chat panel to describe any change in plain language and Rocket applies it in context. Two-way GitHub sync for Next.js TypeScript projects lets your development team extend the generated code.
This is how Rocket builds directly from a Figma file without requiring a developer handoff, turning design files into working apps rather than static references.
Figma to Next.js: Tool Comparison
Not all Figma-to-Next.js tools produce the same output. Here is how the leading options compare.
| Tool | Next.js Output | Full-Stack | Backend | Free Plan | Deploy |
|---|---|---|---|---|---|
| Rocket | Full app (Next.js + Tailwind) | Yes | Supabase, Stripe, APIs | Yes | One-click |
| Locofy | Front-end code only | No | None | Yes | No |
| Anima | HTML/CSS + React snippets | No | None | Limited | No |
| Builder.io | React components | Partial | No | Yes | No |
| Framer | React (marketing sites) | No | No | Limited | Yes |
| Manual coding | Full control | Yes | Manual | N/A | Manual |
Rocket is the only tool in this comparison that produces a complete, deployable Next.js application with backend logic included. Every other option stops at the front end.
Figma to Next.js: Real-World Use Cases
Use Case 1: SaaS Dashboard MVP
A two-person startup team designs a SaaS dashboard in Figma with multiple screens: login, dashboard, settings, and billing. Using Rocket's Figma import, they convert all screens to Next.js in one session. They connect Supabase for authentication and database, add Stripe for billing, and deploy to a live URL.
Total time: under a day, compared to two to three weeks of manual development. This is the kind of speed advantage that changes what is possible for small teams.
Use Case 2: Agency Client Delivery
A design agency creates pixel-perfect Figma designs for a client's marketing website. Instead of handing off to a developer, the designer imports the Figma file into Rocket and selects Next.js output. The client receives a live, editable Next.js app they can iterate on using chat.
Use Case 3: Product Manager Prototyping
A product manager wants to validate a new feature before committing engineering resources. They design the feature in Figma, import it into Rocket, and get a functional Next.js prototype with real navigation and mock data. User testing happens on a real app, not a static prototype.
This approach connects directly to how Rocket takes market validation all the way to product deployment, keeping research and build in the same context.
Common Figma to Next.js Mistakes and How to Avoid Them
Using Fixed Frames Instead of Auto Layout
Fixed frames produce fixed-position CSS in Next.js, which breaks responsive behavior. Always use auto layout in Figma to get responsive flex containers in your generated code. This single change has the biggest impact on output quality.
Unnamed or Poorly Organized Layers
Unnamed layers produce generic component names like Frame 1 or Group 3 in generated code. Name your layers descriptively — for example, HeroSection , NavBar , PricingCard — to get clean, readable component names.
Importing All Screens at Once Without Reviewing
Start with your five to ten most important screens. Import them, review the output, refine in chat, and then add more screens incrementally. This produces significantly better results than importing all 40 screens at once.
Skipping the Design System
Figma files without a consistent design system produce weaker Next.js output. Inconsistent spacing, random color values, and no component library all reduce accuracy. Invest in a clean Figma design system before importing.
How to Prepare a Figma File for Next.js Conversion
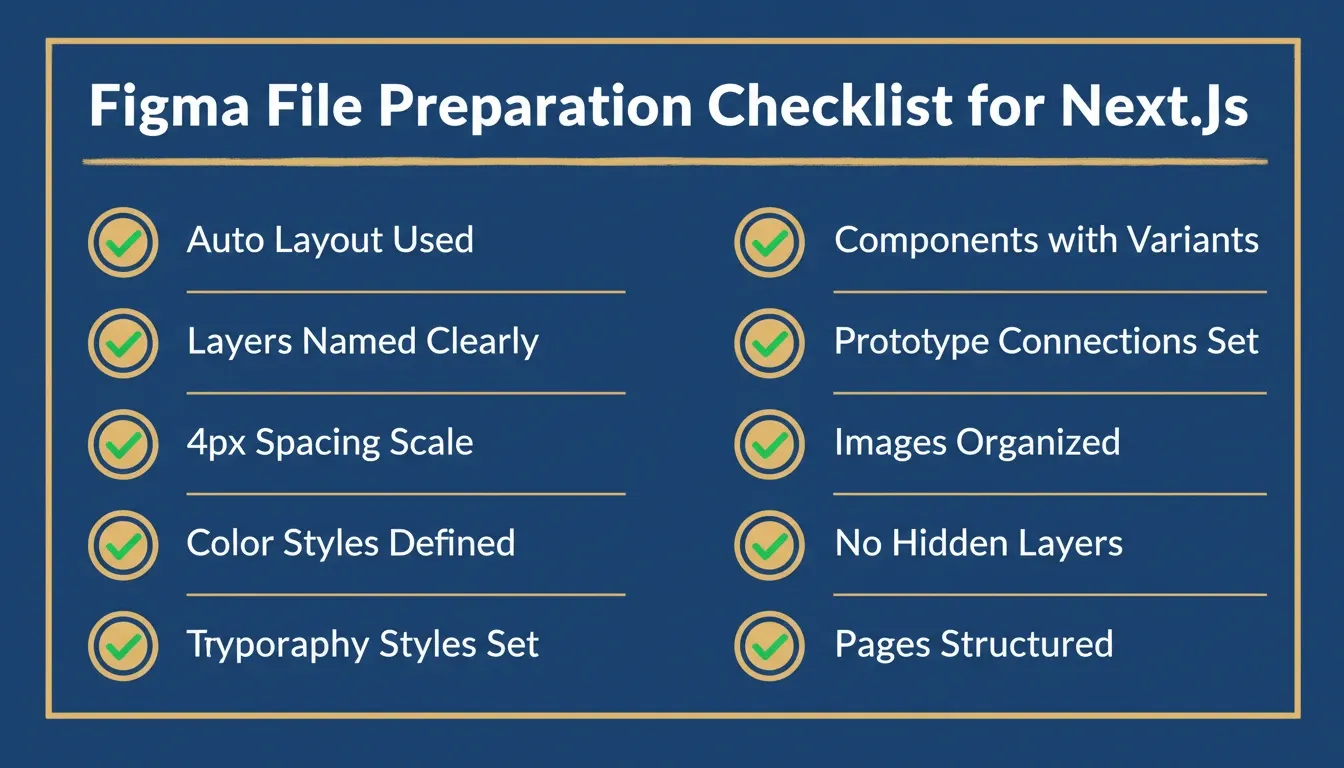
Use this checklist before importing your Figma file to get the best Next.js output.
-
All frames use auto layout (not fixed positioning)
-
Layers and components are named descriptively
-
A consistent spacing scale is used throughout (4px base)
-
Colors are defined as Figma styles or variables
-
Typography is defined as Figma text styles
-
Components use variants for interactive states
-
Prototype connections are set up for navigation flows
-
Images are properly masked and organized
-
No hidden or invisible layers that are not needed
-
File is organized into logical pages (Web, Mobile, Components)
Figma to Next.js vs. Figma to React: What Is the Difference?
A common question is whether to generate Next.js or plain React from a Figma file. The practical difference matters for production apps.
| Feature | Plain React | Next.js |
|---|---|---|
| Routing | React Router (manual setup) | Built-in file-based routing |
| SEO | Limited (client-side only) | Full SSR/SSG support |
| Performance | Good | Excellent (automatic optimization) |
| Deployment | Requires configuration | One-click (Vercel, Netlify) |
| Image optimization | Manual | Built-in Next.js Image component |
| API routes | Separate backend needed | Built-in API routes |
| Production readiness | Requires additional setup | Production-ready by default |
For most modern web apps, Next.js is the better choice. It ships with server-side rendering, static generation, built-in routing, and image optimization that plain React requires additional configuration to achieve.
This is why Rocket generates Next.js for web apps by default, as explained in why Rocket generates Next.js and Flutter for production output.
The Future of Figma to Next.js Conversion
The Figma-to-Next.js workflow is evolving rapidly. Several trends are shaping where this space is heading.
AI agents will understand context, not just appearance. The next generation of tools will infer data models from UI patterns and generate complete application logic alongside the UI. Two-way sync between Figma and Next.js codebases will become standard.
Teams that adopt these tools now will have a significant speed advantage over those still rebuilding designs manually. The gap between design completion and production deployment will continue to shrink as AI models improve.
For a deeper look at how production-grade code generation works, the guide on how Rocket builds production-grade apps covers what production-ready actually means in practice.
Why Rocket Is the Right Tool for Figma to Next.js
Rocket produces a complete, production-ready application, not just code snippets. Other tools stop at the front end. They give you React components that still need to be wired to a backend, configured for routing, and deployed manually.
Rocket gives you a running Next.js app with responsive Tailwind CSS layouts, reusable React components from your Figma component library, built-in Supabase integration, Stripe for payments, and one-click deployment. 1.5 million people have tried Rocket across 180 countries.
The Figma import documentation covers every detail of the import pipeline, from OAuth setup to frame selection and output configuration. Teams building with Figma-to-code workflows consistently find that Rocket is the only option that covers the full stack from a single import.
From Figma to Next.js: The Workflow That Scales
The Figma-to-Next.js workflow has matured from a manual, error-prone process into an AI-powered pipeline any team can use. Whether you are a solo founder building an MVP, an agency delivering client work, or a product team validating new features, the tools available today make it possible to go from a Figma file to a deployed Next.js app faster than ever.
The key is choosing the right tool for your output. If you need front-end code snippets, plugins like Locofy or Anima work well. If you need a complete, production-ready Next.js application with backend logic, authentication, and deployment, Rocket covers the full stack from a single Figma import.
You type the problem. Rocket researches it, builds from it, and deploys it. Start building for free on Rocket.new and go from Figma file to deployed Next.js app in hours, not weeks.
Table of contents
- -What "Figma to Next.js" Actually Means
- -The Traditional Figma to Next.js Workflow (and Why It Fails)
- -Figma to Next.js: Four Methods Compared
- -How AI Converts Figma to Next.js: The Technical Pipeline
- -Step-by-Step: Convert Figma to Next.js with Rocket
- -Step 1: Prepare Your Figma File
- -Step 2: Connect Your Figma Account to Rocket
- -Step 3: Import Your Figma Design
- -Step 4: What Rocket Generates from Your Figma File
- -Step 5: Extend, Integrate, and Deploy
- -Figma to Next.js: Tool Comparison
- -Figma to Next.js: Real-World Use Cases
- -Use Case 1: SaaS Dashboard MVP
- -Use Case 2: Agency Client Delivery
- -Use Case 3: Product Manager Prototyping
- -Common Figma to Next.js Mistakes and How to Avoid Them
- -Using Fixed Frames Instead of Auto Layout
- -Unnamed or Poorly Organized Layers
- -Importing All Screens at Once Without Reviewing
- -Skipping the Design System
- -How to Prepare a Figma File for Next.js Conversion
- -Figma to Next.js vs. Figma to React: What Is the Difference?
- -The Future of Figma to Next.js Conversion
- -Why Rocket Is the Right Tool for Figma to Next.js
- -From Figma to Next.js: The Workflow That Scales