
Twenty sequenced prompts across five phases to build a Stripe-connected payment dashboard, from API key setup and role-based auth to fraud tracking, chargeback monitoring, and exportable revenue reports. No coding required.
This guide covers prompt patterns for building payment dashboard UIs. It is not financial or PCI-compliance advice. Always review Rocket.new's security checklist before launching any app - especially those that handle user data, payments, or sensitive information.
What Is a Payment Gateway Dashboard?
A payment gateway dashboard is an admin interface that gives founders, operators, and finance teams a single view of all payment activity, including transaction history, payout schedules, failed charges, dispute status, and revenue trends, connected to a payment processor like Stripe or Razorpay. Marketplaces, subscription SaaS products, and e-commerce businesses use them to replace manual Stripe Dashboard browsing with a purpose-built operations tool.
Jump to a Phase
| Phase | What You Build | Prompts |
|---|---|---|
| Phase 1: Foundation | Stripe connection, auth, revenue ticker | 1 to 4 |
| Phase 2: Transactions | Data table, detail view, CSV export | 5 to 8 |
| Phase 3: Payouts | Schedule, balances, bank accounts | 9 to 12 |
| Phase 4: Fraud and Disputes | Dispute tracker, fraud alerts, chargeback rate | 13 to 16 |
| Phase 5: Reporting | Revenue charts, method breakdown, retry log | 17 to 20 |
Why Payment Dashboards Need a Build-Order Strategy
How much revenue are you losing because your payment dashboard does not exist yet? According to GitHub's 2024 developer survey, 97% of developers now use AI coding tools at work, but most stop after a single Stripe checkout prompt.
The gap between "accept payments" and "manage payments" is where founders lose visibility into refunds, disputes, and failed charges. This post gives you twenty sequenced prompts that build a complete admin dashboard, from Stripe API key connection to chargeback rate charts, in the order that actually works.
Most tutorials treat a payment gateway dashboard as one prompt. That approach produces a broken admin dashboard with no user authentication, no real data connections, and missing error states.
Build order matters because each layer depends on the previous one. You cannot build a transaction data table without payment processing connected first, and you cannot add a payout tracker without clean transaction history underneath it. A SaaS dashboard that shows payment success rates without handling the failure path is a liability, not a tool.
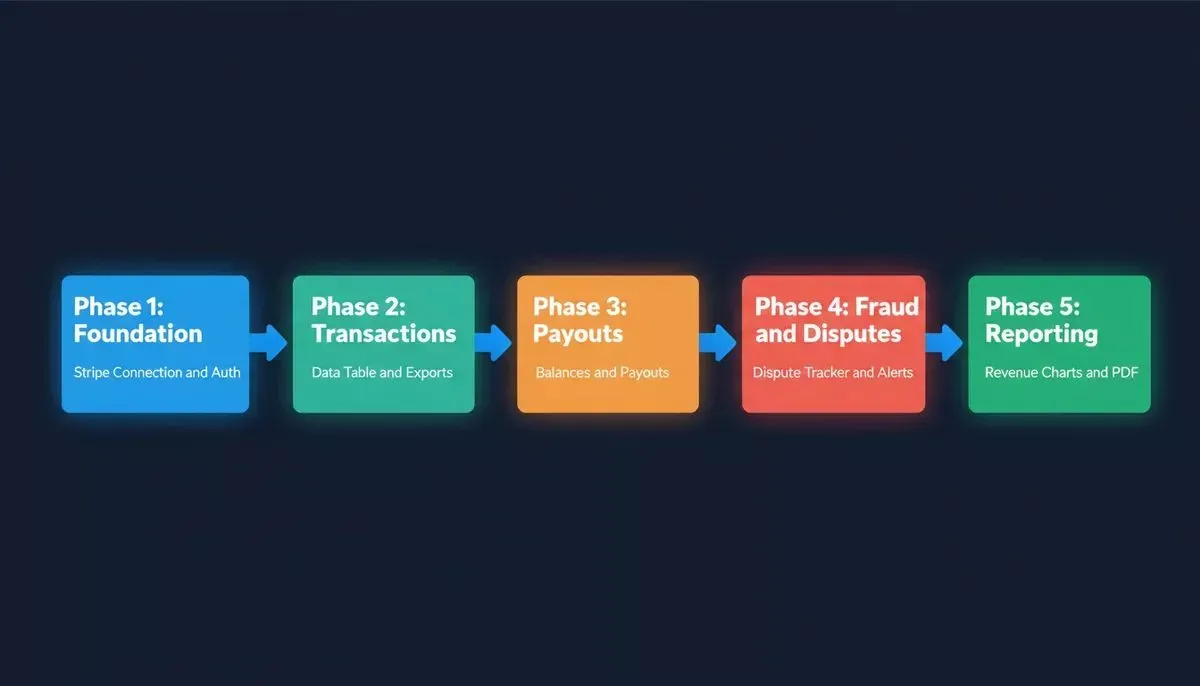
Five phases, twenty prompts. Each layer builds on the one before it.
| Layer | What It Covers | Why It Comes First |
|---|---|---|
| Foundation | Stripe API key connection, role-based permissions, revenue ticker | Nothing works without auth and data sources |
| Transactions | Filterable data table, detail view, CSV export | Core operations dashboard for daily use |
| Payouts | Schedule, balances, bank accounts | Financial operations depend on clean transaction data |
| Fraud and Disputes | Dispute tracker, fraud alerts, chargeback rate monitor | Requires transaction history to flag anomalies |
| Reporting | Revenue charts, method breakdown, retry logs | Analytics dashboard aggregates all prior layers |
The right sequence means each prompt builds on production-ready code from the one before it. Let's walk through all twenty.
Phase One: Foundation Prompts for Auth and Revenue Tracking
These first four prompts create the skeleton of your entire payment gateway dashboard. Get these right, and every later prompt plugs into a working system.
Rocket.new tip: Connect Stripe by pasting your Secret key and Publishable key into the secure connector popup. No OAuth flow required. Rocket.new supports 25+ integrations including Stripe and Razorpay. See the adding payments tutorial for the full walkthrough.
Prompt 1: Stripe API Key Connection and Dashboard Shell
The prompt: "Build a Next.js admin dashboard connected to Stripe using my API keys. Include a left sidebar with navigation, a top header showing the connected Stripe account name, and a main content area that confirms API connection status with a green or red indicator. Use Inter font, dark mode toggle, and responsive design."
What to check: The dashboard shows a real Stripe connection status, not a placeholder. Verify your Secret key and Publishable key are stored as environment variables, not in client-side code. Test that disconnecting and reconnecting the Stripe connector works cleanly.
Why this prompt works: It establishes the shell, navigation, and live Stripe connection in one generation. Everything downstream depends on this working.
Follow-up prompt: "Add a notification bell icon in the top header that shows a count badge for unread alerts. Store notification preferences per user in Supabase."
Prompt 2: Multi-Role User Authentication
The prompt: "Add role-based permissions to the dashboard with three levels: Owner (full access), Admin (everything except billing changes), and Viewer (read-only, no actions). Create a user authentication system with email and password, show the active tab highlighted in the left sidebar, and restrict actions based on role."
What to check: Log in as each role. Confirm that Viewer users cannot trigger any write actions. Verify that role-based permissions persist across sessions.
Why this prompt works: Role-based access is the security foundation every subsequent prompt builds on. Adding it in Prompt 2 means you never have to retrofit it.
Follow-up prompt: "Add an audit logs page that records who performed which action, with customer name, timestamp, and the specific change made. Display in a data table with search bar and date range filter."
Prompt 3: Live Revenue Ticker
The prompt: "Create a hero section at the top of the dashboard with four metric cards showing total revenue today, payment success rate, active subscribers, and failed payments count. Pull real data from the connected Stripe account. Update every thirty seconds without page reload."
What to check: The metric cards display real data, not mock numbers. Confirm the polling interval works. Check the empty state when no payments exist yet.
Why this prompt works: A live revenue ticker is the single most-used element of any payment operations dashboard. It gives every team member an instant read on health.
Follow-up prompt: "Add a date range selector above the metric cards so users can switch between today, this week, this month, and custom ranges. Show the total revenue change as a percentage compared to the previous period."
Prompt 4: Mobile Responsive Shell
The prompt: "Make the entire dashboard mobile responsive. On screens below 768px, collapse the left sidebar into a hamburger menu. Stack the metric cards vertically. Make the data table horizontally scrollable. Keep all interactive elements thumb-friendly."
What to check: Test on three viewport sizes. The responsive design should not break any functionality. Verify the grid layout adapts correctly at each breakpoint.
Why this prompt works: Rocket.new generates production-ready Next.js code. Most apps generate in 1 to 3 minutes, so testing responsiveness immediately after each prompt catches layout issues before they compound.
Follow-up prompt: "Add a clean white background option alongside dark mode. Let users pick their preferred theme from a settings dropdown in the top header."
Ready to build Phase One? Start with Prompt 1 on Rocket.new, and Rocket.new generates the full dashboard shell with Stripe connected.
Phase Two: Transaction Management Prompts That Handle Real Data
With your foundation in place, these prompts create the operations dashboard your team uses daily.
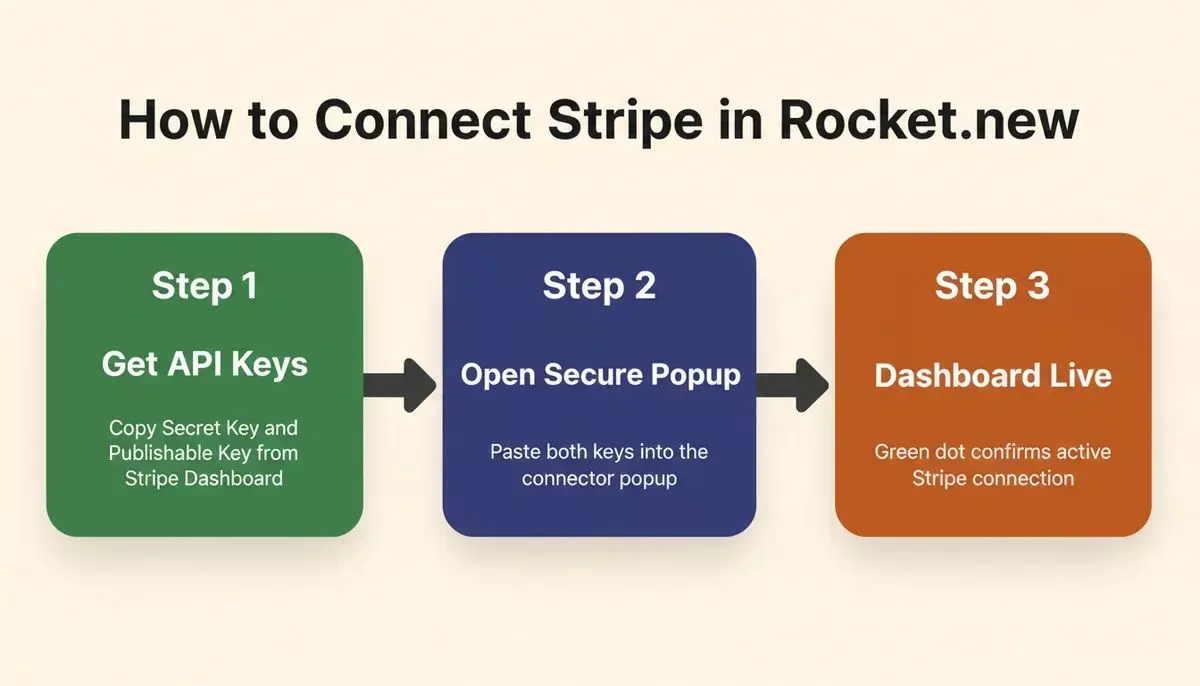
Connecting Stripe in Rocket.new takes three steps: Secret key, Publishable key, and a secure popup
Prompt 5: Filterable Transaction Data Table
The prompt: "Build a transaction data table that pulls real data from Stripe. Include columns for transaction ID, customer name, amount, payment status (succeeded, pending, failed, refunded), payment method, and date. Add a search bar that filters by customer name or transaction ID. Include sortable columns and pagination showing twenty items per page."
What to check: Sort by amount and date. Verify the search bar returns partial matches. Test with more than one hundred records to confirm pagination works.
Why this prompt works: This is the highest-traffic screen in any payment dashboard. A well-structured data table with real Stripe data is the foundation for every action in Phases 3 and 4.
Follow-up prompt: "Add color-coded payment status badges: green for succeeded, yellow for pending, red for failed, blue for refunded. Show a tooltip on hover with the full payment processing details."
Prompt 6: Single Transaction Detail View
The prompt: "When a user clicks any row in the transaction data table, open a detail panel on the right side. Show the full payment timeline: created, processing, succeeded, or failed. Include customer email, shipping address if available, payment method details, and any metadata. Add a one-click copy button for the transaction ID. Include a 'View in Stripe' deep link that opens this transaction directly in the Stripe Dashboard."
What to check: Confirm the detail panel loads real data for the selected transaction. Test that the timeline shows accurate timestamps. Verify the 'View in Stripe' link opens the correct Stripe Dashboard URL.
Why this prompt works: Deep-linking to the Stripe Dashboard for transaction details is the right pattern. It surfaces the data your team needs in your dashboard while directing refund and dispute actions to Stripe where they belong.
Follow-up prompt: "Add a 'Send Receipt' button in the detail panel that triggers a Resend transactional email to the customer. Show a confirmation toast after sending."
Prompt 7: Refund Status Tracker
The prompt: "Add a refund status tracker to the transaction detail panel. Show whether a refund has been initiated for this transaction, the refund amount, the reason, and the current status (pending, succeeded, failed) pulled from Stripe. Include an 'Initiate Refund in Stripe' button that deep-links directly to this transaction in the Stripe Dashboard so the operator can process the refund there. Log a note in the audit logs when the deep-link is clicked."
Important: Rocket.new's Stripe connector reads payment data and handles checkout, subscriptions, and webhooks. Refund processing happens directly in the Stripe Dashboard. This prompt builds a read-only refund status view with a direct link to take action in Stripe. This is the correct pattern per Rocket.new's Stripe connector docs.
What to check: Confirm refund status pulls accurately from Stripe. Verify the deep-link opens the correct Stripe transaction. Check that the audit log entry records the timestamp and user.
Why this prompt works: Showing refund status in your dashboard gives operators instant visibility without duplicating Stripe's refund management UI.
Follow-up prompt: "Add role-based permissions so only Owner and Admin users see the 'Initiate Refund in Stripe' button. Show a disabled state with a tooltip for Viewer users explaining they lack permission."
Prompt 8: CSV Export for Transactions
The prompt: "Add an 'Export' button above the transaction data table that downloads a CSV file of all currently filtered transactions. Include all visible columns plus any applied date range or payment status filter. Show a loading indicator during export. Name the file with the current date range."
What to check: Export with a filter active and confirm only filtered rows appear. Open the CSV in a spreadsheet and verify column headers match. Test with large data sets.
Why this prompt works: CSV export is the most-requested feature in payment dashboards for finance teams. It bridges your dashboard to accounting tools like QuickBooks or Xero.
Follow-up prompt: "Add scheduled export: let users set a weekly email delivery of their transaction summary as CSV. Store the preference in user settings."
Phase Three: How Do Payout and Balance Prompts Work?
These four prompts give founders visibility into when money actually reaches their bank account. The Stripe dashboard clone guide covers layout patterns, but these prompts focus specifically on the payout logic.
For subscription SaaS founders specifically, payout visibility is critical. Delayed payouts and pending balance confusion are among the top reasons finance teams miss monthly close deadlines. The SaaS subscription platform guide covers the full billing architecture that these payout prompts connect into.
Prompt 9: Payout Schedule Display
The prompt: "Create a Payouts page accessible from the left sidebar. Show the current payout schedule (daily, weekly, monthly) pulled from Stripe. Display the next scheduled payout date and estimated amount. Include a 'Manage Payout Schedule in Stripe' link that deep-links to the Stripe Dashboard payout settings. Include an empty state for new accounts with no payout history."
What to check: The schedule reflects your real Stripe settings. The empty state shows a helpful message rather than a blank page. The deep-link opens the correct Stripe settings page.
Why this prompt works: Displaying payout schedule data from Stripe gives operators a single-pane view, while directing schedule changes to Stripe ensures accuracy and compliance.
Follow-up prompt: "Add a minimum payout threshold display. If the available balance is below the threshold, show a notice explaining why the payout was skipped."
Prompt 10: Available vs Pending Balance Display
The prompt: "Add a balance section showing two key metrics: available balance (ready to pay out) and pending balance (payment processing still in transit). Show the breakdown by currency if the account handles multiple currencies. Include a tooltip explaining the difference between available and pending for users who are new to payment processing."
What to check: Verify balances match your Stripe Dashboard. Test with multiple currencies. Confirm the tooltip appears on hover and is readable.
Why this prompt works: Available vs pending is the most common source of founder confusion around payouts. A clear visual with a tooltip reduces support tickets.
Follow-up prompt: "Add a historical balance chart below the numbers showing the past thirty days of available balance as a line chart with the date range on the x-axis."
Prompt 11: Bank Account Display
The prompt: "Build a bank account display section within Payouts. Show connected bank accounts with the last four digits, bank name, and default status pulled from Stripe. Include a 'Manage Bank Accounts in Stripe' button that deep-links to the Stripe Dashboard bank account settings. Show verification status and connection date for each account. Include appropriate error states for failed verifications."
What to check: Bank account data matches what appears in your Stripe Dashboard. The deep-link opens the correct Stripe settings page. Error states show clear messages when verification has failed.
Why this prompt works: Displaying bank account status in your dashboard gives operators instant visibility. Directing add and remove actions to Stripe keeps sensitive financial operations in the right system.
Follow-up prompt: "Add a banner alert when the default bank account has a pending verification, so operators know to complete it before the next payout."
Prompt 12: Transfer History Log
The prompt: "Add a transfer history data table below the bank accounts. Show columns: date, amount, destination bank (last four digits), and status (paid, in transit, failed). Include date range filtering and a search bar. Show a badge count of failed transfers that need attention. Include a 'View in Stripe' link per row."
What to check: Dates and amounts match Stripe records. Filter by failed status to see only problematic transfers. The badge count updates when new failures occur.
Why this prompt works: A transfer history log with direct Stripe links gives finance teams the audit trail they need without leaving your dashboard.
Follow-up prompt: "For failed transfers, add a 'View Failure Details in Stripe' button that deep-links to the specific failed payout in the Stripe Dashboard."
Phase Four: What Should Fraud and Dispute Prompts Include?
Global payments revenue reached $2.5 trillion in 2024 across 3.6 trillion transactions, according to McKinsey. With that volume, even a small fraud rate means millions in losses. These prompts build your monitoring and tracking layer.
Important: Dispute evidence submission and dispute management happen in the Stripe Dashboard. The prompts below build a read-only dispute tracker with status monitoring and direct Stripe links. This is the correct architecture per Rocket.new's Stripe connector docs.
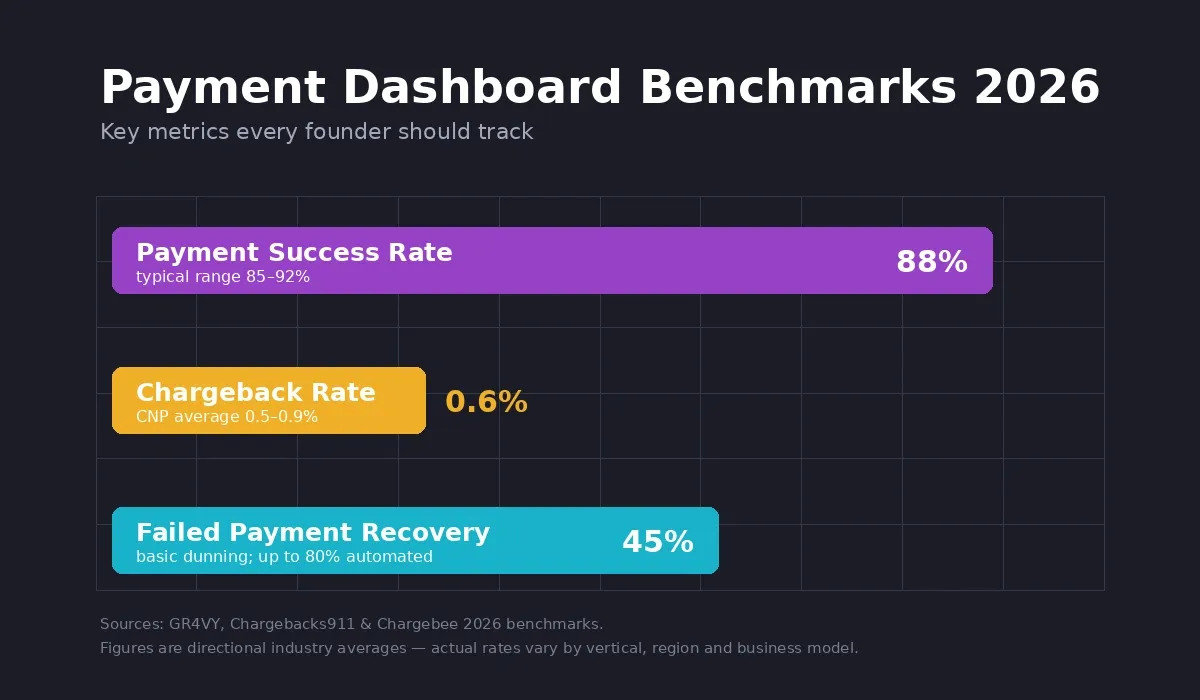
Key payment dashboard benchmarks every founder should track before building the monitoring layer
Prompt 13: Dispute Status Tracker
The prompt: "Create a Disputes page with an inbox-style layout. Show open disputes pulled from Stripe with customer name, amount, reason category, deadline for response, and current status (needs response, under review, won, lost). Clicking a dispute opens a detail view with the full timeline and a 'Respond in Stripe' button that deep-links directly to this dispute in the Stripe Dashboard. Show a badge count of disputes needing response."
What to check: Dispute data pulls accurately from Stripe. The 'Respond in Stripe' deep-link opens the correct dispute in the Stripe Dashboard. Deadline dates trigger a notification bell alert when approaching.
Why this prompt works: A dispute tracker with deadline visibility and direct Stripe links is the highest-value fraud monitoring feature. Operators see everything in one place and act in the right system.
Follow-up prompt: "Add a dispute summary card at the top of the page showing total open disputes, total disputed amount, and average response time."
Prompt 14: Fraud Alert Thresholds
The prompt: "Add a Settings section for fraud alerts. Let users configure thresholds: flag transactions above a custom amount, alert on more than three failed attempts from the same card in one hour, and notify when a single customer makes purchases from multiple countries within an hour. Show alerts in the notification bell with a red badge count. Each alert should include a 'View in Stripe' link to the relevant transaction."
What to check: Trigger each threshold condition manually. Confirm alerts appear in real time. Verify alert dismissal works and the badge count decreases.
Why this prompt works: Configurable fraud thresholds with direct Stripe links give operators actionable alerts without requiring custom fraud infrastructure.
Follow-up prompt: "Add a fraud score display (0 to 100) to each transaction row in the data table. Highlight rows above 70 with a subtle red background. Pull the score from Stripe Radar."
Prompt 15: Chargeback Rate Dashboard
The prompt: "Build a chargeback rate analytics dashboard showing: current chargeback rate as a percentage, trend over the past six months as a line chart, breakdown by reason code as a donut chart, and a list of recent chargebacks with 'View in Stripe' links. Highlight when the rate approaches 1% (the threshold where payment processors flag your account). Use a clean white background with clear data labels."
What to check: Math is correct: chargebacks divided by total transactions. The 1% warning line appears on the trend chart. Reason code breakdown totals match the overall count.
Why this prompt works: Chargeback rate visibility is critical for marketplace and SaaS founders. A rate above 1% can trigger Stripe account review, and early warning prevents that.
Follow-up prompt: "Add a comparison view: this month vs last month chargeback rate side by side. Include a forecast line showing projected rate based on current trend."
Prompt 16: Dispute Response Preparation Assistant
The prompt: "Add a 'Prepare Response' panel for each open dispute. When opened, it pulls the relevant transaction data, customer email, order details, and shipping address from your Supabase database and formats them into a checklist of evidence items to gather before responding in Stripe. Include a notes field and a 'Mark as Ready' status. Log the preparation activity in audit logs."
What to check: The panel pulls the correct transaction and customer data. The evidence checklist matches the dispute reason category. Audit logs record the preparation activity.
Why this prompt works: Preparing evidence in your dashboard before switching to Stripe to submit it is the right workflow. It keeps your team organized without overstating what the connector can do natively.
Follow-up prompt: "Add win rate tracking per dispute reason category. Show which evidence types correlate with the highest reversal rates based on historical dispute outcomes."
Phase Five: Reporting Prompts That Turn Numbers Into Decisions
Your full-stack app prompt strategy should always end with reporting. These four prompts transform raw transaction data into actionable insights for growing businesses.
Revenue reporting is where payment dashboards earn their keep. The difference between a dashboard that gets checked once and one that drives weekly decisions is almost always the quality of the reporting layer.
Prompt 17: Revenue by Period Chart
The prompt: "Create a Reports page with a revenue chart showing gross revenue, net revenue (after refunds and fees), and total refunds as separate lines. Default to monthly view with toggles for weekly and daily. Include a date range picker for custom periods. Show total revenue summary numbers above the chart. Pull real data from Stripe payments."
What to check: Toggle between views and confirm data aggregates correctly. Custom date range shows accurate totals. Net revenue equals gross minus refunds minus fees.
Why this prompt works: A revenue chart with gross vs net breakdown is the single most-shared report in any payment dashboard. Investors and board members ask for this first.
Follow-up prompt: "Add revenue goal tracking. Let users set a monthly target. Show progress as a horizontal bar below the chart with percentage complete."
Prompt 18: Payment Method Breakdown
The prompt: "Add a payment method breakdown card showing what percentage of revenue comes from credit cards, debit cards, bank transfers, and digital wallets. Display as a horizontal stacked bar chart with hover tooltips showing exact amounts. Include a data table below with the numbers for users who prefer text over visuals."
What to check: Percentages sum to 100%. Hover tooltips show correct dollar amounts. The data table matches the visual exactly. Test with an e-commerce platform that accepts multiple methods.
Why this prompt works: Payment method breakdown informs pricing and checkout optimization. Knowing that 60% of revenue comes from digital wallets, for example, justifies prioritizing Apple Pay.
Follow-up prompt: "Add trend arrows showing whether each method's share is growing or shrinking compared to last month. Highlight the fastest-growing method."
Prompt 19: Failed Payment Retry Log
The prompt: "Build a failed payment retry log showing: original attempt date, customer name, amount, failure reason (insufficient funds, expired card, bank decline), retry attempts count, and current status. Include filters for failure reason and date range. Show a summary card at the top with total failed amount this month and recovery rate. Include a 'View in Stripe' link per row."
What to check: Failure reasons match Stripe's decline codes. Summary card math is correct: recovered amount divided by total failed. The 'View in Stripe' link opens the correct charge.
Why this prompt works: Failed payment visibility with Stripe links gives your team the data to prioritize outreach. Even a 10% recovery rate on failed payments is meaningful revenue at scale.
Follow-up prompt: "Add a 'Send Recovery Email' button per row that triggers a Resend transactional email prompting the customer to update their payment method."
Prompt 20: Exportable Revenue Report
The prompt: "Create a revenue report builder that lets users combine the revenue chart, payment method breakdown, and failed payment summary into a single exportable PDF. Include a date range that applies globally to all sections and company branding (logo upload, accent color). Generate the PDF with a clean layout suitable for sharing with investors or board members."
What to check: The PDF generates without errors. All charts render correctly in static format. Date range filter applies consistently across all sections. Branding appears correctly.
Why this prompt works: An investor-ready PDF export is the final mile of a payment dashboard. It turns operational data into a shareable artifact without manual copy-paste into slide decks.
Follow-up prompt: "Add scheduled reports: weekly summary sent to a list of email addresses. Let users pick which sections to include and set the delivery day."
Security and Compliance for Payment Dashboards
A payment dashboard touches customer financial data, which means security is not optional. Before accepting real payments, run through Rocket.new's security checklist and review the compliance and privacy settings for GDPR, CCPA, and cookie consent.
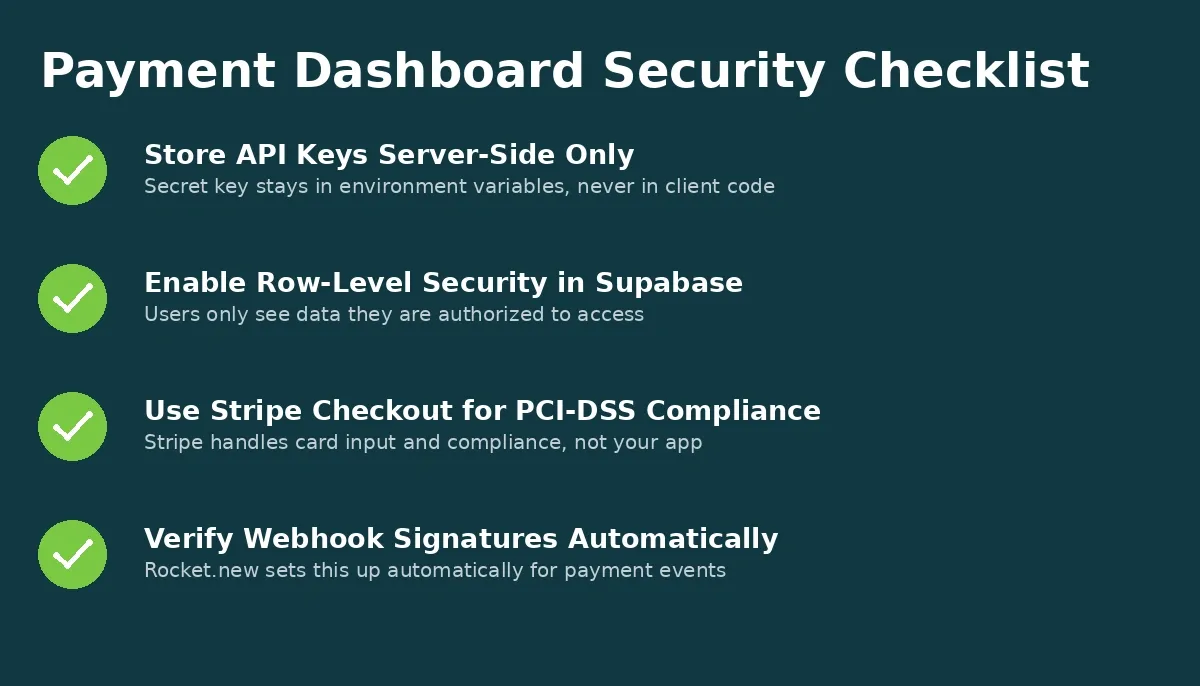
Four security principles every payment dashboard must implement before going live
Store API keys server-side only. Rocket.new stores your Stripe Secret key as an environment variable, never in client-side code. Your Publishable key is safe on the client; your Secret key is not.
Use row-level security in Supabase. If your dashboard stores transaction metadata in Supabase, enable row-level security so users only see data they are authorized to access.
PCI-DSS scope. Rocket.new uses Stripe Checkout, which is a hosted payment page. This keeps your app out of PCI-DSS scope for card data. Stripe handles card input, validation, and compliance.
Webhook signature verification. Rocket.new automatically sets up webhook handlers with signature verification for checkout.session.completed and customer.subscription.updated events.
Where Rocket.new Fits in Your Payment Dashboard Build
Rocket.new is a three-pillar vibe solutioning platform: Solve for research, Build for production-ready apps, and Intelligence for competitor monitoring. For a payment dashboard specifically, all three pillars are relevant.
Before you build, use Solve. Run a Solve research task on "payment dashboard chargeback benchmarks for SaaS" or "Stripe vs Razorpay for marketplace payouts" to validate your architecture decisions before writing a single prompt. Solve delivers structured, evidence-backed reports in minutes.
While you build, use Build. Rocket.new's Build supports 25+ integrations including Stripe (one-time checkout, subscriptions, webhooks) and Razorpay (added April 2026). Connect Stripe by pasting your Secret key and Publishable key into the secure popup. See the SaaS app recipe for the full Supabase + Stripe + Resend stack.
After you launch, use Intelligence. Track how competitors are evolving their payment and pricing pages. Rocket.new Intelligence watches competitor websites, pricing changes, and product updates across nine signal pillars, so you know when a rival adds a new payment method or changes their subscription model before your customers tell you.
For teams building internal tools on top of payment data, the internal tool building guide covers the broader dashboard architecture that payment dashboards sit within. And if you are building for an e-commerce context specifically, the e-commerce app building guide covers the product catalog and checkout flows that feed into this dashboard.
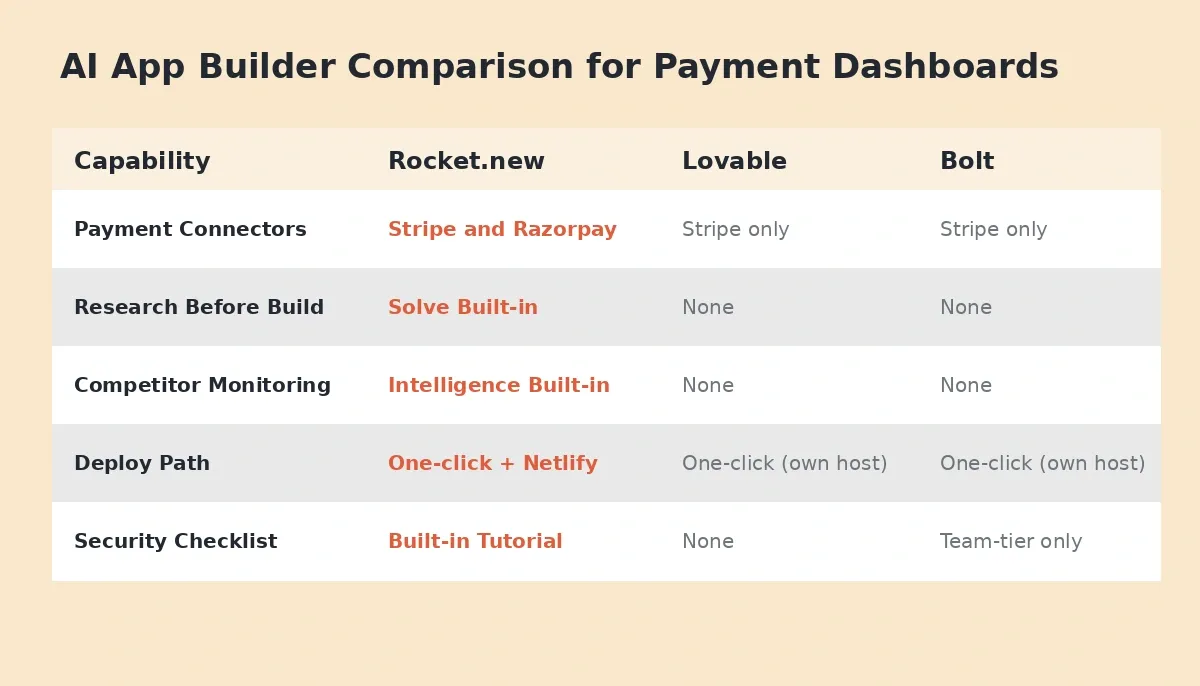
Rocket.new vs Lovable vs Bolt: how the three platforms compare for payment dashboard builds
| Capability | Rocket.new | Lovable | Bolt |
|---|---|---|---|
| Code ownership | Full, download and deploy anywhere | Full | Full |
| Native payment connectors | Stripe and Razorpay (25+ total) | Stripe only | Stripe only |
| Research before building | Solve (built-in) | None | None |
| Competitor monitoring | Intelligence (built-in) | None | None |
| Deploy path | One-click Netlify and custom domain | Manual | Manual |
| Security checklist | Built-in tutorial | None | None |
| Generation time | 1 to 3 minutes per prompt | Varies | Varies |
Your Payment Dashboard Starts With the Right Prompt Sequence
Twenty prompts, five phases, one functional payment gateway dashboard. The sequence matters more than any single prompt because payment processing touches every layer of trust, from user authentication to dispute resolution. Start at Phase One and work forward.
The digital payments market hit $37.45 trillion in transaction value in 2026, according to Statista. Your customers expect a dashboard that matches that scale.
Ready to build your payment command center? Start on Rocket.new with Prompt 1 and have your foundation layer running in under 15 minutes.
Table of contents
- -What Is a Payment Gateway Dashboard?
- -Jump to a Phase
- -Why Payment Dashboards Need a Build-Order Strategy
- -Phase One: Foundation Prompts for Auth and Revenue Tracking
- -Prompt 1: Stripe API Key Connection and Dashboard Shell
- -Prompt 2: Multi-Role User Authentication
- -Prompt 3: Live Revenue Ticker
- -Prompt 4: Mobile Responsive Shell
- -Phase Two: Transaction Management Prompts That Handle Real Data
- -Prompt 5: Filterable Transaction Data Table
- -Prompt 6: Single Transaction Detail View
- -Prompt 7: Refund Status Tracker
- -Prompt 8: CSV Export for Transactions
- -Phase Three: How Do Payout and Balance Prompts Work?
- -Prompt 9: Payout Schedule Display
- -Prompt 10: Available vs Pending Balance Display
- -Prompt 11: Bank Account Display
- -Prompt 12: Transfer History Log
- -Phase Four: What Should Fraud and Dispute Prompts Include?
- -Prompt 13: Dispute Status Tracker
- -Prompt 14: Fraud Alert Thresholds
- -Prompt 15: Chargeback Rate Dashboard
- -Prompt 16: Dispute Response Preparation Assistant
- -Phase Five: Reporting Prompts That Turn Numbers Into Decisions
- -Prompt 17: Revenue by Period Chart
- -Prompt 18: Payment Method Breakdown
- -Prompt 19: Failed Payment Retry Log
- -Prompt 20: Exportable Revenue Report
- -Security and Compliance for Payment Dashboards
- -Where Rocket.new Fits in Your Payment Dashboard Build
- -Your Payment Dashboard Starts With the Right Prompt Sequence