The best AI prompts for onboarding screens are structured instructions that tell the model who the user is, what each screen needs to achieve, and which constraints to follow, so it can generate clear, personalized onboarding copy that reduces churn and shortens time to value.
This guide is for product teams, HR managers, and builders creating onboarding for new users or new hires, and it covers 10 prompt types, copy-ready templates, best practices by industry, key metrics, common mistakes to avoid, and how to build every screen in Rocket without writing code.
AI prompts for onboarding screens work best when they define user context, screen goal, tone, length, and output format up front. For teams building customer or employee onboarding, that matters because generic screens drive drop-off, low engagement, and more support burden, while better prompts help create flows that improve retention and get people to value faster.
This guide walks through the prompt types, use cases, deployment steps, and screen-by-screen templates you can use to ship stronger onboarding flows with less manual copywriting.
How to Choose the Right Onboarding Prompt for Your Onboarding Process
The right onboarding screen prompt is the one that names a single user, a single goal, and a single constraint; everything else is noise.
Most teams skip this step. They ask AI for "a nice onboarding screen" and get a generic welcome message that looks like every other product's welcome message.
The prompts in this guide are structured differently: each one specifies who the screen is for, what action it drives, and what limits the copy. That structure is what separates a screen that retains from one that repels.
Before using any prompt below, understand what each component does:
| Component | What to Include | Example |
|---|---|---|
| User context | Role, seniority, arrival channel | New marketing hire, day one, remote team |
| Screen goal | The single action this screen drives | Schedule the first manager check-in |
| Constraints | Word count, tone, compliance rules | Under 80 words, warm tone, GDPR checkbox |
| Variables | Personalization fields | [employee name], [start date], [manager name] |
| Output format | Heading, body, button labels, skip link | H1 + 3 bullets + primary CTA + skip option |
The more precisely you fill each component, the less the AI has to guess. And when AI guesses at onboarding copy, it defaults to the same patterns every other product uses.
What Are AI Prompts for Onboarding Screens?
AI prompts for onboarding screens are structured natural language instructions that tell an AI builder what screen to generate, for whom, and with what constraints.
Unlike a generic design request, a well-formed onboarding prompt includes the user context, the screen goal, word count limits, tone of voice, and the expected output format. The result is a screen that feels written for one specific person rather than a template pulled from a library.
Onboarding screens cover a wide range of touchpoints. A new hire's first-day welcome screen is an onboarding screen. So is the product tour a SaaS customer sees after signing up, the compliance acknowledgment a healthcare worker must complete, and the progress tracker that shows a new employee how far along they are in their first week. Each requires a different prompt structure, a different tone, and a different set of variables.
Why Onboarding Screens Fail Without the Right Prompts
Generic prompts produce generic screens. Generic screens produce churn.
Why do 77% of users abandon an app within three days of downloading it? Only 8.4% of users completed the onboarding process within 30 days during Q2 2025. That gap between downloading and actually getting value is where most product teams and HR managers lose their audience.
The failure is rarely a design problem. It is a specificity problem.
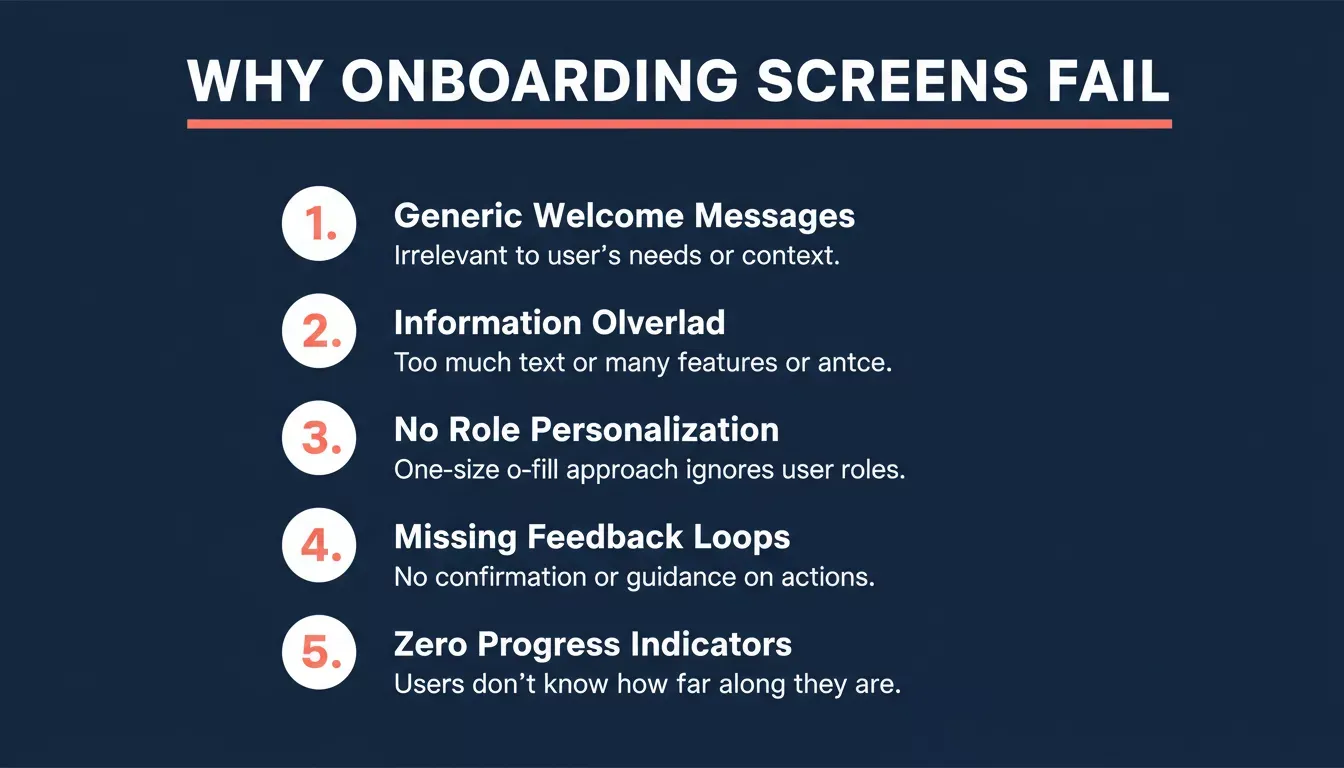
Five root causes of onboarding screen failure, each of which is fixed by a more specific prompt
Here is what breaks down when teams skip prompt-driven onboarding design:
| Failure Mode | Root Cause | Prompt Fix |
|---|---|---|
| Generic welcome messages | No user context in the prompt | Add role, department, and arrival channel |
| Information overload on screen one | No constraint on scope | Add word count limit and single-goal rule |
| No role-based personalization | One prompt for all user types | Write one prompt per role type |
| Missing feedback loops | No feedback screen in the flow | Add Prompt 6 (feedback survey) |
| Zero progress indicators | No progress component requested | Specify the progress bar in the output format |
Personalized onboarding increases user retention by 40% compared to generic flows. The prompt is where that personalization begins. Teams that use vibe coding for product managers are already applying this thinking to every screen they ship.
Types of Onboarding Screens You Can Build With AI Prompts
Onboarding is not a single screen. It is a system of ten distinct screen types, each with a different goal.
Before diving into individual prompts, here is a map of every screen type this guide covers:
| Screen Type | Primary Goal | Best For |
|---|---|---|
| Welcome screen | First impression, orient the user | New hires, new customers |
| Progress tracker | Show completion status, reduce drop-off | All onboarding users |
| Product tour | Demonstrate core value fast | SaaS customers, trial users |
| Role-based flow | Personalize the path by job function | New employees |
| Compliance screen | Acknowledge policies, reduce legal risk | Enterprise, healthcare, fintech |
| Feedback survey | Gather experience data, improve the flow | End of onboarding |
| Manager follow-up | Trigger check-ins, sustain engagement | HR teams, managers |
| Resource hub | Deliver role-specific tools and docs | New hires |
| Re-engagement screen | Bring back users who dropped off | Customers, employees |
| Training scheduler | Book required sessions automatically | New hires |
Prompt-to-metric loop: write, deploy, measure, and refine until retention targets are met
The Best AI Prompts for Onboarding Screens
Prompt 1: Welcome Screen Prompt
Generate a warm, role-aware first screen that orients a new hire or customer the moment they arrive.
A welcome screen is the first thing a user sees after joining. It sets the emotional tone for everything that follows. A generic "Welcome aboard!" message signals that the product does not know who the user is. A prompt-generated welcome screen that uses their name, department, and manager's name signals the opposite.
Example prompt:
"Create a welcome onboarding screen for [new hire name] joining the [department] team on [start date]. Include a greeting from their manager [manager name], three priority actions to complete today, and a progress bar showing step 1 of 5. Tone: warm, direct, under 60 words for body text. Output: H1 heading, body paragraph, three bullet actions, one primary CTA button labeled 'Start Now'."
What this generates:
-
A personalized H1 greeting using the hire's name and department
-
Three actionable first-day tasks specific to their role
-
A progress bar component showing position in the overall flow
-
A primary CTA that advances to the next screen
How it is used: This screen fires immediately after account creation or system login. It replaces the generic welcome email with an interactive screen that tells the new hire exactly what to do next. HR teams use this to reduce day-one confusion and cut the volume of "what should I do first?" messages to managers.
Prompt 2: Progress Tracker Screen Prompt
Show users exactly how far along they are in the onboarding process to prevent drop-off at every step.
Progress indicators are one of the most consistently effective retention tools in onboarding design. When users can see what they have already completed, they are more likely to finish. When they cannot, every incomplete step feels like the beginning.
Example prompt:
"Generate a dashboard screen showing onboarding progress for a new employee in their first week. Display completed setup steps with green checkmarks, pending items including security training and HR system access, and a personalized tip based on their role. Include a 'Schedule check-in with manager' CTA. Show a percentage completion bar. Under 90 words total. Output: progress bar, completed list, pending list, tip block, one CTA."
What this generates:
-
A visual progress bar with percentage complete
-
A completed steps list with status indicators
-
A pending items list with direct action links
-
A contextual tip block personalized to the user's role
-
A manager check-in scheduling CTA
How it is used: Product teams embed this screen as a persistent dashboard element that users return to throughout their first week. It reduces support tickets by showing users exactly what is left to complete and in what order, and AI onboarding is linked to a 30% faster path to productivity.
Teams also use this progress view to define success around visible milestones, which can increase new hire productivity by 30% by keeping tasks clear and sequenced. Prompts that include progress bars and milestone celebrations consistently lift completion rates.
Prompts 1 and 2 work best as a pair. The welcome screen sets direction; the progress tracker sustains it. Build your first two screens on Rocket; welcome and progress tracker work best together.
Prompt 3: Product Tour Screen Prompt
Guide new SaaS customers to their first meaningful action within the first session of using the product.
A product tour is not a feature list. It is a guided path to the moment a user realizes the product is worth their time, and it should showcase core product capabilities early. The prompt below generates a focused three-screen sequence rather than a sprawling feature dump.
Example prompt:
"Write onboarding screen copy for new users seeing the app dashboard for the first time. Highlight three product features most relevant to [user segment: marketing teams]. Keep copy under 40 words per screen. Each screen should have one feature name as the H2, a two-sentence explanation, one action button, and a 'Skip tour' link. Generate screens for features: data import, report builder, and team sharing."
What this generates:
-
Three sequential tour screens, one per feature
-
Feature-specific H2 headings with short explanations
-
Action buttons that trigger the feature directly
-
A skip link on every screen respects user autonomy
How it is used: SaaS teams use product tour screens to reduce time-to-first-value. The flow should make it easy for users to see what to expect before they begin the next step. Rather than showing every feature at once, this prompt generates a focused sequence that shows the user the one thing most likely to make them stay.
Teams that segment tour prompts by user type see higher activation rates than those using a single generic tour. For deeper guidance on structuring these prompts, see prompt engineering best practices for accurate AI results.
Prompt 4: Role-Based Onboarding Flow Prompt
Create entirely different onboarding paths for different job functions without writing each screen from scratch.
The onboarding process for new hires fails most often when it ignores the difference between a senior engineer and a junior sales rep. Role-based prompts let HR teams create specific onboarding paths that match each hire's background, role, and learning style while reflecting the company and its specific needs.
Example prompt:
"Generate a first-day onboarding screen for a new hire in [sales / engineering / marketing]. Include role-specific resources as a three-item list, a welcome message from their direct manager, links to the two current projects they will join, and key milestones for their first 30 days. Adapt tone and complexity to match their seniority level: [junior / senior]. Under 120 words. Output: H1, welcome paragraph, resource list, milestone list, one CTA."
What this generates:
-
A role-specific welcome screen with department-appropriate language
-
A curated resource list relevant to the hire's function
-
A 30-day milestone roadmap scoped to their seniority
-
A manager welcome message placeholder with variable fields
How it is used: HR teams run this prompt once per role type and store the outputs as reusable templates. Role-based flows can also include tracks for sales reps alongside engineering and marketing. A junior sales rep sees a different screen from a senior engineer from the moment they log in.
A stronger onboarding strategy also helps reinforce company values and company culture from the first login. Teams report fewer support tickets and higher satisfaction levels in the first month when role-based flows are active.
This is the same principle behind how to build HR onboarding software in minutes.
Prompt 5: Compliance Acknowledgment Screen Prompt
Generate clear, plain-language compliance screens that employees actually read and acknowledge without friction.
Compliance screens are mandatory in enterprise, healthcare, and fintech onboarding flows. The problem most teams face is that walls of legal text cause users to click through without reading. This prompt generates a screen that summarizes the policy in plain language first, then links to the full document.
Important for compliance use cases: If you are building a screen that will collect real employee PII or compliance acknowledgments, review Rocket's task visibility settings before deploying. Free-plan tasks are public by default. For sensitive HR or compliance data, use a paid plan and set task visibility to private.
Example prompt:
"Generate an onboarding compliance screen for new hires that explains data security and acceptable use policies in plain language. Under 100 words. Include a checkbox labeled 'I have read and understood this policy', a link to the full policy document, and a support contact for questions. Tone: professional but approachable. Output: H2 heading, two-paragraph summary, checkbox component, policy link, support contact line."
What this generates:
-
A plain-language policy summary in two short paragraphs
-
An acknowledgment checkbox component
-
A link to the full policy document
-
A support contact line for questions
How it is used: Legal teams review the AI output; the prompt handles the plain-language translation. This dramatically improves genuine acknowledgment rates compared to presenting the full legal document directly. Always have a legal review compliance screen copy before deployment.
Building a compliance screen? Start on a paid plan to keep employee data private.
Prompt 6: Feedback Collection Screen Prompt
Capture structured experience data at the end of onboarding to support continuous improvement in every future flow.
Feedback screens are the most underused screen type in onboarding design. Most teams skip them because they assume users will not fill them out. The prompt below generates a low-friction survey that takes under two minutes to complete and produces both quantitative and qualitative data.
Example prompt:
"Create an end-of-week onboarding survey screen asking new employees three questions about their onboarding experience. Question 1: clarity of setup instructions (1-5 rating scale). Question 2: quality of manager support (1-5 rating scale). Question 3: satisfaction with resources provided (1-5 rating scale). Add one open free-text field labeled 'What could we improve?' Submit button labeled 'Send feedback'. Under 80 words total. Output: H2 heading, three rating components, one text field, one submit button."
What this generates:
-
Three structured rating questions with 1-5 scale components
-
One open-text field for qualitative feedback
-
A submit button with a clear label
-
A concise, low-friction survey layout
How it is used: Product and HR teams place this screen at the end of the first-week onboarding flow. The structured rating questions produce quantitative data that can be tracked over time. The open-text field surfaces specific friction points that ratings alone would miss. Teams can also use this screen to gather feedback on blockers that appear after the first week.
Prompt 7: Manager Follow-Up Trigger Screen Prompt
Automate the check-in reminders that keep new hires engaged past the first week.
Remote-first companies face a specific onboarding challenge: new hires lack the ambient social cues that in-office employees get naturally. Manager follow-up screens solve this by surfacing the right check-in questions at the right time automatically, reducing manual work and repetitive tasks for managers.
Example prompt:
"Create a manager reminder screen that triggers on day 3, day 7, and day 14 for each new hire. Each screen should include: the hire's name and current onboarding completion percentage, three suggested check-in questions relevant to their role, a link to review their onboarding progress dashboard, and a button to submit feedback on the onboarding experience. Tone: supportive, brief. Under 80 words per trigger. Output: H2, hire status block, question list, two CTA buttons."
What this generates:
-
Three trigger-specific screens with dynamic hire status data
-
Role-relevant suggested check-in questions for each timing
-
A progress dashboard link for the manager
-
A feedback submission button
How it is used: HR teams configure these screens as automated triggers inside the onboarding system. Day-3 screens focus on logistics. Day-7 screens focus on role clarity. Day-14 screens focus on team integration. This prompt generates all three in one pass.
These triggers can handle follow-ups and other routine tasks automatically. This is especially useful for customer success teams running onboarding at scale.
Prompt 8: Training Scheduler Screen Prompt
Help new hires book required training sessions without back-and-forth emails or calendar confusion.
Training no-shows are one of the most common first-week failures in employee onboarding. The root cause is almost always the same: the booking process requires too many steps. This prompt generates a screen that consolidates all required sessions into a single booking interface.
Example prompt:
"Generate a screen that helps new hires schedule their compliance training, security orientation, and department-specific onboarding sessions. Display a progress bar showing completed vs remaining sessions. Include a 'Book now' button for each session and an automated follow-up note if sessions are not booked within 48 hours. Under 100 words. Output: H2, session list with booking buttons, progress bar, reminder note."
What this generates:
-
A session list with individual booking buttons per training
-
A progress bar showing sessions booked vs remaining
-
An automated 48-hour follow-up reminder note
-
A clean layout that makes booking feel like a single step
How it is used: New hires see all required sessions in one place and book directly from the screen. Teams using this screen report a reduction in training no-shows and a faster path to full compliance certification.
Prompts 6, 7, and 8 form a natural check-in system, feedback, manager triggers, and training scheduling all connected.
Turn them into a working flow on Rocket.
Prompt 9: Resource Hub Screen Prompt
Deliver the right documentation, tools, and access guides to each new hire based on their department.
Resource hub screens replace the "here is a Notion doc with everything you need" approach that overwhelms new hires. By grouping resources into clear categories and scoping them to the hire's department, this screen reduces setup time from days to hours while enabling users to find the right resources faster.
Example prompt:
"Create a personalized resource hub screen for a new employee in [department: engineering]. Display links to relevant documentation, HR systems access guides, IT setup instructions, and team communication channel links. Group resources under three headers: 'Get Access', 'Learn the Tools', and 'Meet the Team'. Make sure the hub can integrate access guidance across tools. Under 100 words. Output: three H3 sections, each with three resource links and a brief description."
What this generates:
-
Three grouped resource sections with clear H3 headers
-
Department-specific links for documentation, access, and tools
-
Brief descriptions under each link so users know what they are clicking
How it is used: HR teams run this prompt once per department and update it quarterly. The resource hub answers the most common setup questions before users need to ask them, which has a direct impact on first-week support ticket volume.
This is one reason teams building internal tools with AI prioritize resource delivery screens early in the flow.
Prompt 10: Re-Engagement Screen Prompt
Bring back users who dropped off mid-onboarding before they churn permanently and weaken long-term retention.
The key design principle for re-engagement screens is showing what the user has already accomplished rather than what they have not done. This reframes the return as progress continuation rather than failure recovery.
Example prompt:
"Write a re-engagement onboarding screen for a user who completed 40% of the onboarding flow and has not returned in 3 days. Include a progress summary showing what they have already completed, a single next step with a clear CTA, and a short motivational message under 20 words. Offer a 'Resume where I left off' button and a 'Start over' option. Tone: encouraging, not pushy. Under 70 words total. Output: H2, progress summary, next step block, two CTA buttons."
What this generates:
-
A progress summary showing completed steps
-
A single highlighted next step to reduce decision paralysis
-
A short motivational message that does not feel like a guilt trip
-
Two CTA options respecting the user's choice to resume or restart
How it is used: Product teams trigger this screen via email or push notification when a user has not returned within a defined window. Teams using this prompt see measurable improvement in day-7 and day-30 retention rates. The message should create a sense of progress rather than guilt.
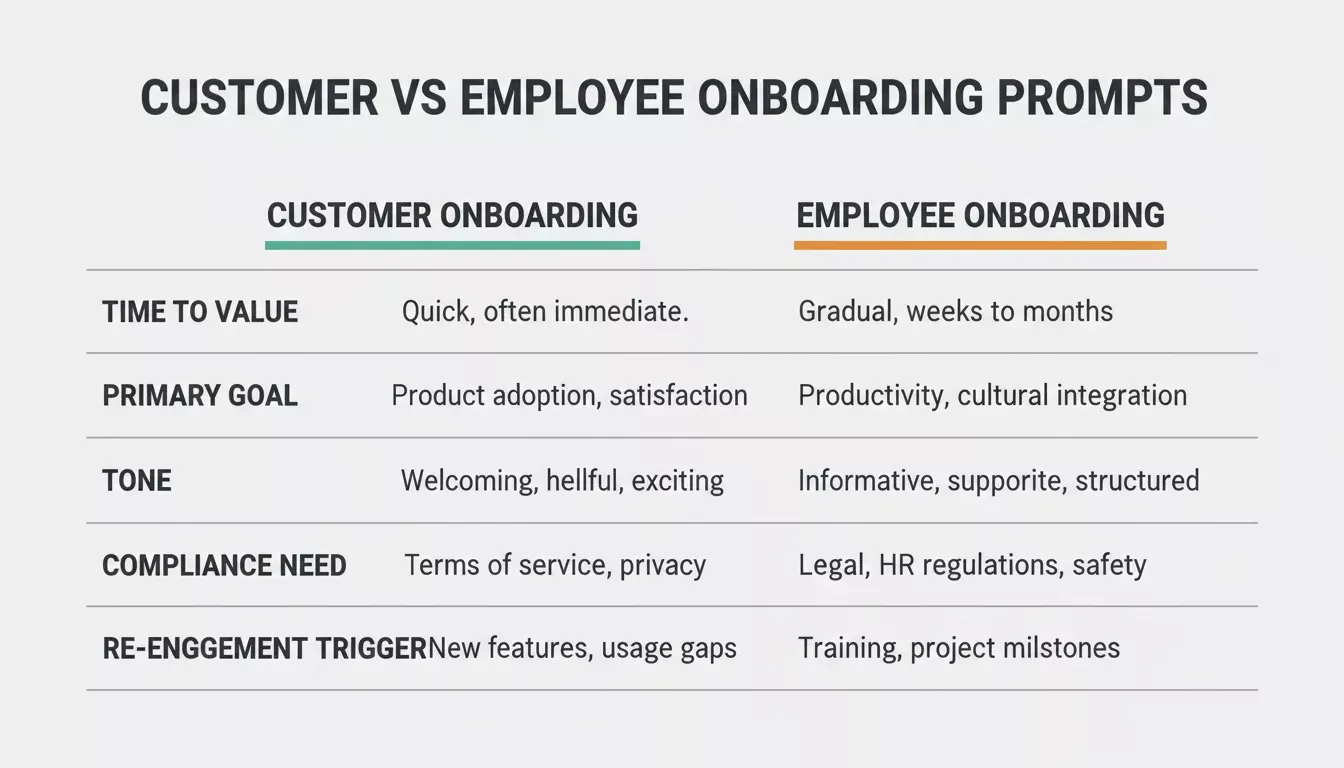
Customer Onboarding vs. Employee Onboarding: Prompt Differences
The goal is the same: to get someone to value fast, but the prompt structure, tone, and timing differ significantly between customer and employee onboarding.
Customer onboarding and employee onboarding require different prompt structures, tones, and timing
| Dimension | Customer Onboarding | Employee Onboarding |
|---|---|---|
| Time to value | Seconds to minutes | Hours to days |
| Primary goal | Activate the product feature | Complete setup and compliance |
| Tone | Energetic, benefit-focused | Warm, supportive, informational |
| Personalization signals | Segment, plan tier, arrival channel | Role, department, seniority, manager |
| Compliance need | Low to medium | High (policies, security, legal) |
| Feedback timing | After the first key action | End of first week |
| Re-engagement trigger | 24-48 hours of inactivity | 3-5 days of incomplete tasks |
| Progress metric | Feature activation rate | Onboarding completion percentage |
When writing prompts for customer onboarding, lead with value. The first screen should answer "What does this do for me right now?" When writing prompts for employee onboarding, lead with clarity. The first screen should answer "What do I need to do today?"
"Onboarding isn't a phase; it's the entire first date. If you're still talking about yourself after 10 minutes, there won't be a second."- Des Traynor, Intercom co-founder (paraphrased from his writing on intercom.com/blog)
Key Metrics Your Onboarding Prompts Should Target
Every prompt you write should connect to a measurable outcome. Without a metric target, you are not measuring onboarding effectiveness or whether screens move the numbers that matter.
Every $1 invested in user experience returns $100, and 52% of customers stop buying after a bad experience. Onboarding is the first and most critical UX investment you make.
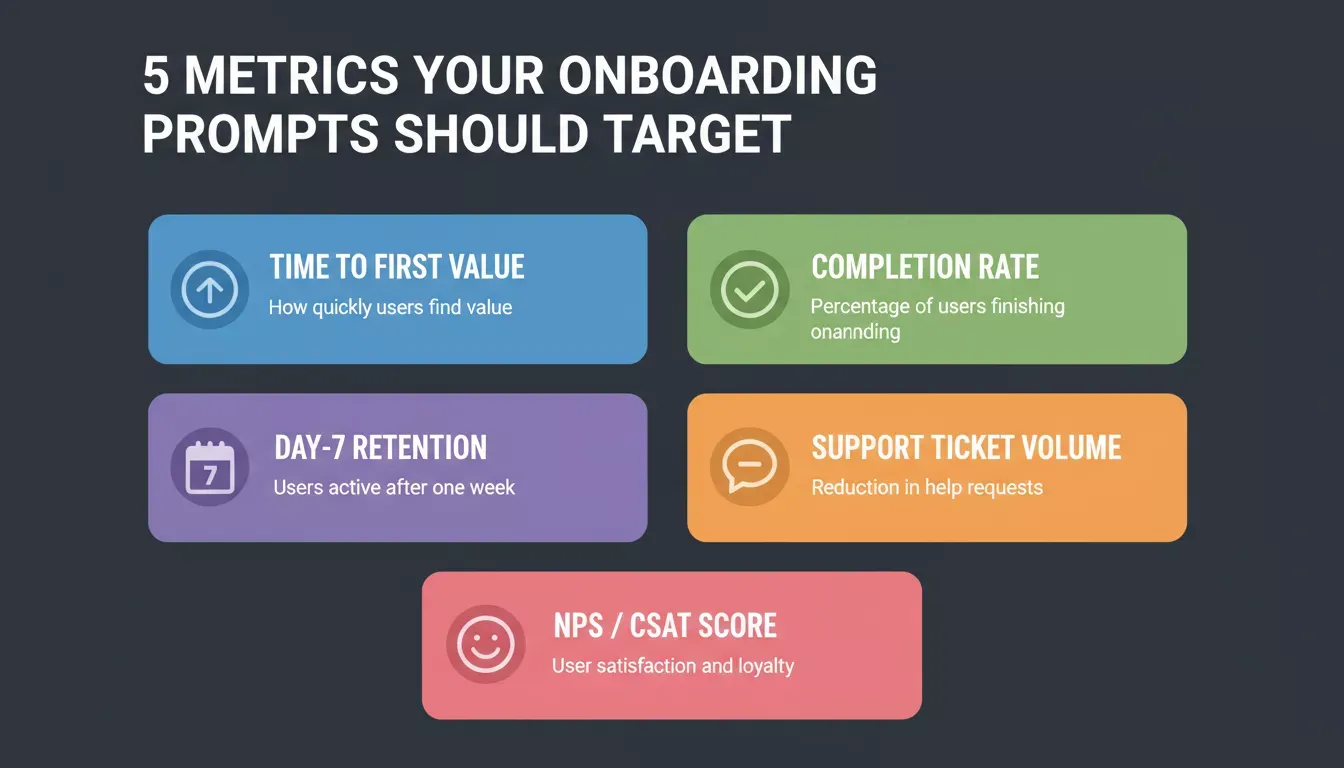
Five metrics every onboarding prompt should be designed to move, connect each screen to one measurable outcome
| Metric | What It Measures | How to Embed in Prompts |
|---|---|---|
| Time to first value | Time from signup to first meaningful action | Include clear CTAs, minimal text, and skip options |
| Completion rate | Percentage of users who finish all steps | Add progress bars, milestone celebrations |
| Day-7 retention | Users who return after one week | Generate personalized follow-up screens |
| Support ticket volume | Questions raised during onboarding | Include contextual help, tooltips, and inline FAQs |
| Satisfaction score (NPS/CSAT) | Perceived quality of the onboarding experience | Add a feedback survey at the end of the flow; define clear targets tied to the onboarding flow |
How to Validate Your Onboarding Flow Before Building It
Before writing a single prompt for a screen, use Rocket's Solve pillar to validate your onboarding assumptions with structured market research.
Rocket is a three-pillar vibe solutioning platform. The article so far has focused on Build, the AI app builder that generates production-ready screens from natural language. But Build is most effective when it is preceded by Solve.
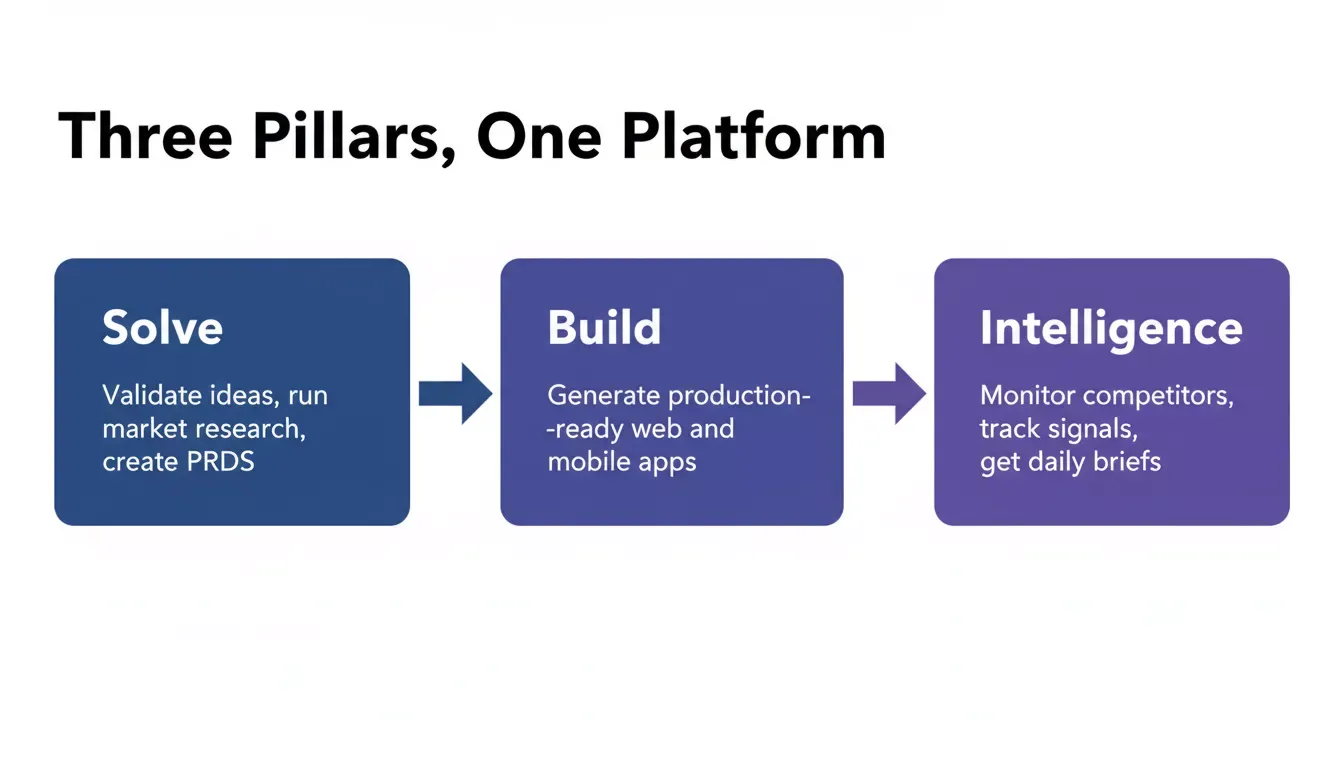
Rocket's three pillars work together: Solve validates assumptions, Build generates screens, and Intelligence monitors competitors
Solve turns complex business questions into structured, evidence-backed reports. Before you build an onboarding flow, you can ask Solve questions like:
-
"What are the most common drop-off points in SaaS onboarding flows for B2B tools?"
-
"What onboarding screen patterns correlate with higher day-7 retention in HR software?"
-
"What compliance requirements apply to employee onboarding screens in healthcare in the EU?"
Solve returns structured reports with data, insights, and actionable recommendations. Those findings then flow directly into your Build tasks, so the onboarding screens you generate are grounded in market research, not guesswork. This is the same workflow described in how to do market research and validate a business idea.
Once your onboarding flow is live, Intelligence monitors competitors' onboarding changes continuously. If a competitor adds a new welcome screen pattern, changes their product tour structure, or updates their compliance flow, Intelligence surfaces that signal to your dashboard automatically.
This is how the three pillars connect in practice for onboarding:
-
Solve: validates your onboarding assumptions before you build
-
Build: generates the screens from your validated prompts
-
Intelligence: monitors competitor onboarding changes after you launch
Best Practices for Writing Onboarding Screen Prompts
The habits below consistently produce better onboarding screens regardless of screen type.
Specify one goal per screen: Prompts that ask for a screen that does multiple things produce screens that do none of them well. Every prompt should name a single action the user takes before moving on.
Always include word count constraints: Without a word count, AI defaults to verbose copy. Onboarding screens have a 50-word ceiling for customer flows and an 80-word ceiling for employee flows. Put the number in the prompt.
Name the variables explicitly: Write [employee name], [department], [manager name] in the prompt rather than describing them generically, especially from the very beginning of the flow when personalization first appears. This forces the output to include placeholder fields that your system can populate dynamically.
Request the output format: Tell the AI whether you want an H1 and three bullets or a two-column layout with a sidebar. Without a format instruction, the AI picks a structure that may not match your design system.
Test with edge cases: Run the same prompt with different role types, seniority levels, and arrival channels. If the output changes meaningfully between runs, the prompt is underspecified. Add more constraints until the output is consistent. Using AI works best when prompts are iterated with real onboarding data and role variations.
Iterate on the constraint layer, not the instruction: If a prompt produces screens that are too long, add a word count. If the tone is wrong, add a tone descriptor. Do not rewrite the entire prompt; adjust one constraint at a time and re-run.
Onboarding Screen Prompts by Industry
Different industries have different compliance requirements, user expectations, and onboarding timelines. Adapt the core prompts above for your vertical.
| Industry | Highest-Value Prompts | Key Adaptation |
|---|---|---|
| SaaS products | Prompts 3 and 10 | Lead with a feature benefit; keep screens under 40 words |
| Healthcare | Prompt 5 | Plain-language summaries; legal review required; log acknowledgment timestamp |
| Fintech | Prompts 5 and 8 | Reference KYC/AML requirements; professional and reassuring tone |
| Enterprise HR | Prompts 4 and 8 | One prompt template per department; run as a batch for all variants |
| E-learning | Prompts 2 and 3 | Completion rate is the primary metric; learners need visible progress |
| Remote-first | Prompt 7 | Automate check-in triggers; remote hires lack ambient social cues |
Common Mistakes in Onboarding Prompt Design
Most onboarding prompt failures come from the same six mistakes.
Asking for too much in one prompt. A single prompt that asks for a welcome screen, a progress tracker, a compliance acknowledgment, and a feedback survey will produce a bloated, unfocused output. Write one prompt per screen type.
Forgetting the skip option. Customers who feel trapped in an onboarding flow abandon it. Every prompt for customer-facing screens should include a skip or "remind me later" option. Compliance screens are the exception; they should not have skip options.
Ignoring mobile constraints. If your onboarding flow runs on mobile, add "optimized for 375px viewport" to every prompt. AI will default to desktop-first layouts unless you specify otherwise. Rocket's Build pillar generates both web and mobile apps from the same prompt, so specifying the target platform matters.
Using the same tone for customers and employees. Customer onboarding should feel like a product demo. Employee onboarding should feel like a supportive colleague. These require different prompt instructions.
Not testing with real variable data. Run every prompt with actual names, departments, and dates before deploying. Placeholder text like "[employee name]" that never gets replaced is one of the most common onboarding screen failures.
Building compliance screens on a free plan. Free-plan tasks in Rocket are public by default. If you are building screens that will handle real employee PII or compliance acknowledgments, use a paid plan and set task visibility to private.
Check Rocket's pricing page for plan options.
How Rocket Turns Onboarding Prompts Into Deployed Screens
Rocket's Build pillar generates production-ready onboarding screens from natural language, using natural language processing to interpret prompt instructions and generate UI, logic, navigation, and 26+ service integrations, all from a single description.
Rocket is a vibe solutioning platform with three pillars:
Solve (research and PRDs), Build (the AI app builder), and Intelligence (competitor monitoring). The prompts in this guide work with Rocket's Build pillar, which generates production-ready Next.js web apps and Flutter mobile apps from natural language descriptions.
When you describe an onboarding flow in Build, Rocket generates the screens, logic, and navigation in one pass while fitting into existing workflows. You can connect 26+ third-party services, including Supabase for databases, Calendly for scheduling, Tally or Typeform for feedback forms, and Twilio for SMS notifications, directly from the Build chat using Rocket's Connectors, with integrations helping automate onboarding across scheduling, messaging, and feedback tools. No separate API setup required.
Build tasks consume credits based on complexity. A simple welcome screen consumes few credits. A full onboarding system with role-based logic, analytics, and integrations consumes more. You can start for free, no credit card required, and paid plans unlock code downloads, private projects, and credit add-ons.
Rocket is different from tools like Bubble or FlutterFlow because it starts from your intent, not a blank canvas. It researches your market context, understands your product type, and generates screens that reflect actual best practices. Other tools give you drag-and-drop components; Rocket gives you a deployed system.
When you need to add a new screen, update compliance copy, or create a variant for a different region, one prompt edit regenerates the relevant screens without breaking your existing flow.
Rocket also treats onboarding screen generation from Figma designs as a full-stack problem, not just a UI task.
Describe your onboarding flow once. Rocket generates every screen, wired and deployed, with no code required.
Table of contents
- -How to Choose the Right Onboarding Prompt for Your Onboarding Process
- -What Are AI Prompts for Onboarding Screens?
- -Why Onboarding Screens Fail Without the Right Prompts
- -Types of Onboarding Screens You Can Build With AI Prompts
- -The Best AI Prompts for Onboarding Screens
- -Prompt 1: Welcome Screen Prompt
- -Prompt 2: Progress Tracker Screen Prompt
- -Prompt 3: Product Tour Screen Prompt
- -Prompt 4: Role-Based Onboarding Flow Prompt
- -Prompt 5: Compliance Acknowledgment Screen Prompt
- -Prompt 6: Feedback Collection Screen Prompt
- -Prompt 7: Manager Follow-Up Trigger Screen Prompt
- -Prompt 8: Training Scheduler Screen Prompt
- -Prompt 9: Resource Hub Screen Prompt
- -Prompt 10: Re-Engagement Screen Prompt
- -Customer Onboarding vs. Employee Onboarding: Prompt Differences
- -Key Metrics Your Onboarding Prompts Should Target
- -How to Validate Your Onboarding Flow Before Building It
- -Best Practices for Writing Onboarding Screen Prompts
- -Onboarding Screen Prompts by Industry
- -Common Mistakes in Onboarding Prompt Design
- -How Rocket Turns Onboarding Prompts Into Deployed Screens