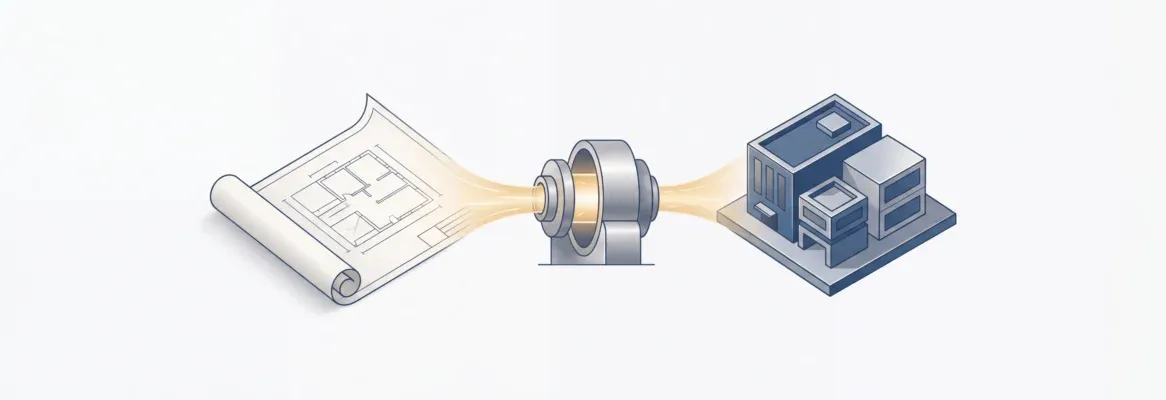
Rocket is a vibe solutioning platform that converts Figma designs, wireframe images, and prompts into production-ready Flutter apps. Upload your design, pick a state management pattern, and Rocket generates clean Dart code. Code download and app store submission require a paid plan and manual steps.
Rocket is a vibe solutioning platform that lets you convert Figma designs, wireframe images, and mockups into production-ready Flutter apps without writing a line of code.
Upload your design, choose your state management pattern, and Rocket generates clean Dart code with native navigation and styled components. This guide covers every input method and the full pipeline from design file to app store submission.
What Ways Can You Start Building a Flutter App in Rocket?
Rocket supports six ways to start a project, giving design-to-code teams multiple entry points depending on what they have available.
Six supported starting points in Rocket: Figma file, screenshot upload, prompt, redesign, template, and GitHub import
-
From a Figma file: paste your Figma frame URL and Rocket imports up to 40 screens, preserving spacing, components, and layout. This is the primary design-to-Flutter path.
-
From an attachment: upload a screenshot, wireframe, mockup, PDF, spreadsheet, or CSV (up to 5 MB per file, up to 5 files at a time), and Rocket builds a working app from your real content.
-
From an idea: describe what you want in plain language, and Rocket generates the UI, logic, and navigation.
-
Redesign: provide a URL, and Rocket transforms an existing website into a new design.
-
From a template: pick a production-ready template and customize it with chat. Zero credits consumed.
-
From GitHub: import an existing repository and continue building with AI.
For teams converting visual designs to Flutter, the Figma import path is the correct route; it is the only starting point that generates Flutter code directly.
The attachment upload path (screenshots, wireframes, PDFs) generates web apps by default. To build a Flutter mobile app from a screenshot, upload it via the attachment path and explicitly instruct Rocket to generate a Flutter mobile app in your prompt.
AI adoption in mobile development has accelerated dramatically, and the reason is clear: manual translation from design to code is one of the biggest bottlenecks in mobile development. Rocket eliminates that bottleneck by making the design file itself the starting point.
Why Is Figma Import the Primary Design-to-Flutter Path?
The gap between a visual mockup and a working Flutter app has always been expensive. Designers think in pixels and flows. Developers think in widget trees and state management. That translation layer costs time, money, and accuracy.
Rocket's Figma connector is the most accurate design-to-code path because it reads the actual design file, preserving exact spacing, component hierarchy, and layer structure, rather than inferring layout from a flattened image. Here is what the Figma-to-Flutter workflow delivers:
-
Import up to 40 screens at a time from a single Figma file or across multiple files
-
Choose your state management pattern: BLoC (complex data flows), GetX (lightweight, fast), Provider (simple and reliable), Riverpod (flexible scaling with dependency injection, which also helps manage dependencies when setting up screenshot automation), or no state management for prototypes
-
Rocket parses your Figma file, optimizes images and layout, and generates clean Flutter code with native navigation
-
After import, compare your Figma design side-by-side with the generated app using the built-in Figma preview panel
-
Iterate with chat: add Supabase auth, connect APIs, add animations, or fix visual mismatches in plain language
Note: Figma import is only available on the web browser at rocket.new. It is not available in the Rocket mobile app.
A developer on Reddit recently shared: "I uploaded a Figma export as a screenshot and got back clean Dart with proper widget composition that Rocket generated. The app bar, navigation, state management, all structured correctly. Saved me three days of setup."
For teams without Figma files, the Flutter app builder AI guide covers how to start from a prompt or image attachment instead.
How Do You Convert a Screenshot or Wireframe Image to Flutter Code?
When you upload a screenshot or wireframe as an attachment, Rocket analyzes the layout, colors, and component patterns from the image. The attachment path supports .png, .jpg, and .jpeg image files up to 5 MB each, with up to 5 files per upload.
Pair your file with a clear prompt, for example: "Build a Flutter mobile app that looks exactly like this screenshot. Match the layout, colors, and components."
In a Flutter app, screenshot capture usually uses either RepaintBoundary or the screenshot package. RepaintBoundary can turn a flutter widget into an image, and a GlobalKey is typically used to target the widget tree being rendered from an image file.
The screenshot package also provides dedicated controllers to capture a specific widget or the whole screen into memory or files. After capture, the output can be saved to the gallery, and pixelRatio controls the image resolution.
Here is how the screenshot to Flutter app workflow compares across tools:
| Tool | Primary Input | Flutter Output | State Management | Store Submission |
|---|---|---|---|---|
| Rocket | Figma, screenshot, image, prompt | Production Flutter + Dart | BLoC, GetX, Provider, Riverpod | Manual via Xcode / Flutter CLI |
| FlutterFlow | Design import | Flutter/Dart | Built-in | Yes (paid plans) |
| Figma Make | Natural language + design | React/web apps | N/A | No (web only) |
| Lovable | Figma URL paste | React + Supabase | N/A | No (web only) |
Rocket's advantage is the breadth of input types, from a raw screenshot to a full Figma file, combined with its research (Solve) and competitive intelligence layers that inform what to build before you build it. According to Figma's 2026 AI builder report, FlutterFlow focuses on generating native mobile apps with pixel-perfect UI from a single prompt.
For a broader look at how Rocket compares to drag-and-drop builders, the FlutterFlow alternatives guide covers the key differences in depth.
What Does the Full Pipeline from Design to App Store Look Like?
The full pipeline from design to app store has more stages than code generation alone. Rocket's three-step process is: Describe, Generate, then Refine and Launch. Here is every stage in detail:
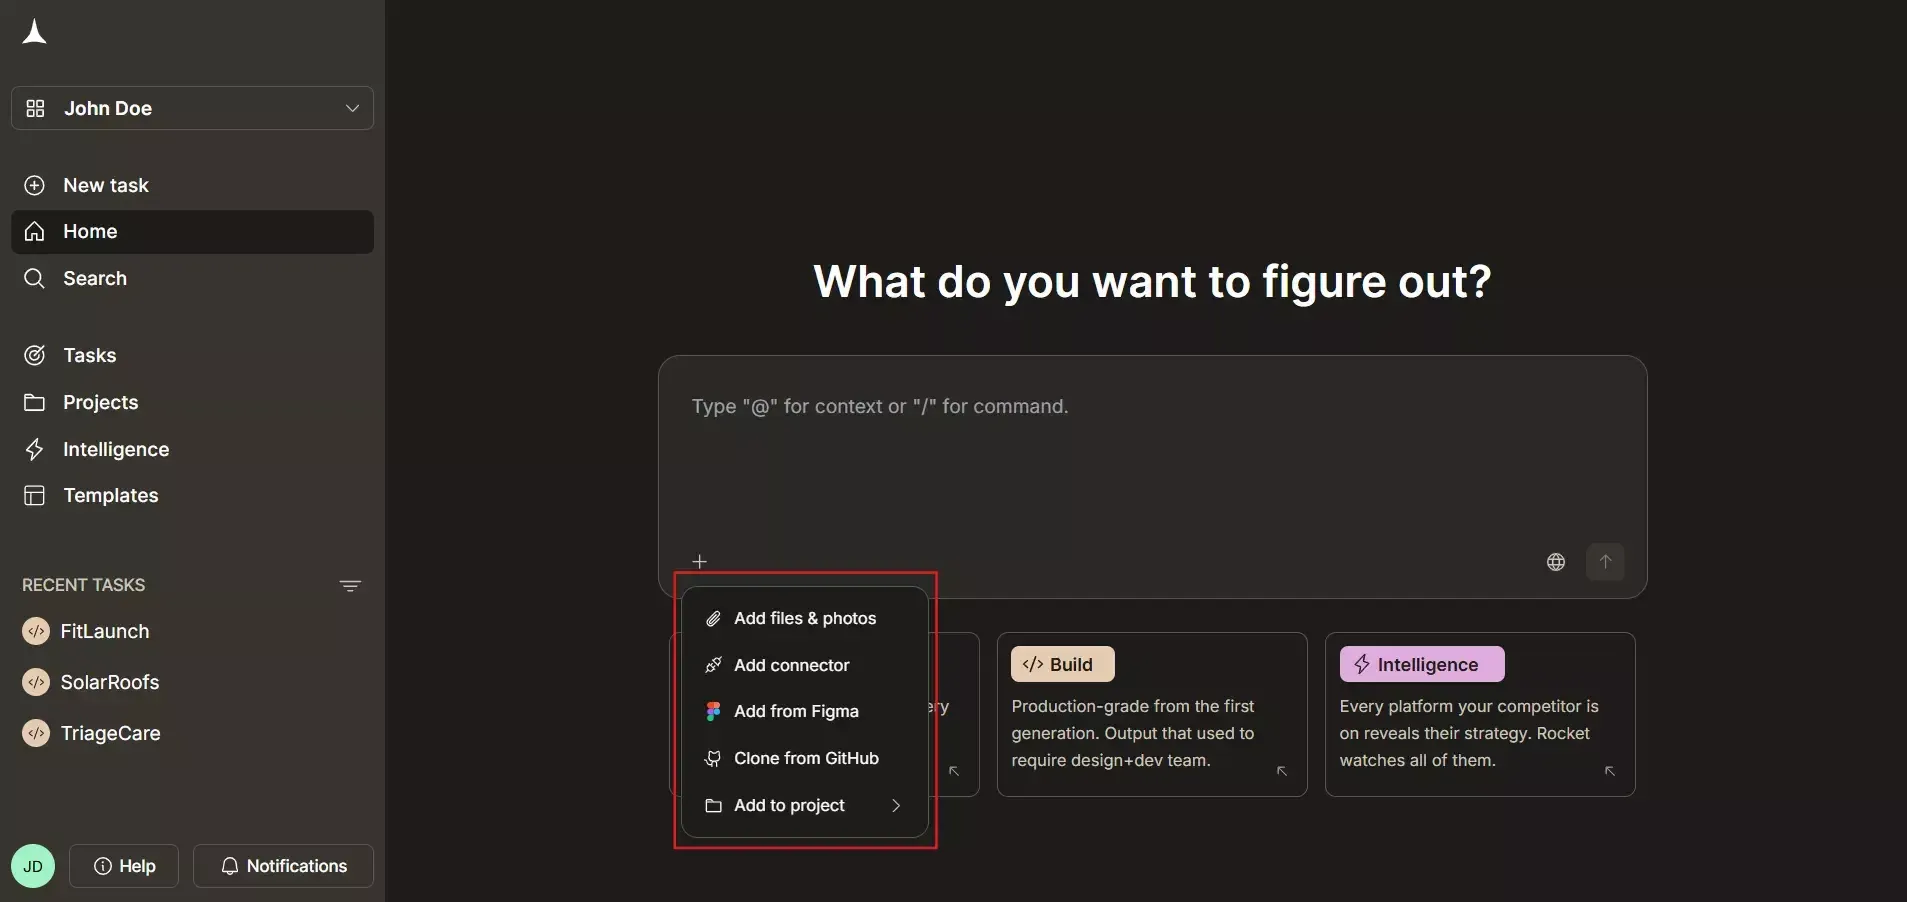
Step 1: Upload your design: Click the + button in the Rocket Build editor and select Add from Figma (for Figma files) or Add files and photos (for screenshots and wireframes): You can also drag and drop or paste an image directly into the chat.
Step 2: Select screens and framework: For Figma imports, choose up to 40 screens and select Flutter as your framework. For image attachments, include your target framework in the prompt.
Step 3: Choose state management: Pick BLoC, GetX, Provider, Riverpod, or no state management based on your app's complexity.
Step 4: Rocket generates your Flutter app: Rocket plans the architecture, writes production-ready code, and shows a live preview the moment generation finishes.
Step 5: Review, iterate, and add functionality: Use the Preview tab to test your app. Iterate through chat, Visual edit, or the Code view. Connect Supabase for auth and database, add Stripe for payments, wire up push notifications, all through chat. You can also use golden tests to generate screenshots for Flutter applications and simplify screenshot management. The Golden Toolkit package is commonly used to automate screenshot generation.
Step 6: Download your code and submit to stores: Open the Code tab and click Download to export your project as a .zip file. A paid plan (Pro or above) is required. Apple App Store submission requires Xcode on a Mac; Google Play requires Flutter CLI on a Mac or PC.
Screenshots can also be generated during integration tests in Flutter, and file names can be changed freely before upload. Fastlane can automate uploading screenshots to app stores, while Codemagic does not natively upload them.
Understanding the right state management pattern for your app is one of the most important decisions in this pipeline. Choosing the wrong pattern early creates technical debt that is expensive to fix later.
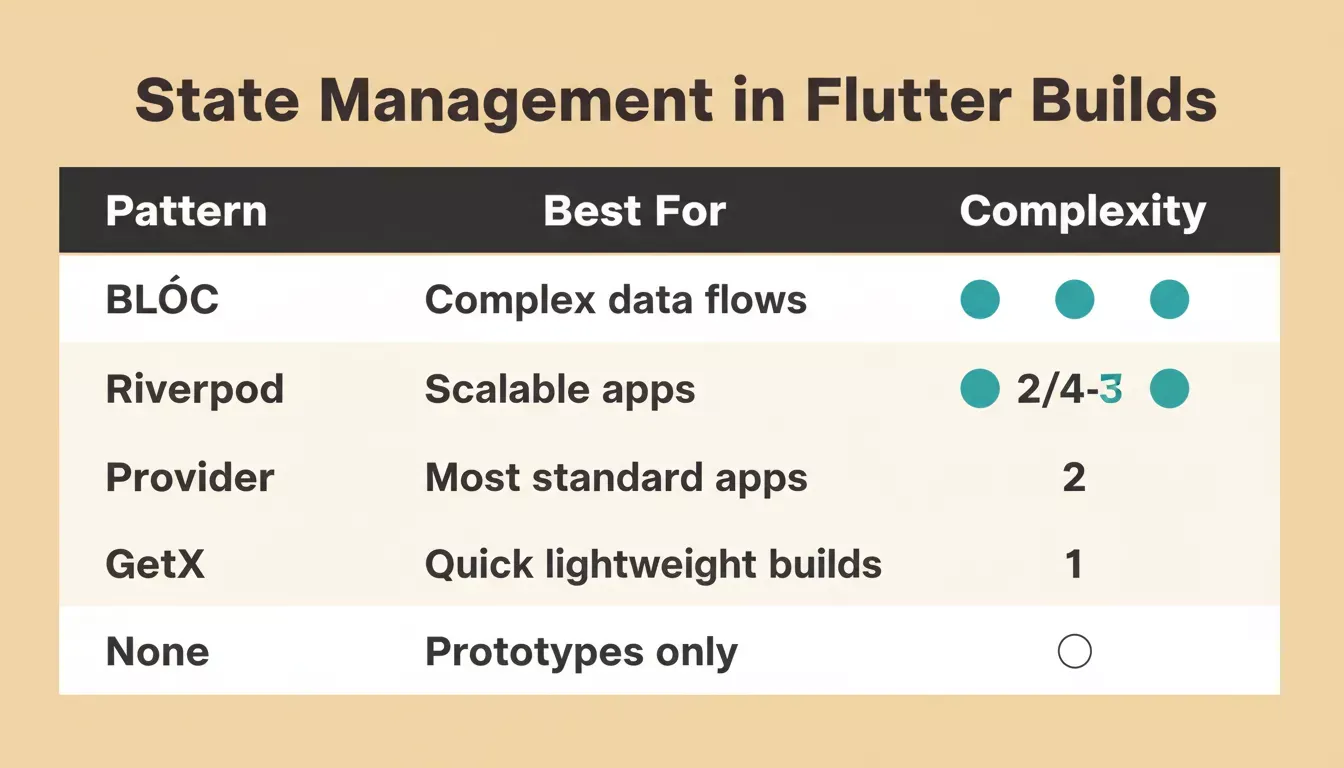
State management options available in Rocket: choose based on your app's data complexity
How Does the AI-Powered Approach Compare to Traditional Development?
The time savings between traditional handoff and AI-powered generation are significant. Traditional design-to-code handoff typically takes 2 to 4 weeks per screen, including interpretation, coding, review, and iteration cycles.

Traditional vs AI-powered Flutter development: the time difference across a typical 4-screen build
With Rocket, the same screens can be generated, reviewed, and iterated within hours. The Figma-to-Flutter pipeline preserves spacing decisions, component hierarchy, and layout structure automatically, removing the interpretation layer that causes most handoff delays.
The key difference is context. Rocket reads your actual design file rather than relying on a developer to interpret it. This means the widget tree reflects what the designer intended, not what the developer guessed.
For teams that want to understand how Rocket handles Figma files specifically, the Figma file to production code guide explains the spacing and component preservation process in detail. If you plan to use golden testing later, properly separate UI and logic early so the app is easier to validate with unit tests, maintain, and extend than with other tests.
The data behind AI-assisted development makes a compelling case for this approach. 84% of developers now use or plan to use AI tools in their workflows, and low-code tools power 62% of new app projects.
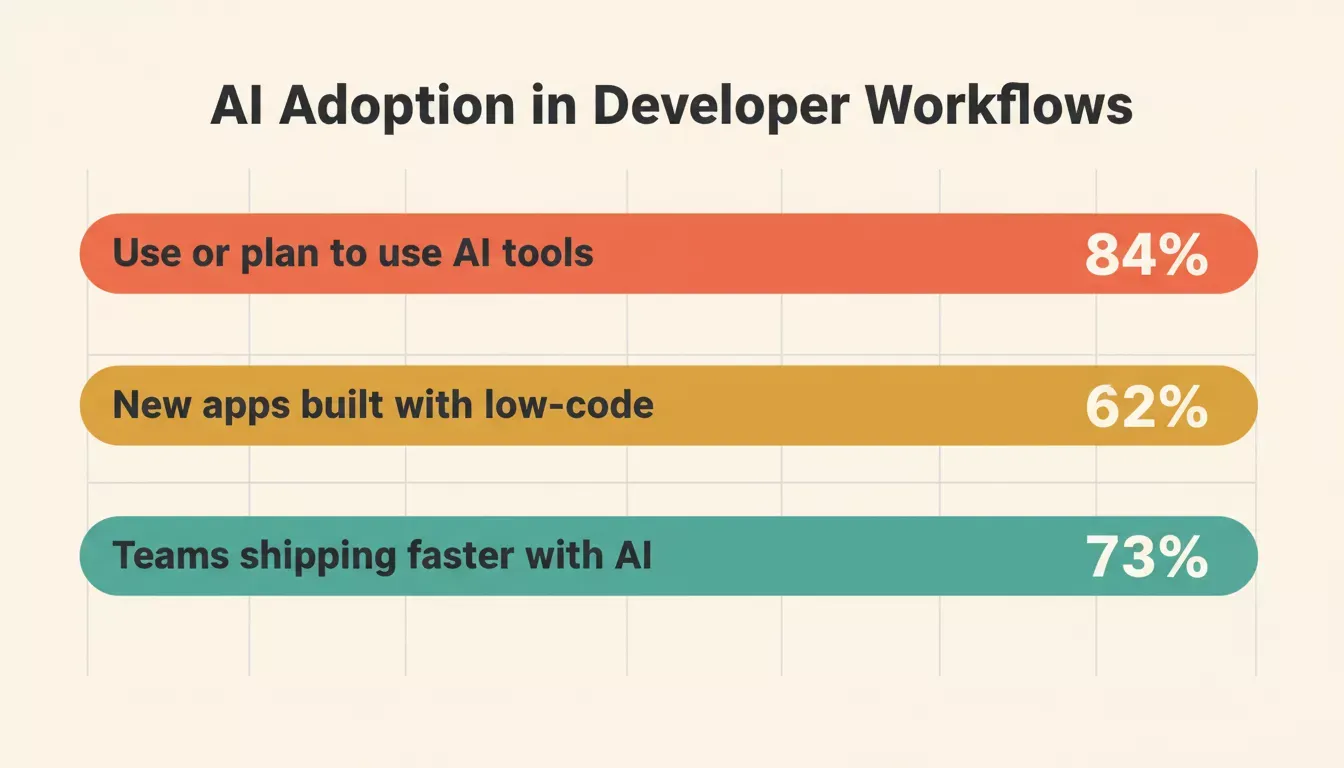
AI adoption rates across developer workflows: the shift to AI-assisted mobile development is accelerating
Teams that start from a design file rather than a blank prompt consistently ship faster because the AI has visual context to work from, not just a text description. Rocket also connects to Solve (market research) and Intelligence (competitor tracking) in the same workspace, and the vibe solutioning platform overview explains how these three layers work together.
For teams building mobile apps from scratch, the step-by-step mobile app guide walks through the full process from idea to deployment. Dispose of controllers when they are no longer needed, and request storage permissions before saving high-resolution screenshots on Android or iOS because they can consume significant device RAM.
What Are the Common Pitfalls When Converting Visual Designs to Flutter?
Even with AI tools, certain mistakes trip teams up repeatedly. Knowing these ahead of time saves hours of debugging.
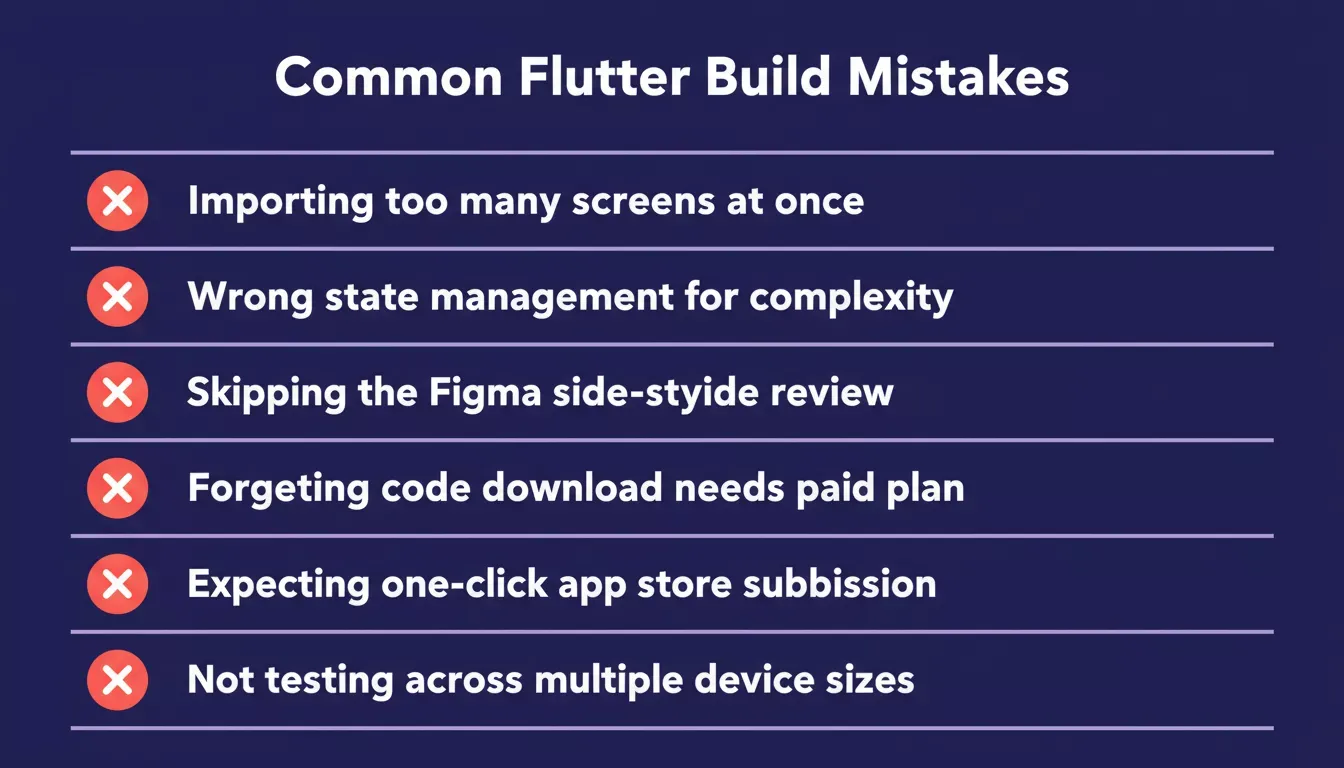
Six common mistakes teams make when converting visual designs to Flutter with AI tools
-
Not specifying Flutter in your prompt when using the attachment path: The attachment upload generates web apps by default. Always include "Flutter mobile app" in your prompt when building from a screenshot or wireframe.
-
Using blurry or low-resolution images: High-contrast screenshots and crisp mockups produce better results. Crop out browser chrome, desktop wallpaper, or unrelated UI elements before uploading.
-
Not accounting for screen size differences: Across device screen size differences lead to layout overflow on smaller devices. Test across iPhone SE, standard, and Max sizes before submitting. Also check app store screenshot sizes early: App Store Connect requires specific screenshot sizes, while the Google Play Store is more permissive.
-
Importing too many screens at once: It can make it harder to catch layout issues early. Start with your 5 to 10 most important screens, then add more incrementally.
-
Choosing the wrong state management pattern: Selecting the wrong pattern for your app's complexity. For simple apps, Provider or no state management works fine. For apps with complex data flows, use BLoC or Riverpod.
-
Expecting one-click store submission: Both the Apple App Store and Google Play Store require manual steps outside Rocket: Xcode on a Mac for iOS, Flutter CLI for Android. Plan for this in your timeline.
For teams building their first mobile MVP, the MVP for mobile app guide covers how to scope your first build correctly before importing into Rocket.
Start building with Rocket today and turn your first wireframe or Figma design into a live Flutter app.
Table of contents
- -What Ways Can You Start Building a Flutter App in Rocket?
- -Why Is Figma Import the Primary Design-to-Flutter Path?
- -How Do You Convert a Screenshot or Wireframe Image to Flutter Code?
- -What Does the Full Pipeline from Design to App Store Look Like?
- -How Does the AI-Powered Approach Compare to Traditional Development?
- -What Are the Common Pitfalls When Converting Visual Designs to Flutter?